
Authenion-3.0 Documentation
Release Notes
Release: 2026
Distribution: March 2026
Version: Authenion - 3.1.0.0
Software Download: LikeMinds Helpdesk portal
Read: Release Summary, Features & Enhancements, Fixes.
Release: 2025
Distribution: April 2025
Version: Authenion - 3.0
Software Download: LikeMinds Helpdesk portal
Read: Release Summary,
Features & Enhancements,
Fixes,
Migrating from 2.x to 3.x Refer to the Authenion Migration From 2.x to 3.x Version guide.
Release: 2024
Distribution: April 2024
Version: Authenion - 2.0
Software Download: LikeMinds Helpdesk portal
Read: Release Summary, Features & Enhancements, Fixes.
Getting Started
1. Introduction
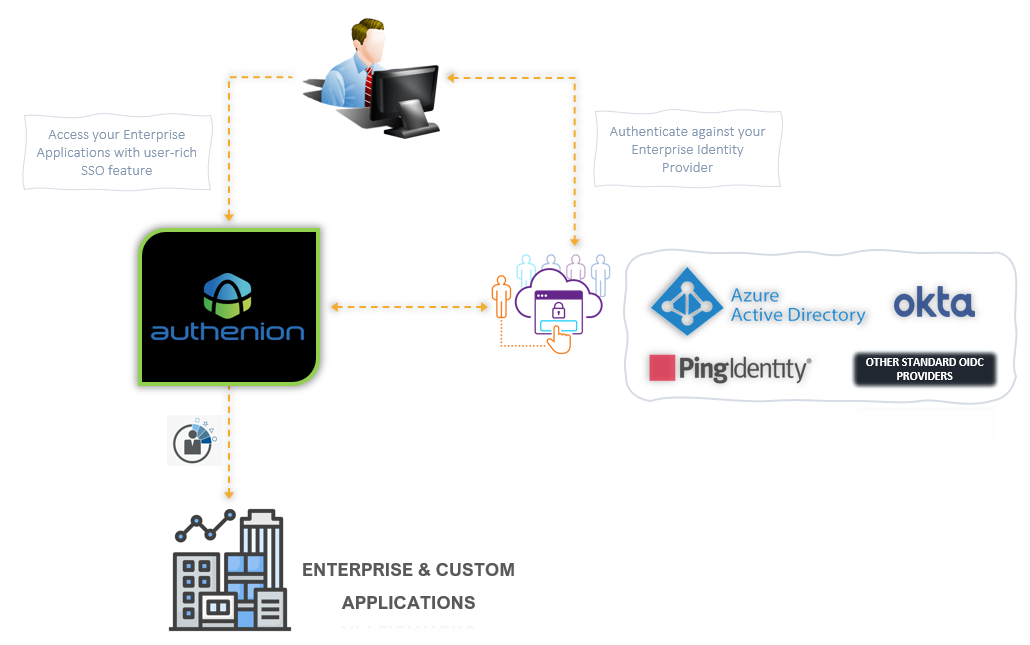
Authenion product from Like Minds is aimed towards delivering a secure Single Sign-On (SSO) experience for Enterprise applications from Oracle, IBM, SAP and other custom applications (java, php, .net, etc.,) that supports HTTP headers as their last mile integration and Single Sign-On. Authenion is a stand-alone product and can be installed on any physical/virtual Linux servers either on-premise/cloud or both. Authenion integrates with standard OpenID Connect providers in the market for authentication related events.
2. How does Authenion work?
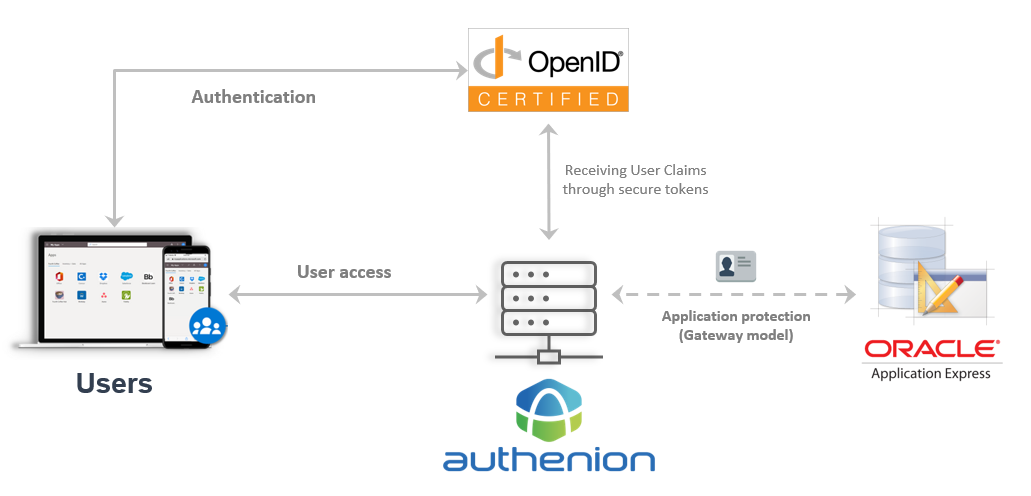
Integration mechanism
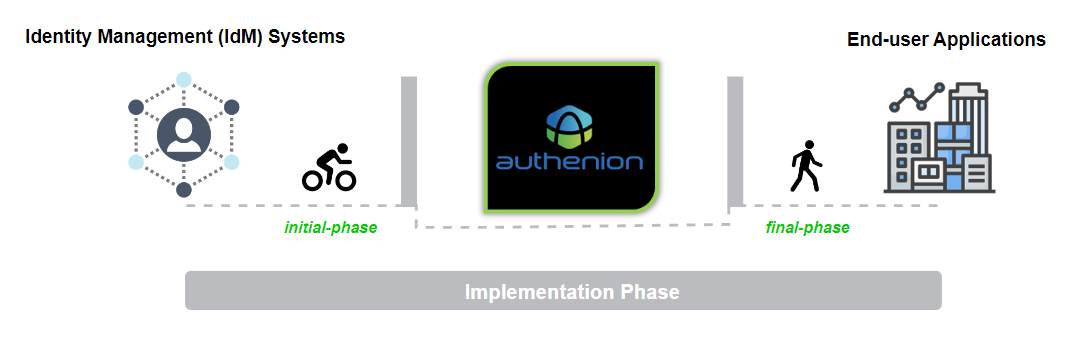
Authenion as a standalone product, must be integrated with your Enterprise/Custom applications & with your Identity Provider (IdP) to complete the 'first mile and last mile integrations' for authentication and Single Sign-On (SSO). Authenion supports integration with OpenID Connect (OIDC) enabled Identity Provider and with a wide range of enterprise & custom applications.
The 'first mile' integration involves connecting with your identity providers, which Authenion uses to receive claims after user's authentication sessions. The claims are sent to Authenion from the Identity Provider (IdP) through OpenID Connect (OIDC) tokens.
The 'last mile' integration involves Authenion integration with end-user's applications where Single Sign-On (SSO) will be enabled.
3. Enterprise Deployment Model
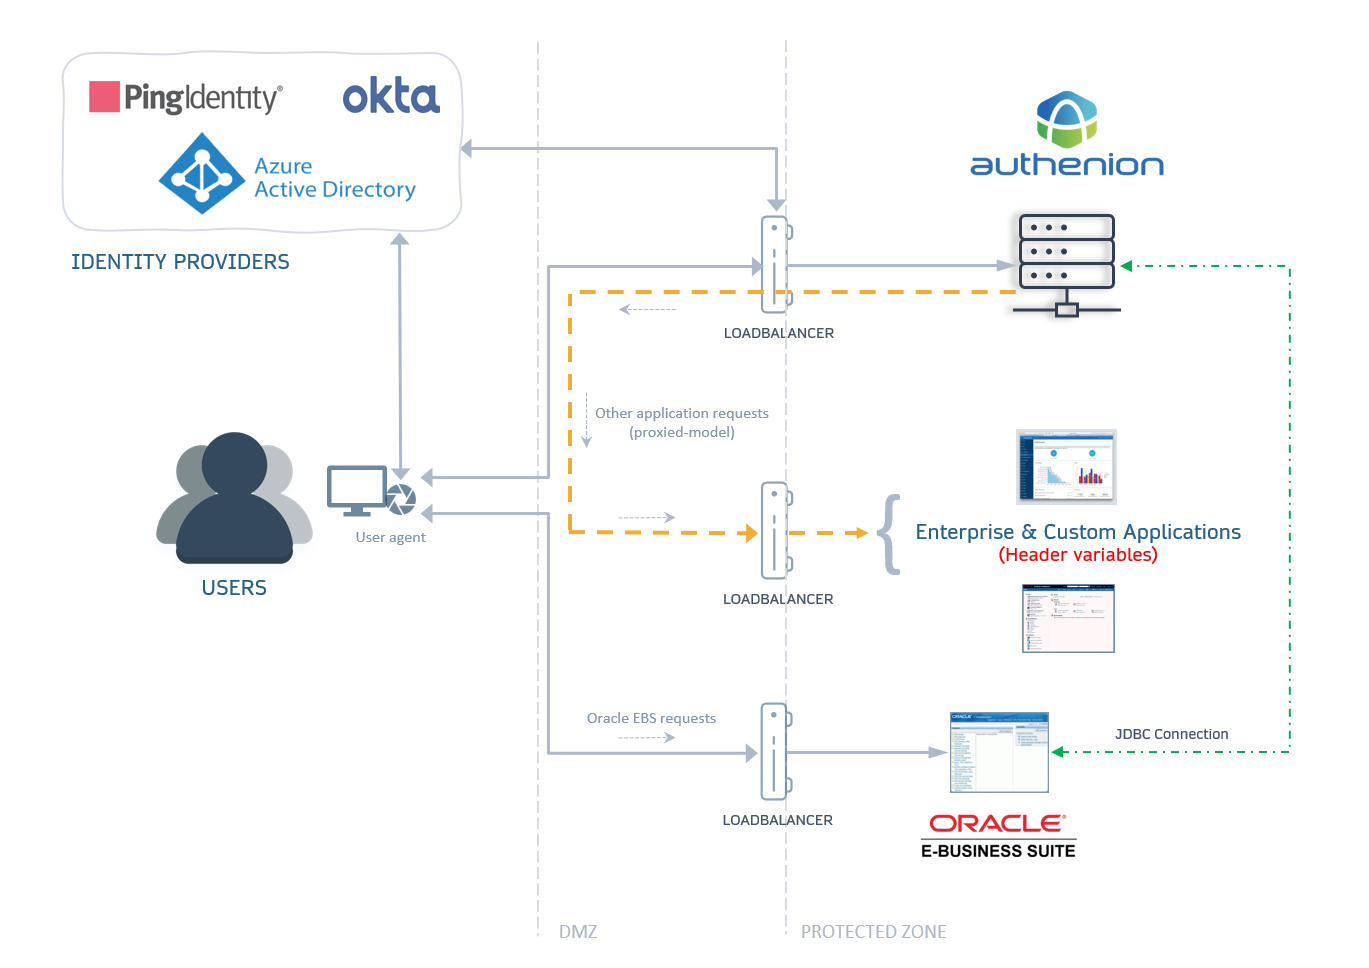
Authenion provides a Gateway architecture for end-user's applications, that supports Header variables for last mile integration and Single Sign-On. In the gateway model, the user's request is initially directed to Authenion and then Authenion grants or denies access to the request based on the application resource protection type.
This deployment model can be set up quickly without disrupting the applications. Authenion will be installed on separate servers from the application web servers.
With the fewer components in the architecture, it is easy to manage. All transactions are logged, and makes it easier for security audit purposes.
4. What can I Configure with Authenion?
Authenion includes a wide range of configurations from its administration console in first-mile & last-mile integration approach. The following are the configurations we can perform in the console.
| Authenion Configurations | Requirements |
|---|---|
|
Entry for end-user's applications in Authenion |
|
|
Connecting with your Identity Provider (IdP) for Authentication |
|
|
Connecting with your LDAP Authentication Provider for Email, SMS and TOTP Authentication |
|
|
Fully-qualified domain name assigned to access applications in the gateway model |
|
|
End-user's application details (server/port information) |
|
|
URI components of the end-user's applications |
|
|
Header variables containing user info for the end-user's application's last-mile integration and Single Sign-On |
|
|
Authenion component responsible for config-data exchange from admin console to authenion server and vice versa. The default port is ‘8090’ & it uses ‘https’. |
System Requirements
The following requirements should be met for Authenion installation. Authenion qualifies & certifies the following configurations, that they are compatible with the product. Authenion supports IPv4 addressing.
Installation
This section provides instructions for installing, configuring & starting/stopping Authenion product. Authenion can be installed on the Linux and Windows servers. For the System requirements, please visit System Requirements section.
1. Pre-requisites
Download and install the chosen supported Java version (OpenJDK 17 to 23) from its respective source.
Set JAVA_HOME Environment Variable (Linux and Windows):
Linux Environment:
Find your Java installation path.
Open the shell profile file and set Java environment variables.
Open the .bash_profile file in your home directory:
#] vi ~/.bash_profileAdd the following lines at the end of the file:
#] export JAVA_HOME=/home/user/java-x.x.x#] export PATH=$JAVA_HOME/bin:$PATHSave and close the file:
- Press Esc, then type :wq and press Enter .
Apply the changes and verify the Java setup
Verify the JAVA_HOME environment variable:
Check if Java is properly installed:
Run the following command in your terminal:
Example output:
Note: Make sure to replace /home/user/java-x.x.x in the JAVA_HOME variable with the actual path you received from the which java command.
Example output:
Windows Environment :
-
Open Environment Variables:
-
Right-click This PC or My Computer.
-
Select Properties.
-
Click Advanced system settings.
-
In the System Properties window, click Environment Variables.
-
-
Set JAVA_HOME:
-
Under System variables, click New.
-
Enter the following:
-
Click OK.
#] Variable name: JAVA_HOME#] Variable value: C:\Program Files\Java\jdk-x.x.xNote: (Replace jdk-x.x.x with your actual JDK folder name)
-
-
Update the PATH Variable:
-
In the System variables section, find and select Path, then click Edit.
-
Click New, then add:
-
Click OK to save and close all dialogs.
#] %JAVA_HOME%\bin -
-
Verify the Setup:
-
Open a new Command Prompt window and run:
#] echo %JAVA_HOME%Example Output:
#] C:\Program Files\Java\jdk-x.x.x -
-
Confirm Java Installation:
-
In the same Command Prompt, run:
#] java -version -
2. Install Authenion
Authenion installation can be done on both Linux and Windows environment. Below are the steps for each:
Linux Environment :
Request or download the Authenion product distribution file (Example: authenion-3.0.zip) and a valid license from the Authenion support portal or by contacting your account manager at LikeMinds.
Download & extract the distribution zip into the installation directory Example:‘/home/user’
<authenion_install_dir>: /home/user/authenion/
- authenion
- bin
-
- config
- deploy
- logs
-
- server
-
- work
Copy the obtained license file “authenion.lic” to the Authenion server and place it in the <authenion_install_dir>/config directory.
| Authenion Components | Description |
|---|---|
|
Distribution ZIP file |
|
|
File system after extraction |
|
|
Directory Structure |
|
Windows Environment :
Request or download the Authenion product distribution file(Example: authenion-3.0.zip) and a valid license from the Authenion support portal or by contacting your account manager at LikeMinds.
Download & extract the distribution zip into the installation directory Example:‘C:\Program Files’
<authenion_install_dir>: C:\Program Files\authenion\
- authenion
- bin
-
- config
- deploy
- logs
-
- server
-
- work
Copy the obtained license file “authenion.lic” to the Authenion server and place it in the <authenion_install_dir>/config directory.
| Authenion Components | Description |
|---|---|
|
Distribution ZIP file |
|
|
File system after extraction |
|
|
Directory Structure |
|
3. Setup Authenion
Linux Environment :
Navigate to the following directory in the Authenion server.
Execute the following command to grant permission.
Run the setup command.
-
If the setup fails, simply run sudo ./setup.sh again and repeat the process.
Read and accept the Software Terms & Conditions to complete the setup process.
After running the setup.sh command, you will be prompted with the following message:
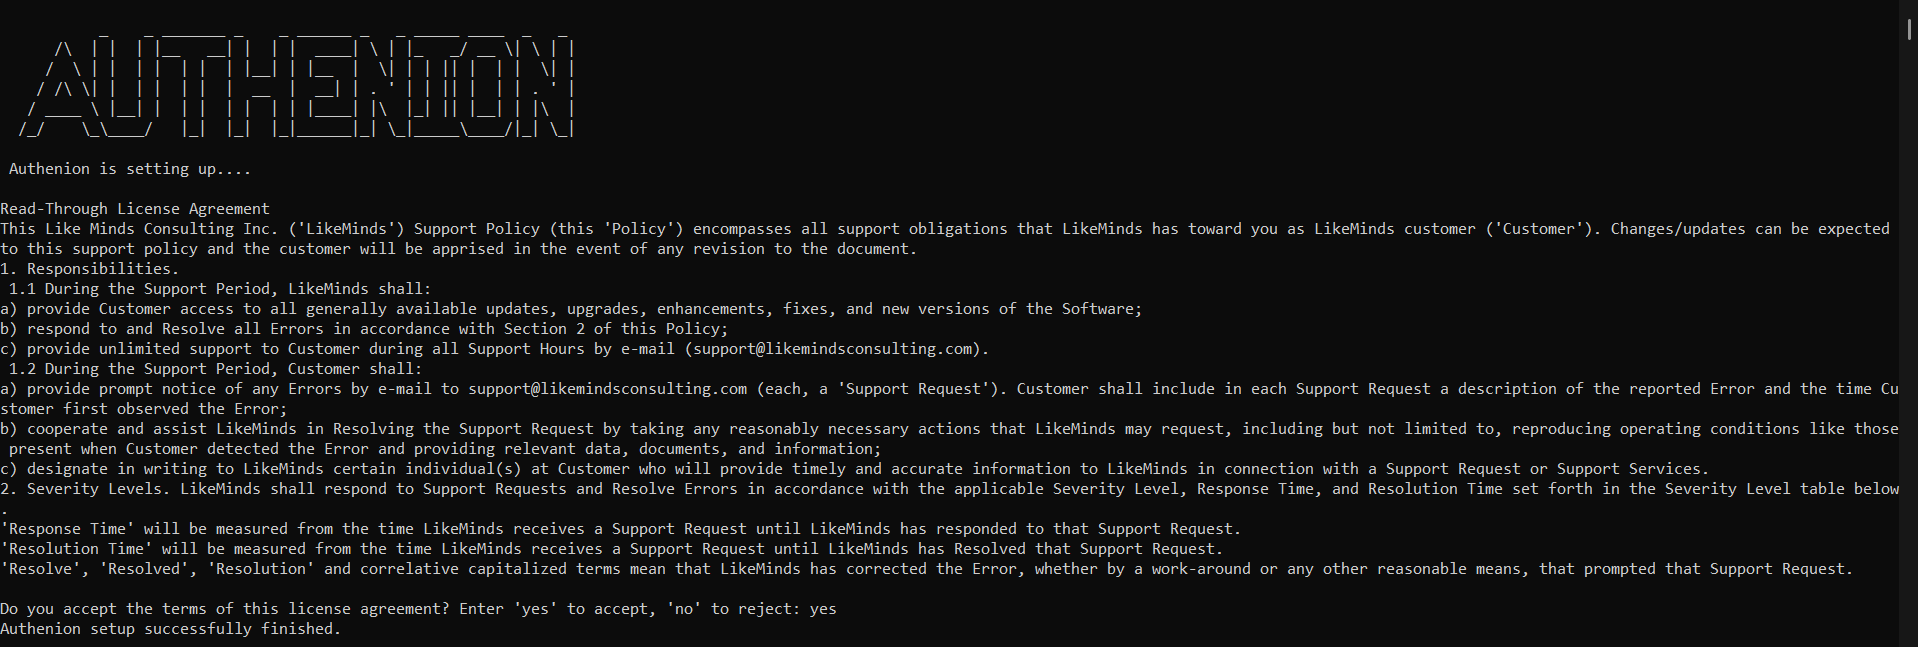
Enter yes to complete the proceed .
Windows Environment :
Navigate to the following directory in the Authenion server.
Run the setup command.
-
If the setup fails, simply run setup.bat again and repeat the process.
Read and accept the Software Terms & Conditions to complete the setup process.
After running the setup.bat command, you will be prompted with the following message:
Enter yes to complete the proceed .
Note: Make sure you have the correct permissions to run batch files and are running Command Prompt as Administrator, if required.
4. Start & Stop Services
Linux Environment :
To Start the Authenion instance, navigate to the “<authenion_install_dir>/bin” directory and run the ‘start-instance.sh’ command.
To Stop the Authenion instance, run the ‘stop-instance.sh’ command.
Check the status of the Authenion application, by navigate to the “<authenion_install_dir>/bin” directory and executing the ‘status.sh’ command.
Example Output:
-
To start a specific service, use the following command format:
-
To stop a specific service, use the following command format:
Note: In Authenion-3.0, we have the option to start and stop each services(sso,agent,debug,grid,oidc,authz and Webserver) individually.
Example:
Example:
Windows Environment :
To Start the Authenion instance, navigate to the “<authenion_install_dir>/bin” directory and run the ‘start-instance.bat’ command.
To Stop the Authenion instance, navigate to the “<authenion_install_dir>/bin” directory and run the ‘stop-instance.bat’ command.
Check the status of the Authenion application, by navigate to the “<authenion_install_dir>/bin” directory and executing the ‘status.bat’ command.
-
To start a specific service, use the following command format:
-
To stop a specific service, use the following command format:
Note: In Authenion-3.0, we have the option to start and stop each services(sso,agent,debug,grid,oidc,authz and Webserver) individually.
Example:
Example:
5. Enable Authenion as a Windows Service
Stop the Authenion instance.
-
Ensure the Authenion application is not running before proceeding .
Navigate to the wrapper directory:
-
C:\Program Files\authenion\bin\wrapper
Update Java home path:
-
Open AuthenionWindowsService.exe.config using a text editor .
-
Modify the Java home path to match your system's current Java installation.
Set up Authenion as a Windows service:
-
Open the Command Prompt using Run as Administrator .
-
Run the script: install-WindowsService.bat
Start the service:
-
Open Services from the Start menu.
-
Locate AuthenionService .
-
Right-click and select Start .
6. Import Identity Provider’s Certificate into Java Trust Store (optional)
The IdP server certificate needs to be imported into the Java trust store only if it is self-signed or issued by a private CA. If the certificate is signed by a well-known Public Certificate Authority (CA), import is not required, since Java already trusts it by default.
Linux Environment :
The following steps will guide you to import the Identity provider’s certificate into the Java trust store.
Export the SSL Certificate from the Identity Provider (PingFederate, PingOne, AzureAD, etc.,) and Place the exported certificate file anywhere inside a directory on the Authenion server.
Navigate to the Java binary directory:
- Open your terminal:
Run the keytool command to import the certificate into Java's trust store (cacerts). This allows Java applications to trust the Identity Provider.
-file </path-to-IdentityProvider-cert>
Example:
-
The certificate used in this example is located at: /home/user/certificate.crt.
-
JAVA_HOME refers to the base JDK installation directory. For example: /home/user/jdk-x.x.x/
Note:
Windows Environment :
The following steps will guide you to import the Identity provider’s certificate into the Java trust store.
Export the SSL Certificate from the Identity Provider (PingFederate, PingOne, AzureAD, etc.,) and Place the exported certificate file anywhere inside a directory on the Authenion server.
Navigate to the Java binary directory:
- Open Command Prompt as Administrator:
Run the keytool command to import the certificate into Java's trust store (cacerts). This allows Java applications to trust the Identity Provider.
-file </path-to-IdentityProvider-cert>
Example:
-
The certificate used in this example is located at: C:\certificate.crt.
-
JAVA_HOME refers to the base JDK installation directory. For example: C:\Program Files\Java\jdk-x.x.x
Note:
7. Import SSL Certificates for Authenion (optional)
Authenion allows you to install your organization’s signed certificates. The certificates should be in the .crt & .key files format. To place your organization’s certificate in Authenion, follow the steps below.
Create an OpenSSL configuration file named (example: server.cnf ) with the required certificate details.
-
Generate a Private Key and Self-Signed Certificate. Run the following command:
-
Export to PKCS#12 Format. For applications like Authenion or other Java-based servers, you may need a .p12 keystore. Use this command:
Copy the server.crt & server.key and place it in “<authenion_install_dir>/server/conf/certs” directory.
The above steps can be repeated during the Authenion certificate renewal process.
default_bits = 2048
default_keyfile = server.key
distinguished_name = req_distinguished_name
req_extensions = req_ext
x509_extensions = v3_ca
prompt = no
[ req_distinguished_name ]
C = US
ST = California
L = San Francisco
O = Lms
OU = IT
CN = *.example.com
[ req_ext ]
subjectAltName = @alt_names
[ v3_ca ]
subjectAltName = @alt_names
[ alt_names ]
DNS.1 = *.example.com
Note: While generating authenion.p12, the alias name must be set to "authenionagent". If a different alias (or none) is used, authenion will fail to recognize the certificate and may throw an error.
Note: This setup is optional. The Certificates can also be installed on load-balancer servers.
Launching the Authenion Admin UI Console
To launch the Authenion Admin UI console, we provide a standalone utility (authenion-admin-xx-version.zip) that can run independently of containers operating on its own server. You can launch the Authenion admin console using either the OIDC provider or the standalone mode.
1. Pre-requisites (for both Linux and Windows)
Java must be installed on the server.
-
Unzip the `authenion-admin-xx-version.zip` file.
-
After extraction, you will see the file authenion-admin-xx-version.jar.
-
Place both authenion-admin-xx-version.jar and authenion.p12 in the same folder.You can copy the authenion.p12 file from the following location: <authenion_install_dir>/config .
2. OIDC Provider for Authentication to Launch Authenion Console
We are using Microsoft Entra ID (formerly Azure Active Directory) as OIDC Provider to Launch the Authenion Console.
Pre-requisites
Azure account with valid subscription.
App registration.
Client Secrets
Configure Redirect Url
Configure Scope
Entra ID Configurations
The following will register Authenion as an OAuth/OIDC client application in Microsoft Entra ID (formerly Azure Active Directory) & establish a unidirectional trust relationship between Authenion and Microsoft identity platform. When the registration finishes, the Azure portal displays the Authenion application registration’s overview pane. You can find the Application ID which will also be used as the client_id when we connect Authenion & Entra ID through OAuth/OIDC.
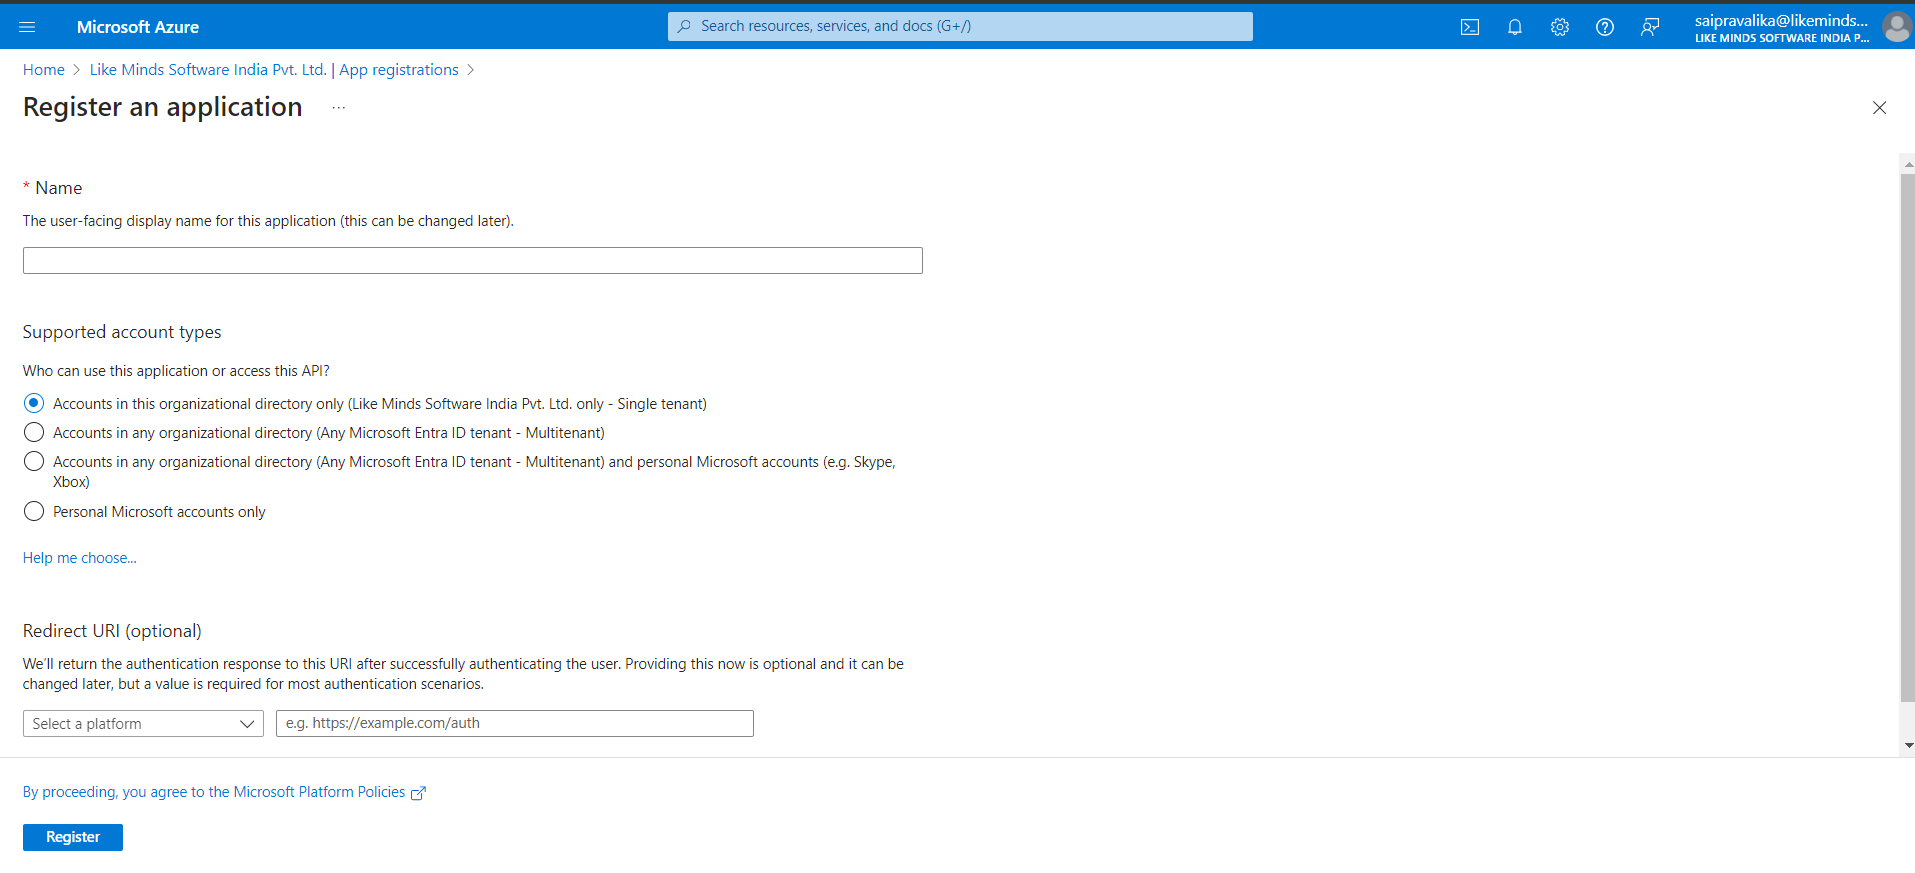
App Registration:
Login to the Azure portal.
In the Manage Microsoft Entra ID (formerly Azure Active Directory) section, click on view.
Click on +Add and then click on App Registration.
Give a display name for the app.
Select the tenant in which you want to register the Authenion application.
Click on Register.
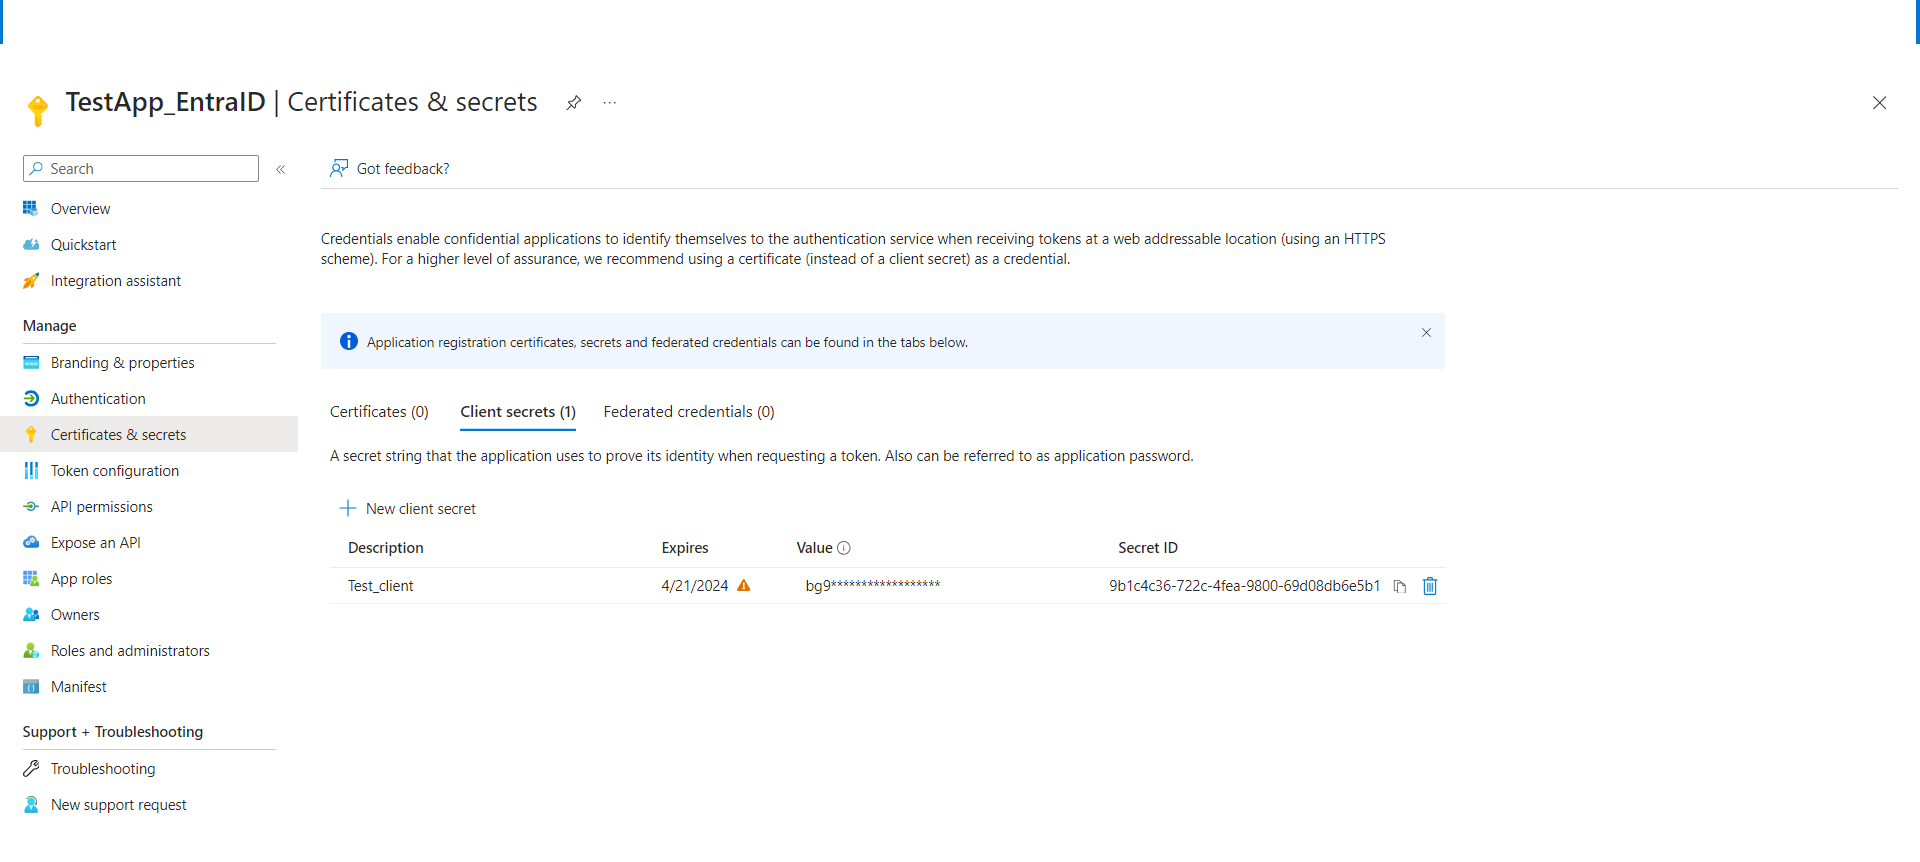
Certificates & Secrets:
From the side menu, click on Certificates & secrets.
Click on Client secrets.
Click on + New client secret.
Enter some description for the client.
Set the expiry for the client.
Click on Add.
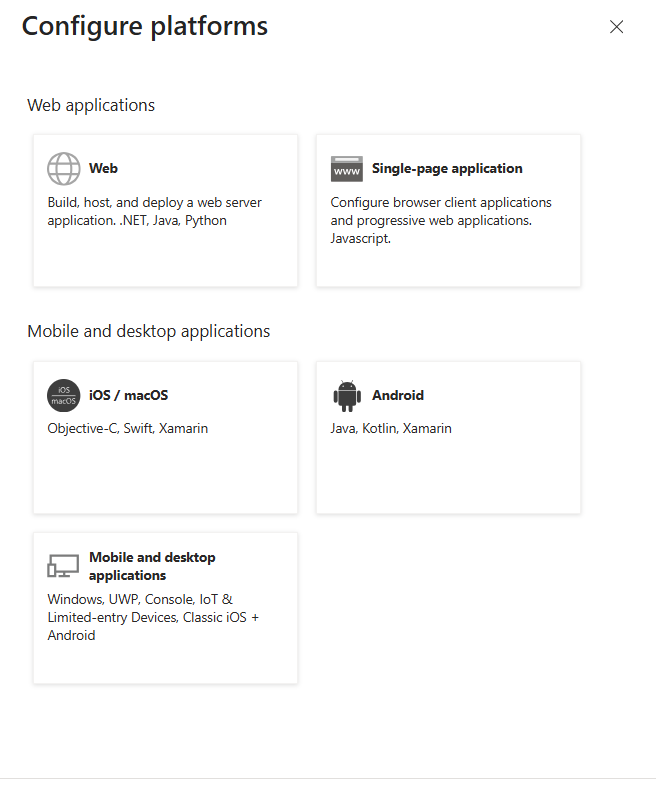
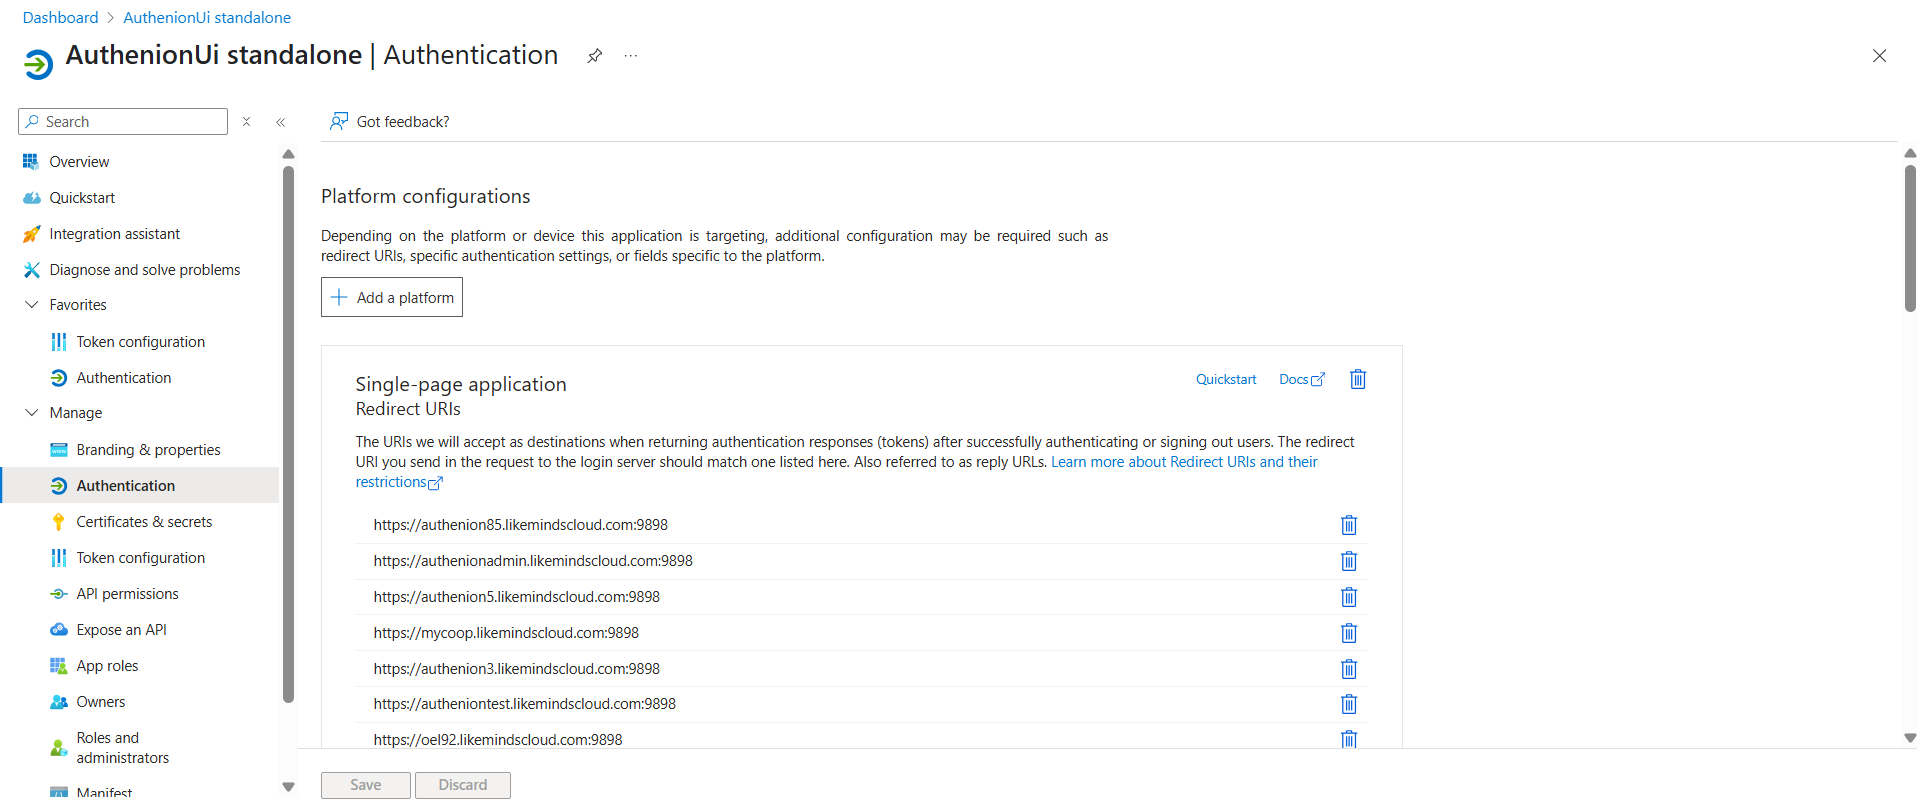
Configure Redirect Url:
-
In the Azure portal, under the registered Authenion Application, configure the redirect URL for the admin UI jar.
-
From the side menu click on the Authentication, click on add a platform and select the single-page application.
-
Add the redirect URI(https://authenionservername:9898) and click on configure.


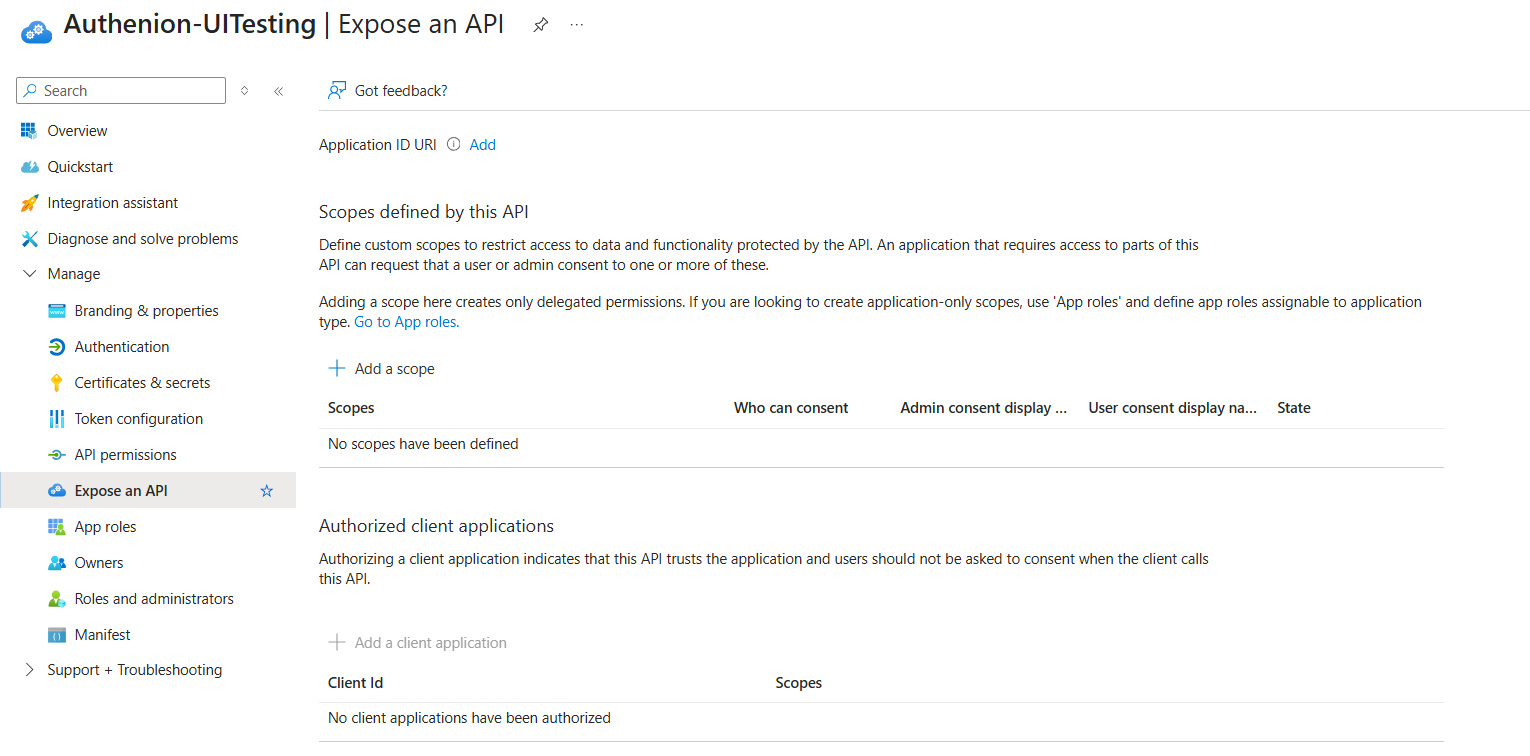
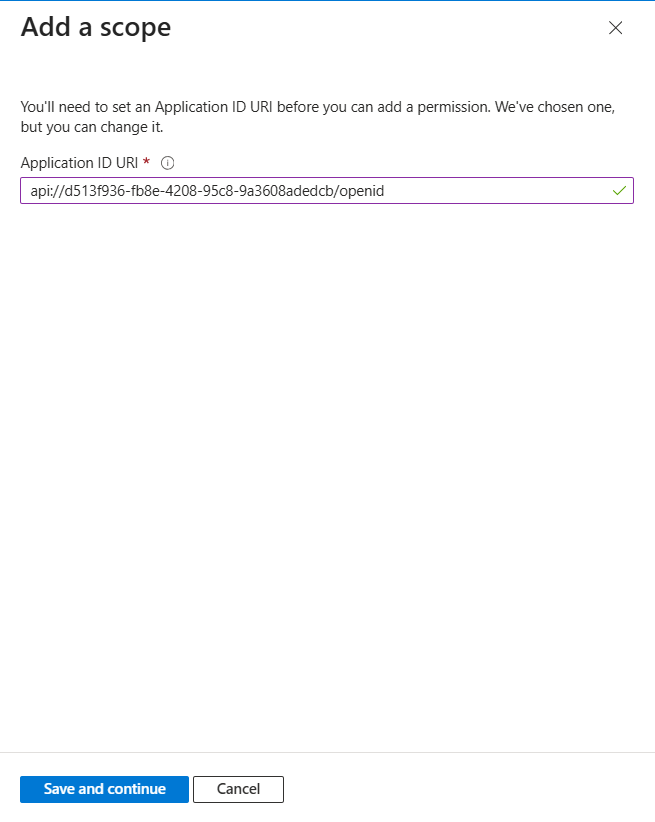
Configure scope:
-
In the Azure portal, under the registered Authenion Application, configure the scope .
-
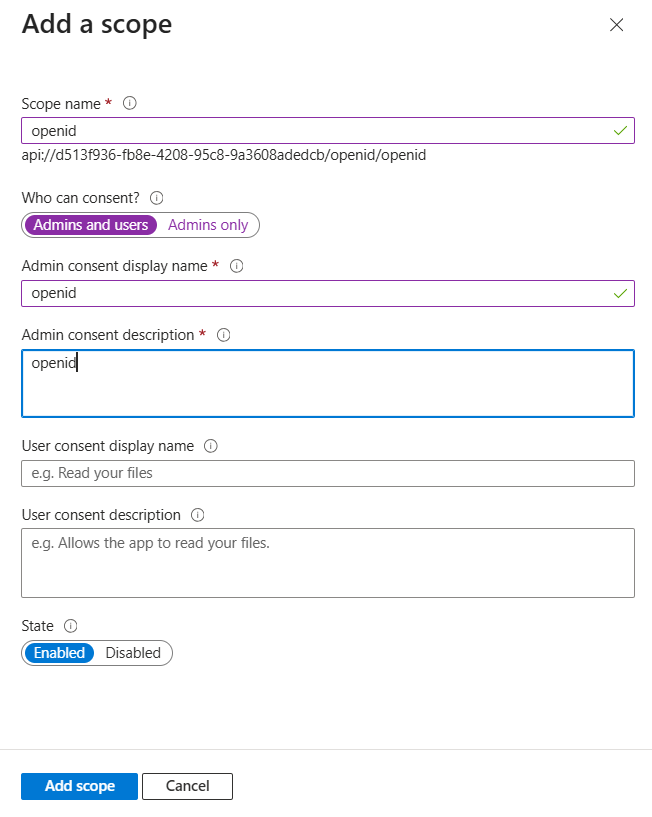
From the side menu, click on Expose an API, then select Add a scope.Add the ApplicationID URI. Set the Scope name as openid, choose Admins and users underWho can consent?, and enter openid for both the Admin consent display name and the Admin consent description.
-
click on the Add scope.
To Launch the Authenion Console:
Open a terminal on your Linux or windows server where the `authenion-admin-xx-version.jar` file is located.
-
Make sure the `authenion.p12` file is in the same directory.
-
Run the following command in the terminal to execute the utility and launch the Authenion UI Admin console:
-
Once the execution is successful, you will be redirected to the Authenion Admin Console.
Note: Please ensure that the redirect_uri used in the command is configured in the OIDC provider.
3. Using Local Authentication to Launch Authenion Console
To launch the Authenion console using local authentication instead of an OIDC provider, follow these steps:
Note:
Before running the command, make sure the environment variables are set up properly in Linux & windows environment.
You can set the password using an environment variable. Ensure the password is strong, including special characters like % or $ for enhanced security.
Linux Environment :
Open vi .bash_profile and add the environment variable:
Save and close the file by pressing Esc, then type :wq and press Enter
Apply the changes and verify the echo $ENV_PASSWORD
Run the following Java command to enable local authentication:
Window Environment :
-
Open Environment Variables:
-
Right-click This PC or My Computer.
-
Select Properties.
-
Click Advanced system settings.
-
In the System Properties window, click Environment Variables.
-
-
Set ENV_PASSWORD:
-
Under System variables, click New.
-
Enter the following:
-
Click OK to save and close all dialogs..
Variable name: ENV_PASSWORDExample :Variable value: "YourPasswordHere"Example :Variable value: Authenion123 -
Run the following Java command to enable local authentication:
To Launch the Authenion Console:
After executing the command, use the following login credentials:
Username:Administrator
Password:Use the value you assigned to the environment variable (e.g., %ENV_PASSWORD%) in the command.
Console Interactions & Configurations
This section describes the UI of Authenion (Admin Console) and its interactions and provides steps for accessing and configuring it. Access the Authenion UI by clicking Administrative Console.
If you are running a local instance of the Authenion UI console, you can access it directly using the local URL: https://servername:9898.(Optional)
Note: To fetch the latest running configuration from an Authenion instance within a cluster, you may point to any instance as they all provide the same configuration.
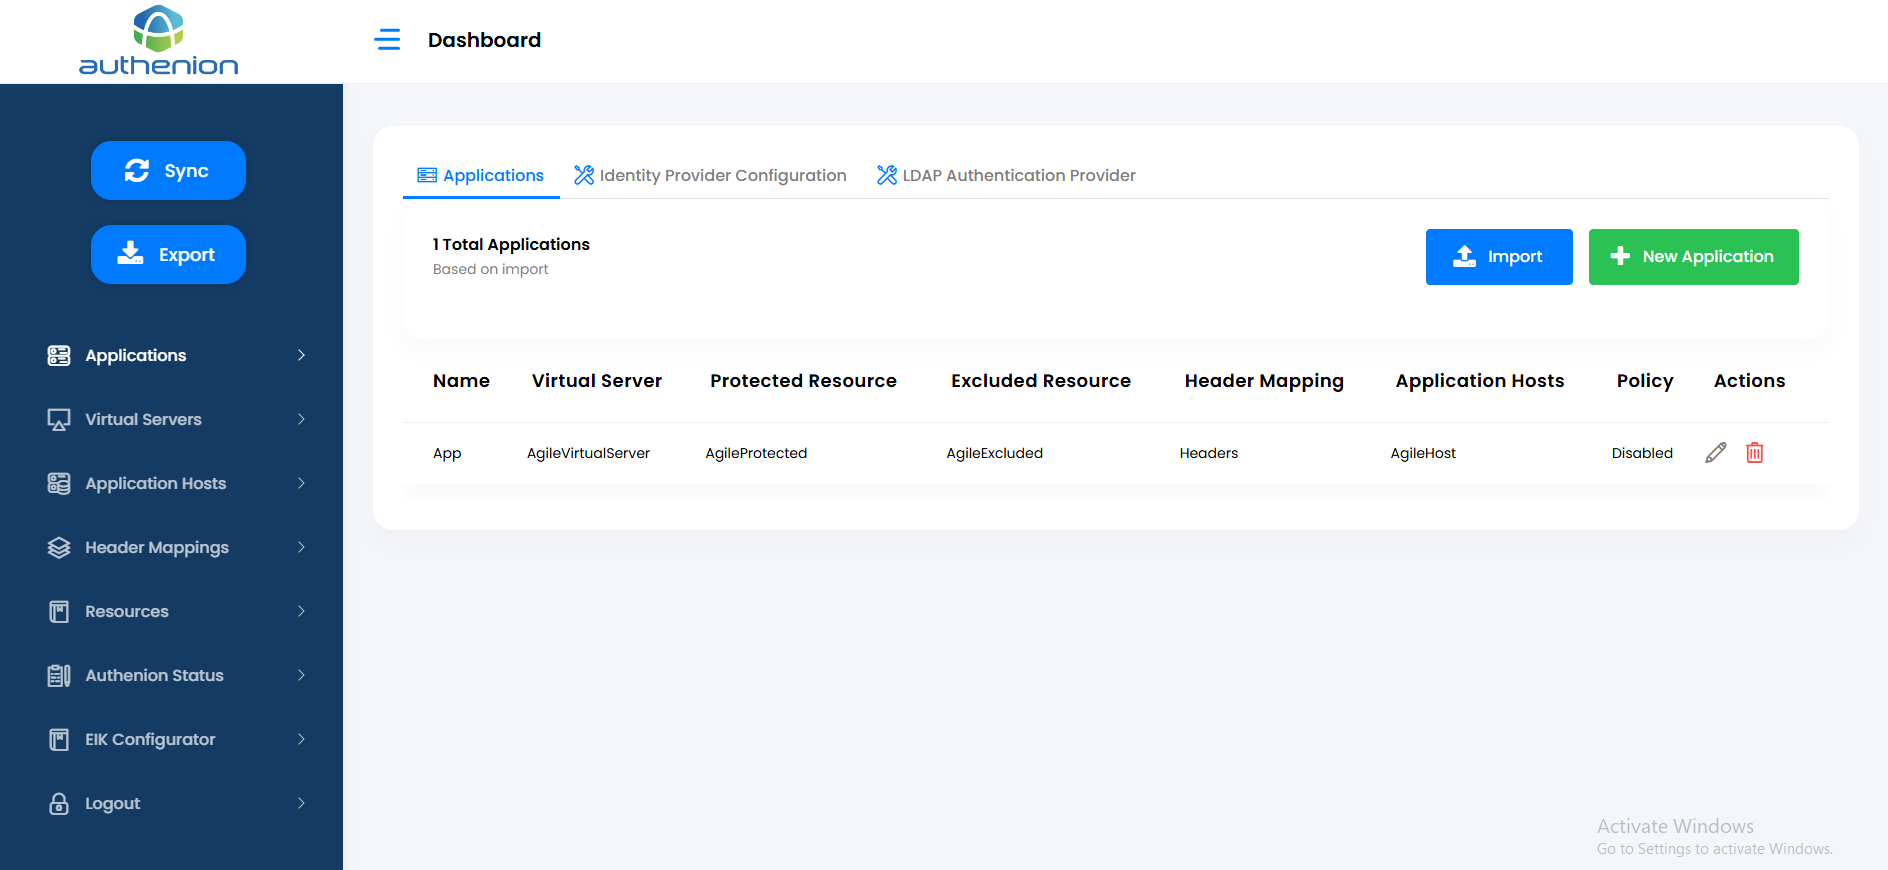
1. Dashboard / Applications
The Dashboard / Applications page lets you view, create, or modify the applications we protect. The total protected applications will be displayed in the Dashboard Application’s tab. It also lets you access the Identity Provider Configuration page next to the Applications tab and access the sidebar menu for other required configurations.

2. Import - Getting config-data into the UI
The Import button in the Dashboard page lets you get the data into the UI.
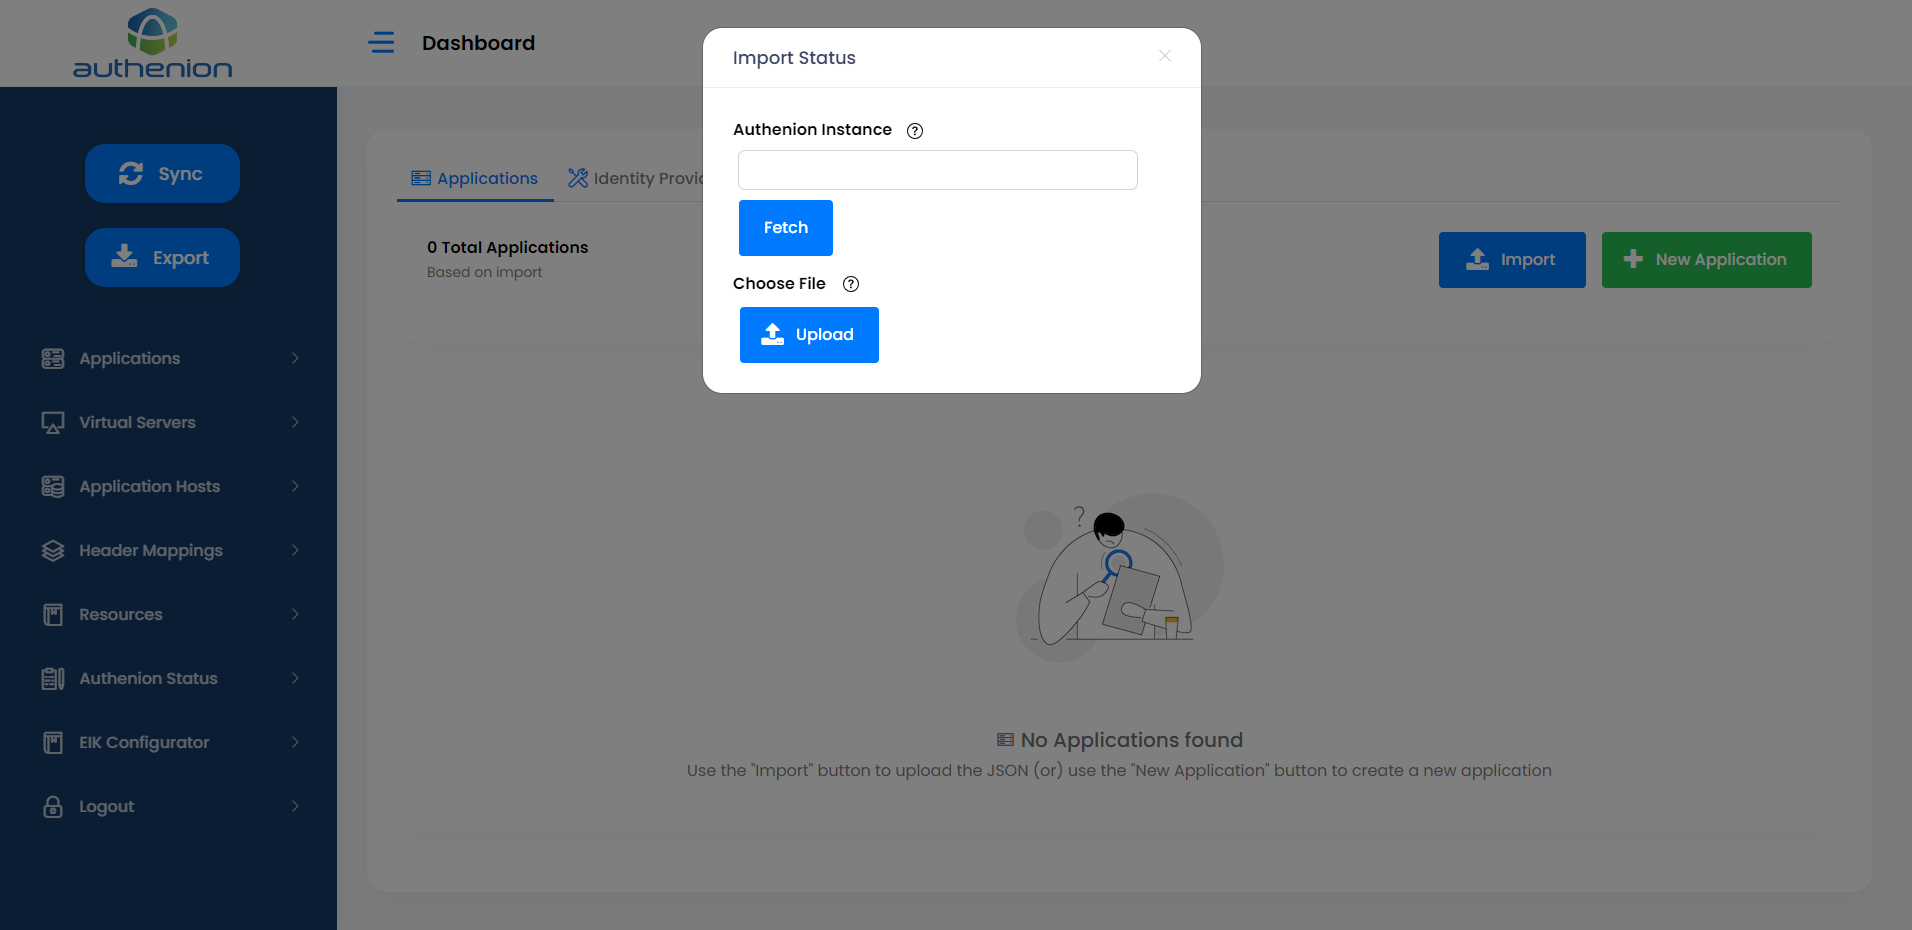
The Import page has two operations:
Fetch Function: The Fetch function is used to get the data from your Authenion Server. It automatically retrieves all the Authenion config data and makes it available in the Authenion UI. It uses the Authenion Instance plugin which is running on the Authenion server.
Upload Operation: The Upload operation is used to load the data from your local file system into the UI manually through any previously extracted configs.
Retrieving Config data from existing Authenion Instance
For first time installation & configuration of Authenion, skip this step and continue with the next section – Identity Provider Configuration.
If you have an Authenion server up & running already, you can bring the configuration data into the UI through the Import function.
Click Import in the Authenion Dashboard.
In the Import page, enter the detail for Authenion Instance. For example, authenion.example.com
Click Fetch.
This will bring your Authenion configuration data from Authenion server to the UI.
3. Identity Provider Configuration
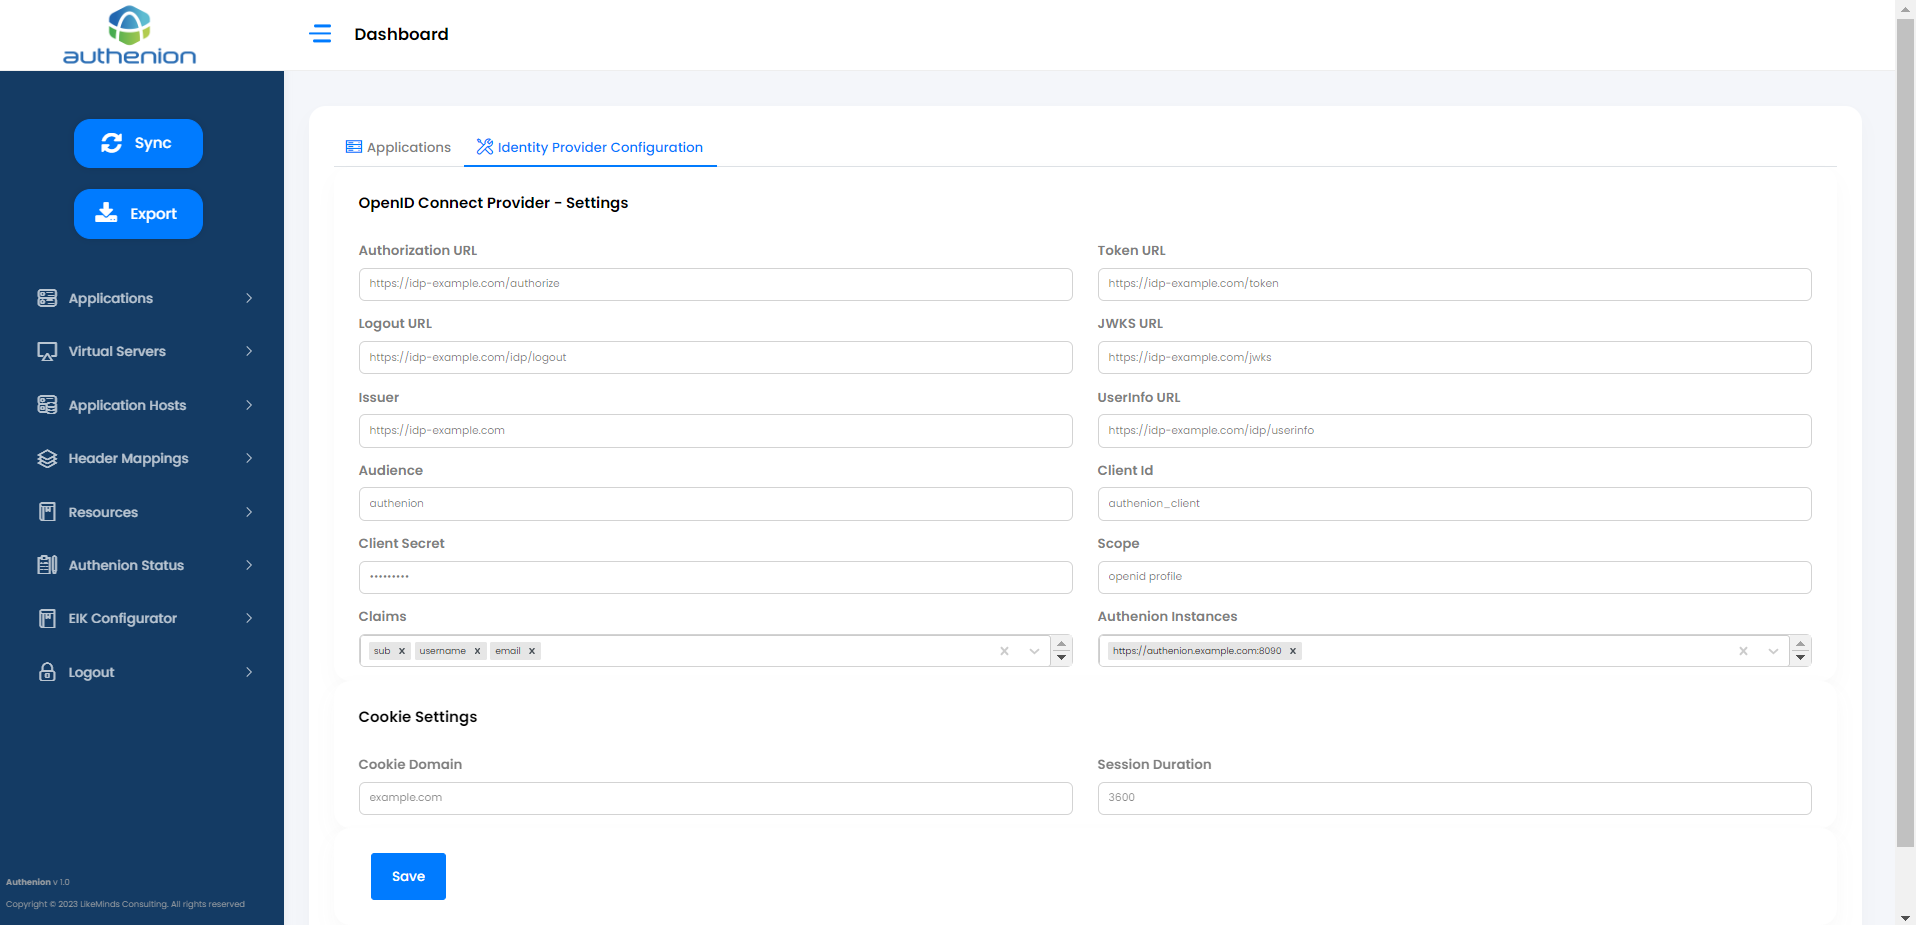
The Identity Provider Configuration page allows you to connect with your Identity Provider / OIDC Token Provider. This configuration includes details such as Token Providers OAuth/OIDC endpoints, Authenion Client registration details, Claims to obtain from the Token Provider. It includes additional configuration for Authenion such as; Authenion Instance, Domain & Session duration configurations.
Adding Identity Provider Configuration
Click Identity Provider Configuration in the Dashboard page.
Enter the following details & click Save to configure your Token Provider with Authenion for authentication.
OpenID Connect Provider - Settings
Authorization URL
https://idp.example.com/authorize
Token URL
https://idp.example.com/token
JWKS URL
https://idp.example.com/jwks
Logout URL
https://idp.example.com/idp/logout
Issuer
https://idp.example.com
Userinfo URL
https://idp.example.com/idp/userinfo (Optional)
Audience
authenion
Client ID
Registered value client_id from your IdP
Client Secret
Registered client_secret value from your IdP
Scope
openid (Multiple scopes can be added)
Claims
Claims from Identity Provider (sub, username, email, etc.,)
Authenion Instances
https://authenion.example.com:8090
Note: If the Authenion is configured in cluster, enter the Authenion Instances value from all the Authenion servers. The default port is 8090 and enabled with HTTPS. This field supports multiple entries.
Cookie Settings
Cookie Domain
example.com
Session Duration
3600
| Configurations | Values |
|---|---|
|
|
|
|
|
|
|
|
|
|
|
|
|
|
|
|
|
|
|
|
|
|
|
|
|
|
|
|
|
|
|
|
|
|
|
|
| Configurations | Values |
|---|---|
|
|
|
|
|
|
4. LDAP Authentication Provider
LDAP authentication is a process where user credentials are validated against a directory services, to grant access to resources. It's a core part of how LDAP (Lightweight Directory Access Protocol) manages user identities and permissions within an organization.
Multi-Factor Authentication: MFA is a security method that requires users to provide two or more verification factors to access a resource. MFA enhances security by reducing the risk of unauthorized access beyond just using a username and password.
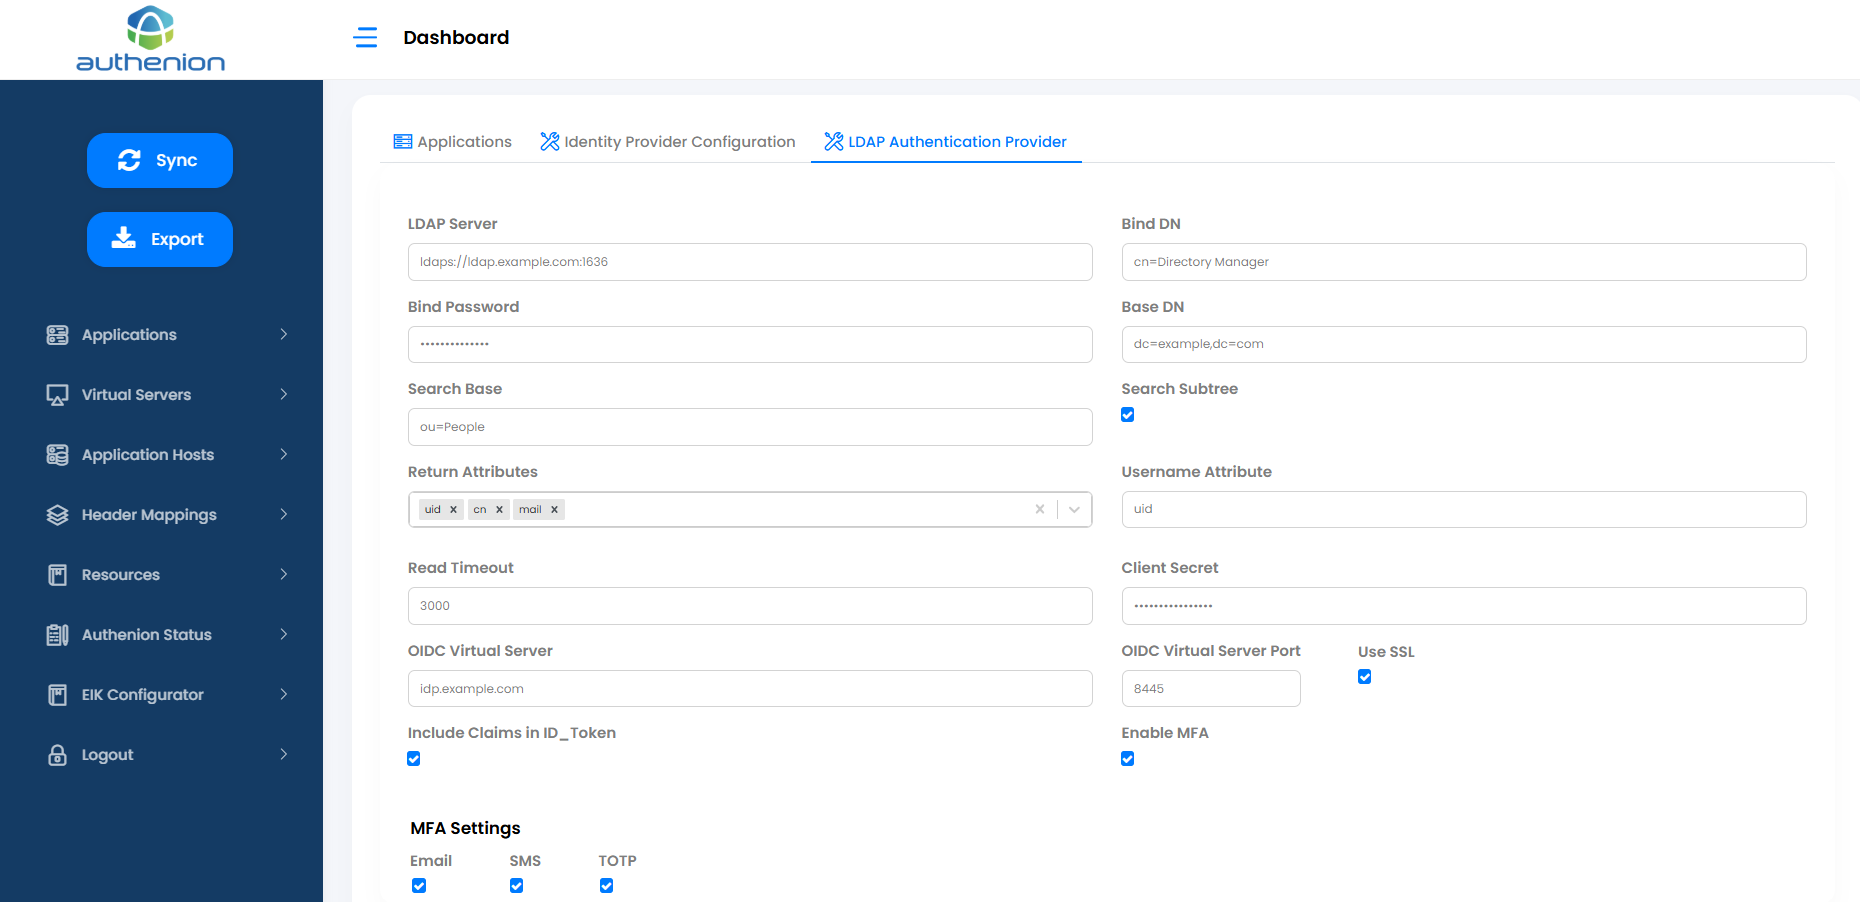
Adding LDAP Authentication Provider Configuration
Click LDAP Authentication Provider Configuration in the Dashboard page.
Enter the following details & click Save to configure your LDAP Provider with Authenion for authentication.
LDAP Authentication Provider - Settings
LDAP Server
Bind DN
Bind Password
Configured Bind Password from LDAP
Base DN
Configured Base DN from LDAP
Search Base
Configured Search Base from LDAP
Search Subtree
checkbox
Return Attributes
Configured the Return Attributes from LDAP
Username Attribute
Configure Username Attribute
Read Timeout
3000
Client Secret
Registered client_secret value from your IdP
OIDC Virtual Server
authenion.example.com
OIDC Virtual Server Port
443
Use SSL
checkbox (Enable/Disable HTTP or HTTPS)
Include Claims in ID_Token
checkbox (Enable/Disable Claims in ID_Token)
Enable MFA
checkbox (Enable/Disable MFA)
Commonly supported LDAP providers are:
- PingDirectory
- Microsoft Active Directory
- OpenLDAP
- Oracle Internet Directory
- Apache Directory Server
- Red Hat Directory Server
- OpenDJ
- SunLdap
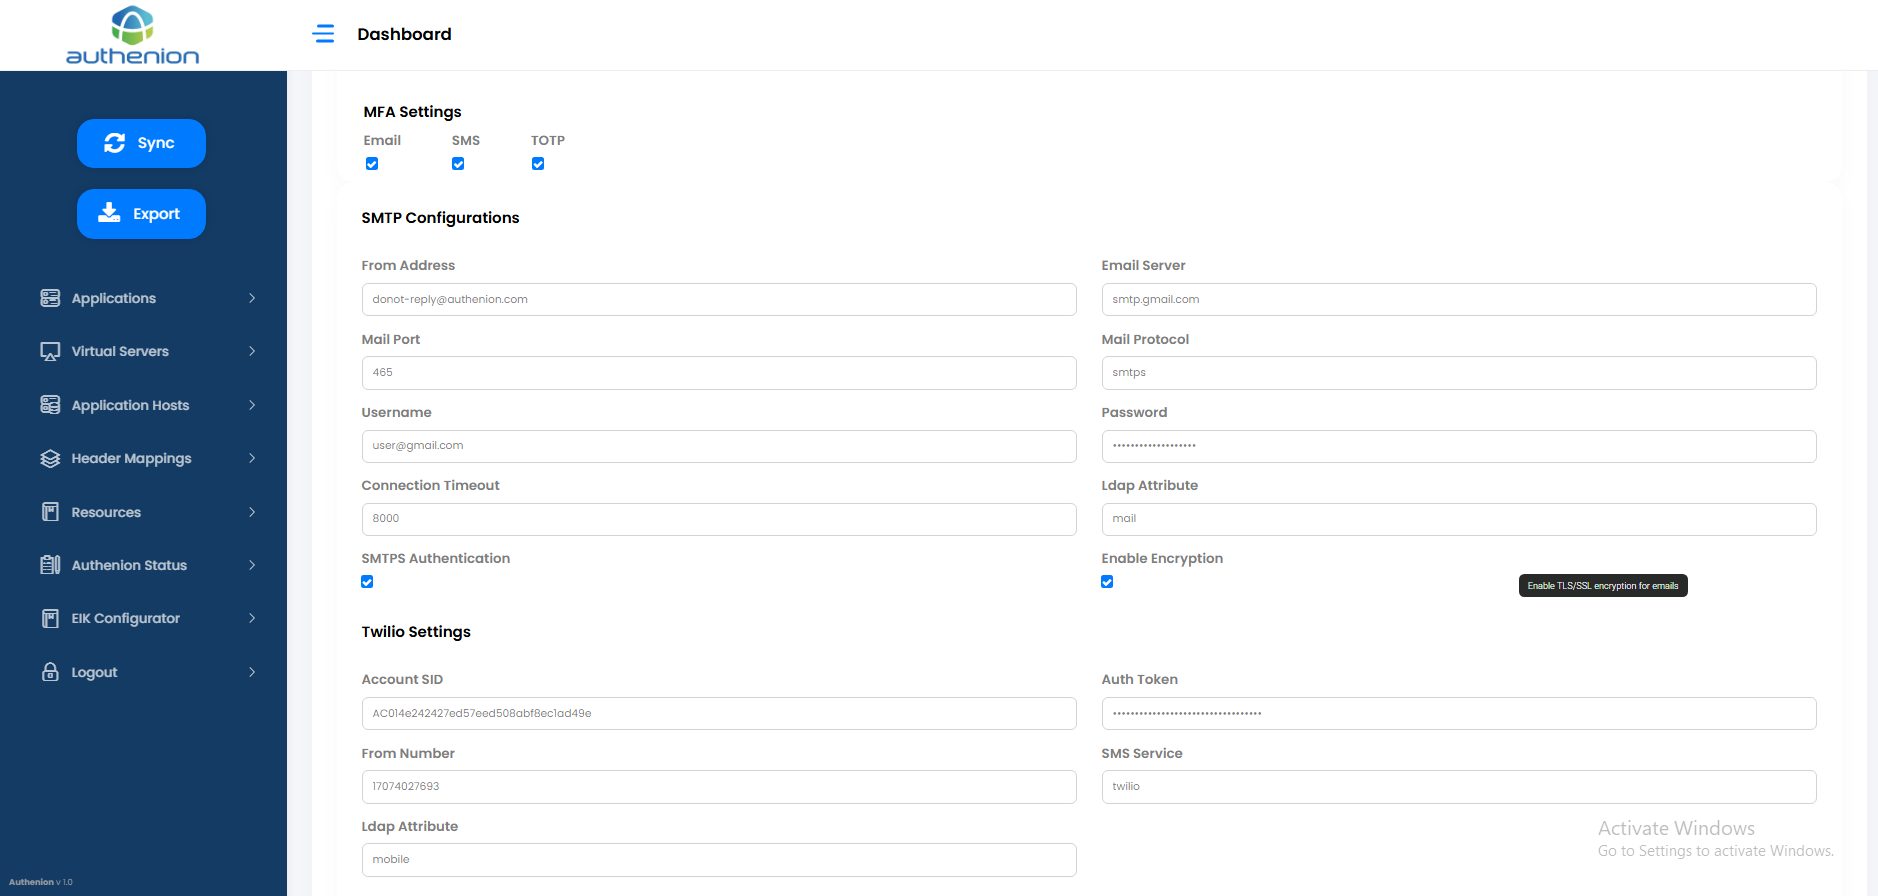
MFA Settings(Optional)
Email
SMS
TOTP
checkbox (Enable/Disable TOTP)
SMTP Configurations
From Address
Email Server
Mail Port
587 (for TLS)/465 (for SSL)
Mail Protocol
smtp/smtps
Username
example.com
Password
password
Connection Timeout
8000
Ldap Attribute
mail
SMTPS Authentication
checkbox (SMTP or SMTPS)
Enable Encryption
checkbox (Enable/Disable TLS or SSL Encryption)
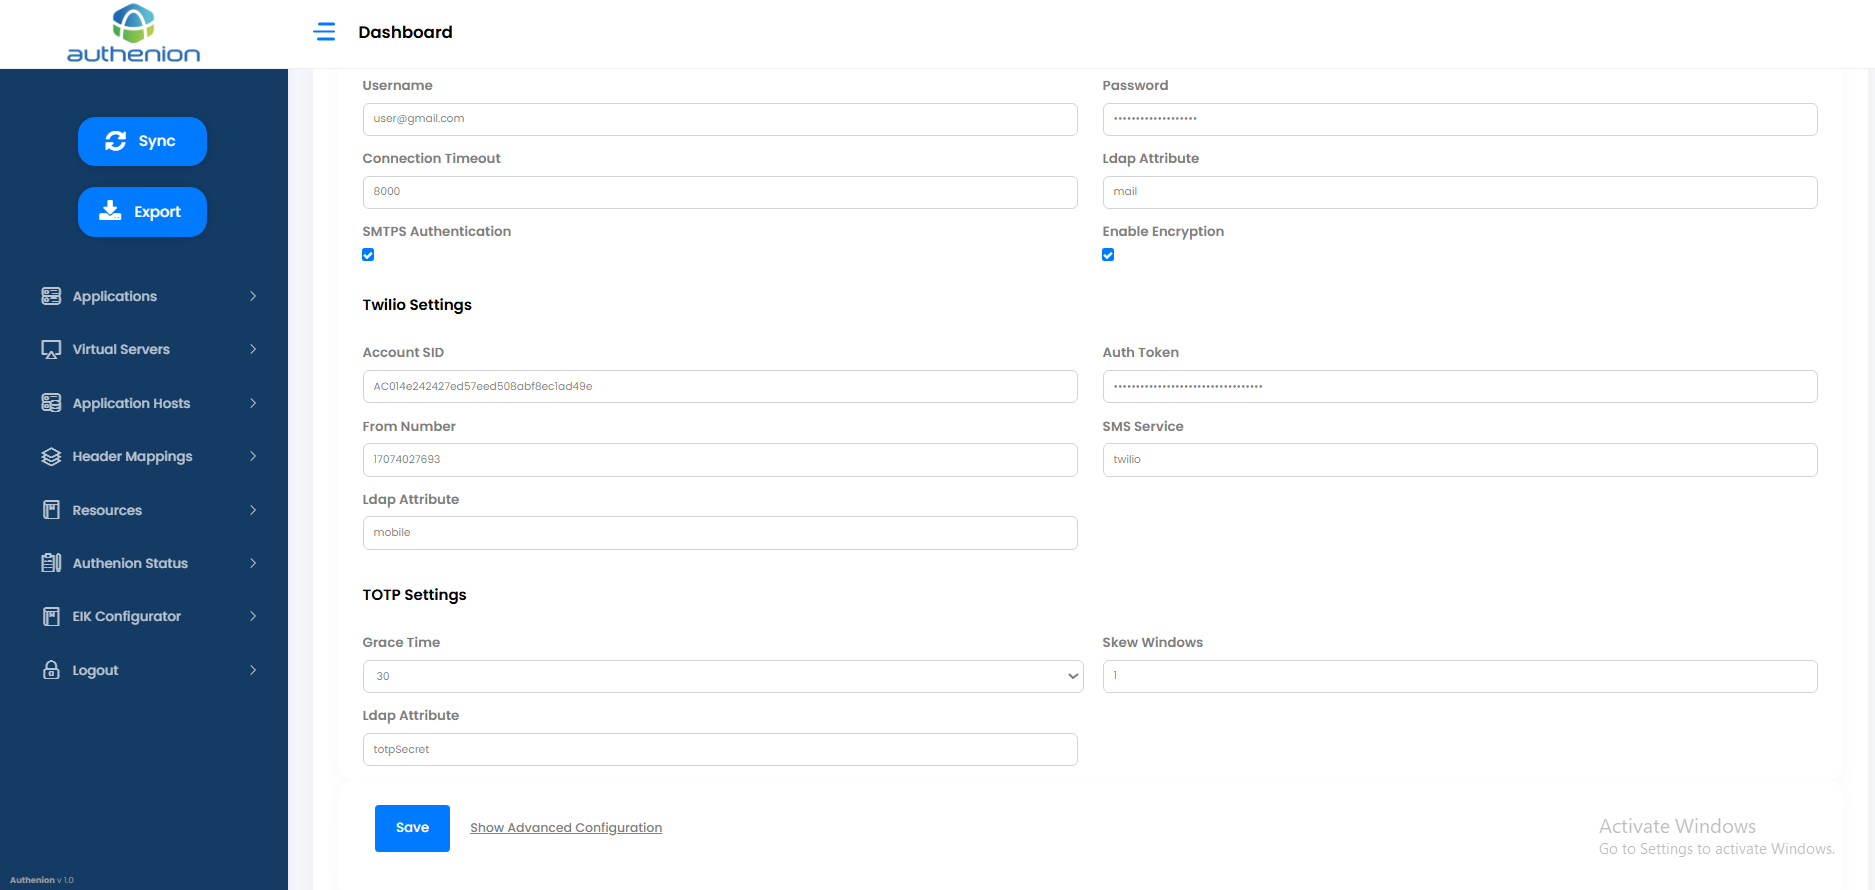
Twilio Settings
Account SID
Auth Token
From Number
Registered From Number from Twilio
SMS Service
twilio
Ldap Attribute
mobile
TOTP Settings
Grace Time
Skew Windows
Ldap Attribute
totpSecret
| Configurations | Values |
|---|---|
|
|
ldaps://ldap.example.com:636 |
|
|
Configured BindDN from LDAP |
|
|
|
|
|
|
|
|
|
|
|
|
|
|
|
|
|
|
|
|
|
|
|
|
|
|
|
|
|
|
|
|
|
|
|
|
|
|
|
Email: When this checkbox is enabled, a one-time password is sent to the user's registered email address for authentication.
SMS: When this checkbox is enabled, users receive a one-time password via SMS, using Twilio integration for message delivery.
TOTP: When this checkbox is enabled, users can authenticate using time-based one-time passwords through apps like Google or Microsoft Authenticat
| Configurations | Values |
|---|---|
|
|
checkbox (Enable/Disable Email) |
|
|
checkbox (Enable/Disable SMS) |
|
|
|
From Address: specify the email address used for sending notification emails.
Email Server: SMTP server for sending emails.
Mail Port: SMTP server port.
Ldap Attribute: The LDAP attribute that stores the user’s email address. This value is retrieved during authentication to send one-time passcodes (OTPs) via email.
| Configurations | Values |
|---|---|
|
|
donot-reply@example.com |
|
|
example.com |
|
|
|
|
|
|
|
|
|
|
|
|
|
|
|
|
|
|
|
|
|
|
|
|
Account SID: A Twilio Account SID is a 34-character alphanumeric identifier unique key that is used to identify a specific Twilio Parent Account or Subaccount.
Auth token: Auth Token is a secret password, used to authenticate requests to the Twilio REST API.
SMS Service: SMS provide or service being used.
Ldap Attribute: The LDAP attribute that stores the user’s mobile number. It is used to deliver OTPs via SMS during the multi-factor authentication process.
| Configurations | Values |
|---|---|
|
|
Registered Account SID from Twilio |
|
|
Registered Auth Token from Twilio |
|
|
|
|
|
|
|
|
|
Grace Time: Refers to the period after a TOTP code has technically expired during which it can still be used for authentication, allowing for minor delays in code entry. The default grace time is either 30 or 60 seconds.
Skew Windows: Refers to the allowance of a certain number of time intervals (e.g., 30-second periods) that are considered valid for authentication, even if there is a slight discrepancy between the client’s and server’s time.
Ldap Attribute: The LDAP attribute where the TOTP (Time-based One-Time Password) secret key is stored for the user. This is used to validate OTPs generated by authenticator apps like Google Authenticator or Microsoft Authenticator.
| Configurations | Values |
|---|---|
|
|
30 or 60 |
|
|
1 |
|
|
|
5. Sidebar
The Sidebar Menu has the following Configurations
Applications
Virtual Servers
Application Hosts
Header Mappings
Resources
Authenion Status
EIK Configurator
Logout
Sync
Export

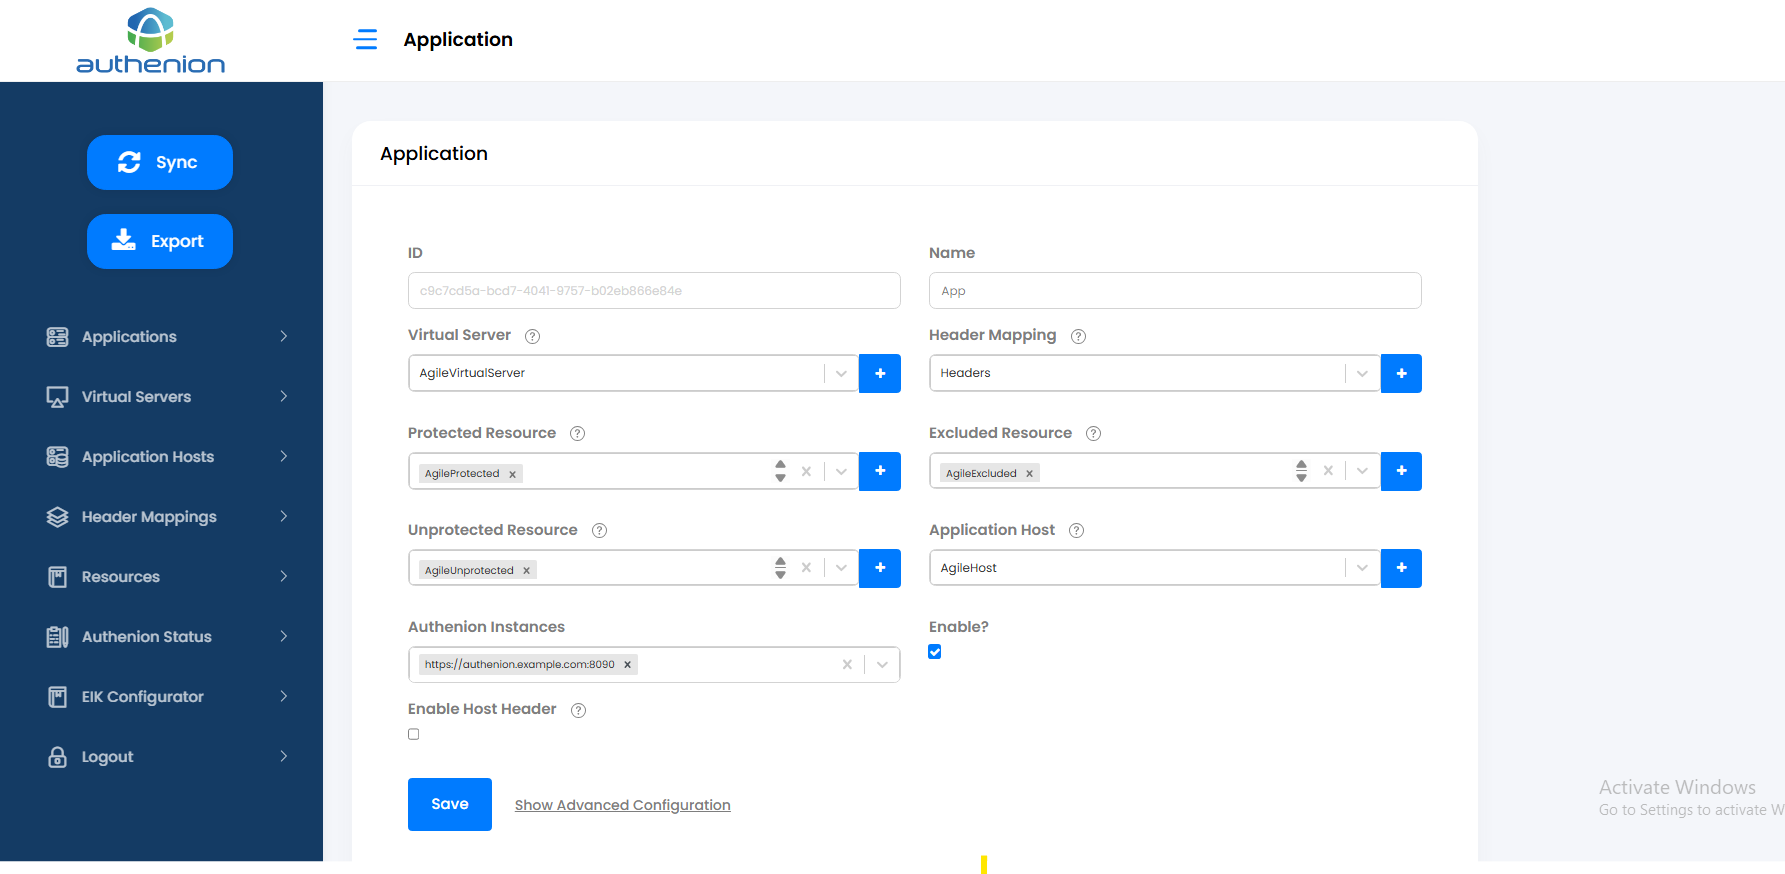
6. Applications
Applications sidebar represent the protected Applications to which the user requests are sent. Each application will have a dedicated entry in the Dashboard/Applications tab. Applications are configured with Virtual Servers, Resources, Header Mappings & corresponds to a single Application Host (target application/backend server).
Adding an Application
Adding a protected application in Authenion has the following pre-requisites. Complete the setup for the below configurations before you create a new application.
-
Virtual Servers (Section 6)
-
Application Hosts (Section 7)
-
Header Mappings (Section 8)
-
Resources (Section 9)
To add an application, click New Application on the Dashboard page.
Enter the following details:
Click Save to complete the configuration for a new application.
| Configurations | Values |
|---|---|
|
Application ID |
Unique ID (auto generated) |
|
Application Name |
App |
|
Virtual Servers |
AgileVirtualServer (Configured in Section 6 ) |
|
Header Mappings |
Headers (Configured Section 8) |
|
Protected Resource |
AgileProtected (Configured Section 9) |
|
Excluded Resource |
AgileExcluded (Configured Section 9) |
|
Unprotected Resource |
AgilepUnprotected (Configured Section 9) |
|
Application Hosts |
AgileHost (Configured Section 7) |
|
Authenion Instances |
https://authenion.example.com:8090 (auto populated) |
|
Enable |
Checkbox (Enable/Disable Application) |
|
Enable Host Headers |
Checkbox (Enable/Disable Host Headers) |
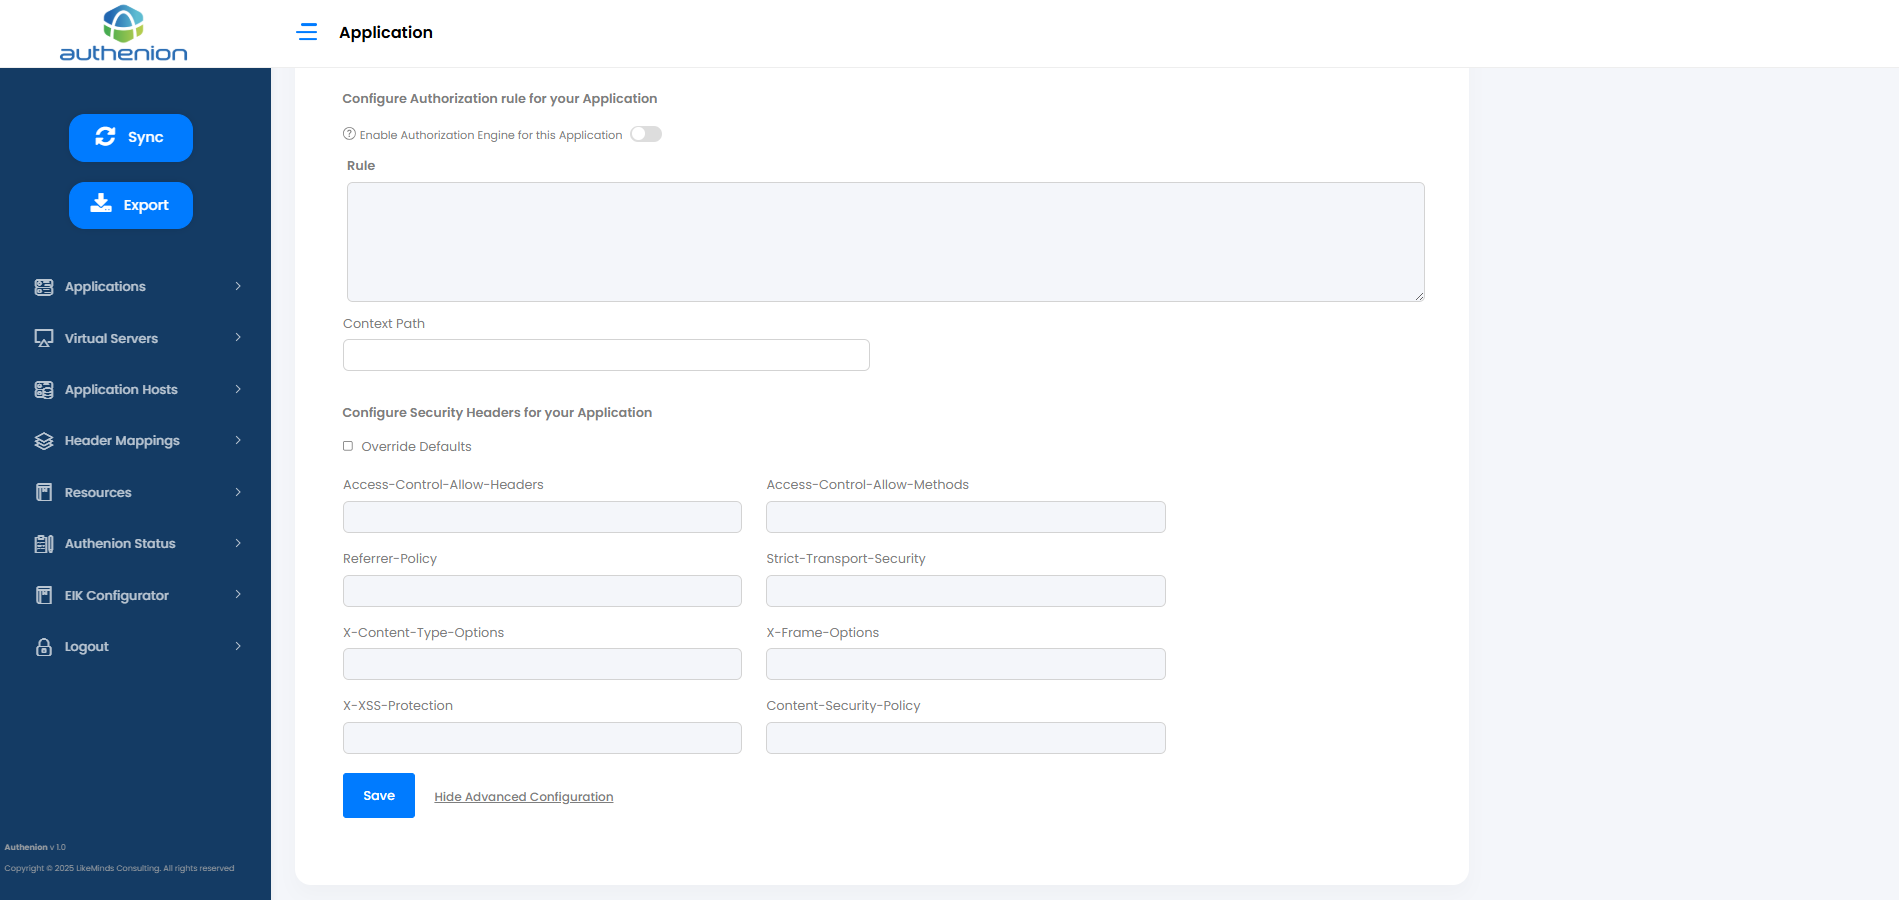
Configure Authorization rule for your Application
Enable Authorization Engine for this Application
Rule
Context Path
/
Configure Security Headers for your Application
Override Defaults
Access-Control-Allow-Headers
Access-Control-Allow-Methods
GET, POST, OPTIONS (Specifies allowed HTTP methods for cross-origin requests)
Referrer-Policy
strict-origin (Ensures that only the origin is sent in the Referer header, protecting sensitive URL info)
Strict-Transport-Security
max-age=31536000; includeSubDomains; preload (Forces HTTPS connections and prevents protocol downgrade attacks)
X-Content-Type-Options
nosniff (Prevents the browser from interpreting files as a different MIME type, reducing XSS risk)
X-Frame-Options
SAMEORIGIN (Blocks the application from being embedded in iframes from other domains)
X-XSS-Protection
1; mode=block (Enables basic cross-site scripting protection in older browsers)
Content-Security-Policy
default-src 'self'; (Restricts all content (scripts, images, styles) to load only from the same origin)
| Configurations | Values |
|---|---|
|
|
Toggle (Enable/Disable the Rules for the Application) |
|
|
Configure Authorization Rules for the Application (optional) |
|
|
|
The following security headers can be configured to enhance application security. These configurations are optional.
| Configurations | Values |
|---|---|
|
|
checkbox (Enable/Disable Override Defaults) |
|
|
DNT,User-Agent,X-Requested-With,If-Modified-Since,Cache-Control,Content-Type,Range (Allows specific headers in CORS requests) |
|
|
|
|
|
|
|
|
|
|
|
|
|
|
|
|
|
|
|
|
|
Authenion Dashboard shows the number of Applications configured.
7. Virtual Servers
Virtual Servers enables you to protect multiple applications and their hosts. The Virtual Server is a combination of hostname and port number and is defined by example.com:443.
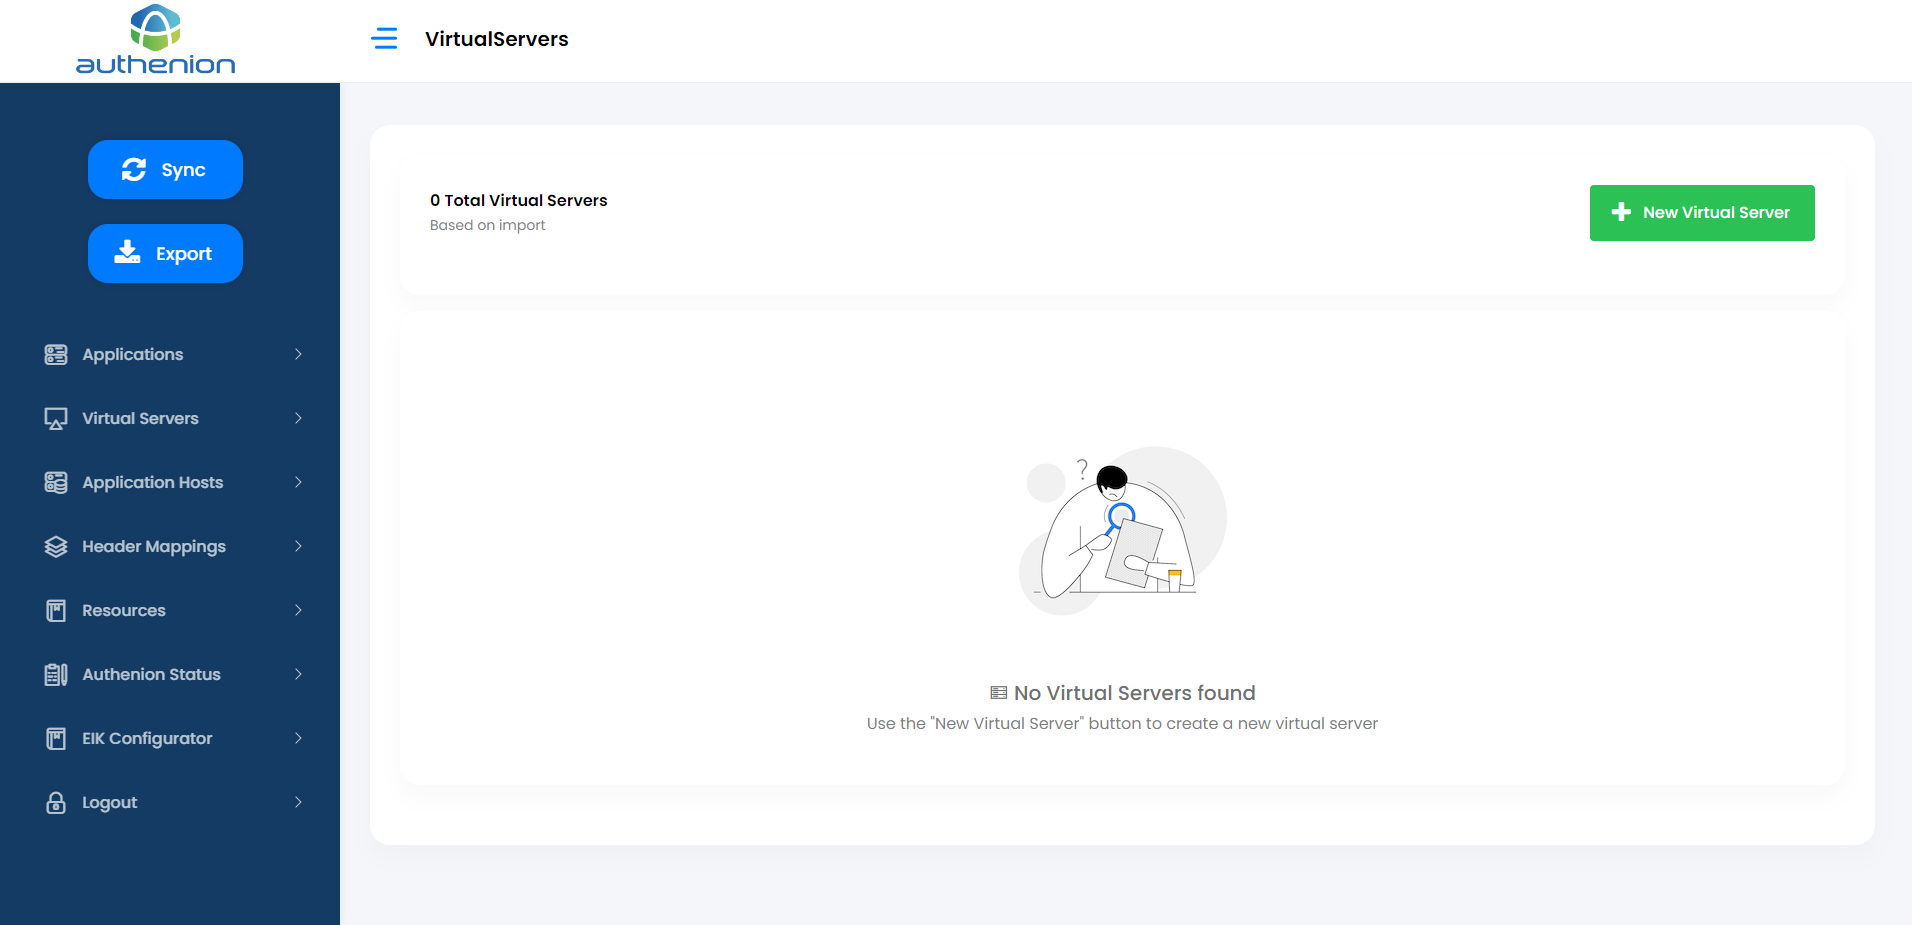
Adding a Virtual Server
Click Virtual Servers on the sidebar menu.
Click the “+ New Virtual Server” button on the Virtual Servers page.
Enter the following details to create a Virtual Server for your application.
Unique ID (auto generated)
AgileVirtualServer
authenion.example.com (protected application domain or hostname)
8443
checkbox (HTTP or HTTPS)
checkbox (Enable/Disable Cache Policy)
Click Save to complete the Virtual Server configuration.
For example:
| Configurations | Values |
|---|---|
|
ID |
|
|
Name |
|
|
Host |
|
|
Port |
|
|
Use SSL |
|
|
Cache Policy |
|

8. Application Hosts
Applications Hosts are the target applications or the backend application servers that Authenion is protecting through the gateway architecture. The target application’s access requests are validated by Authenion before they are forwarded.
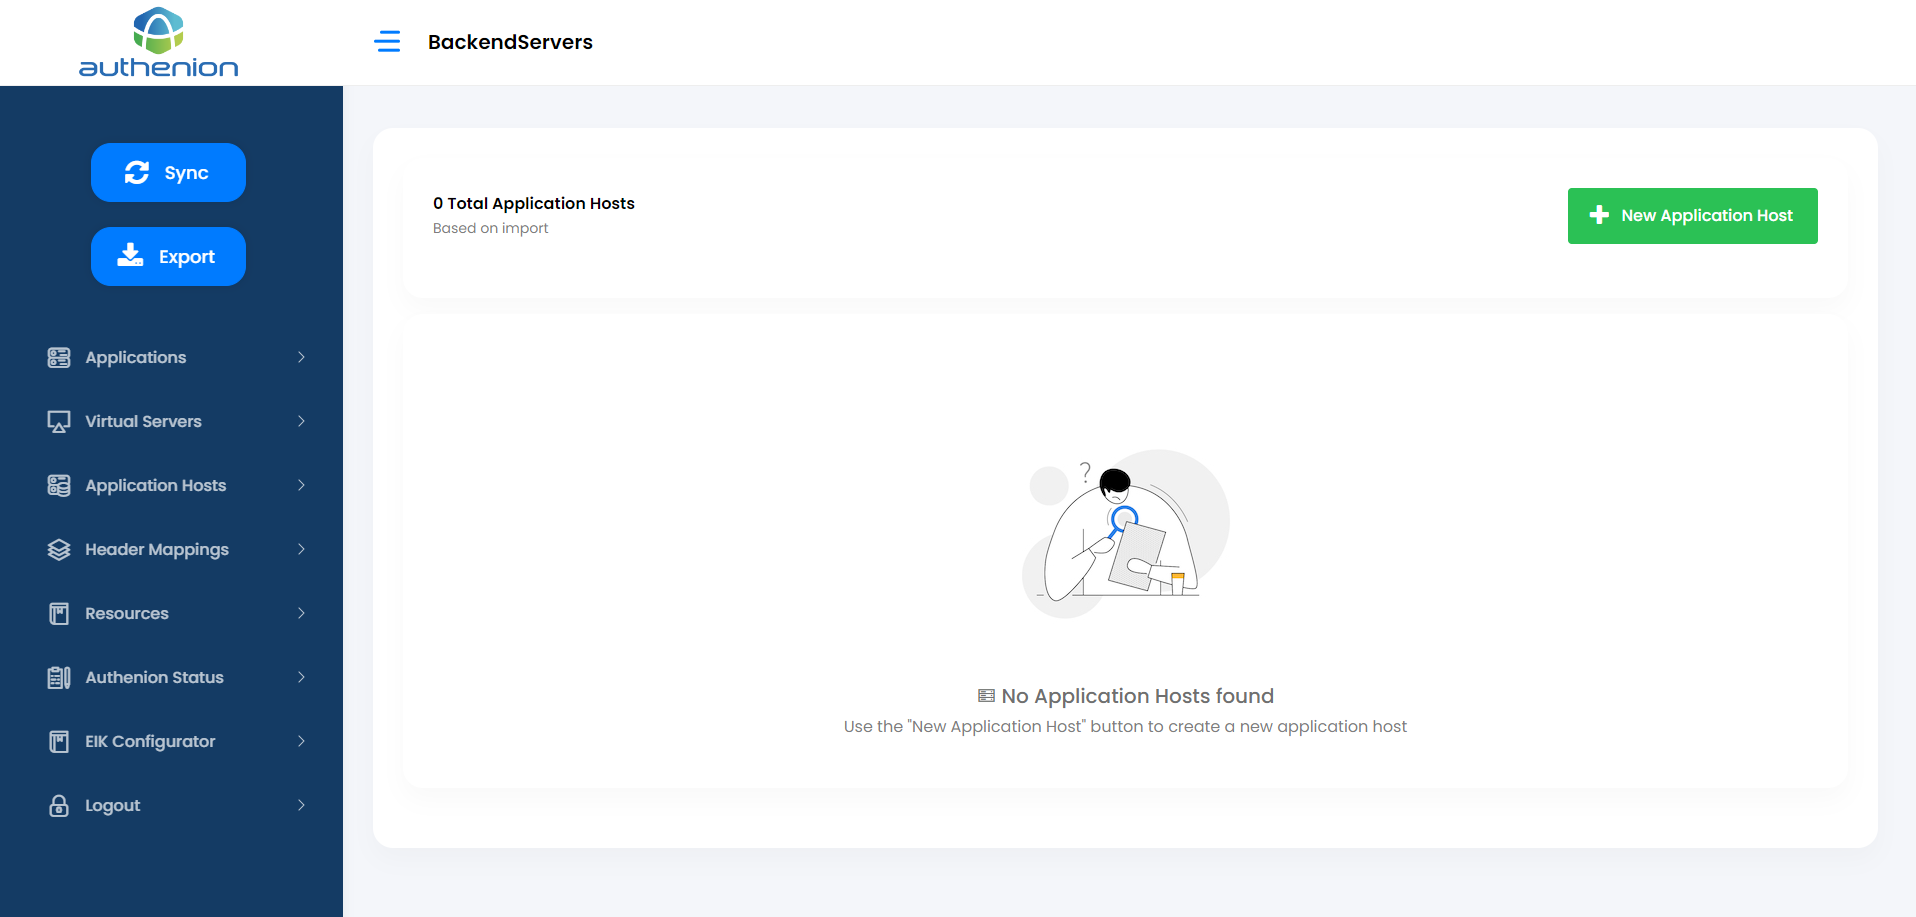
Adding Application Hosts
Click Application Hosts on the sidebar menu.
Click the “+New Application Host” button on the Application Hosts page.
Enter the following details to create an Application Host for your target application server.
Unique ID (auto generated)
AgileHost
agile.example.com:8080 (protected application/webserver details)
checkbox (HTTP or HTTPS)
checkbox (Enable/Disable Session Persistence)
checkbox (Enable/Disable HTTP Proxy with HTTP/1.1 )
-
Click Save to complete the Application Host configuration.
For example:
| Configurations | Values |
|---|---|
|
ID |
|
|
Name |
|
|
Host |
|
|
Use SSL |
|
|
Enable Session Persistence |
|
|
HTTP1.1 |
|

9. Header Mappings
Header Mappings sends the User attributes to the target application after authentication. The target application will send the attributes for validation purposes. The Header Mappings will receive the user attributes from the Claims which are sent by the Token Provider. Once the claims are received, it is then made available as HTTP-Headers to the target applications.
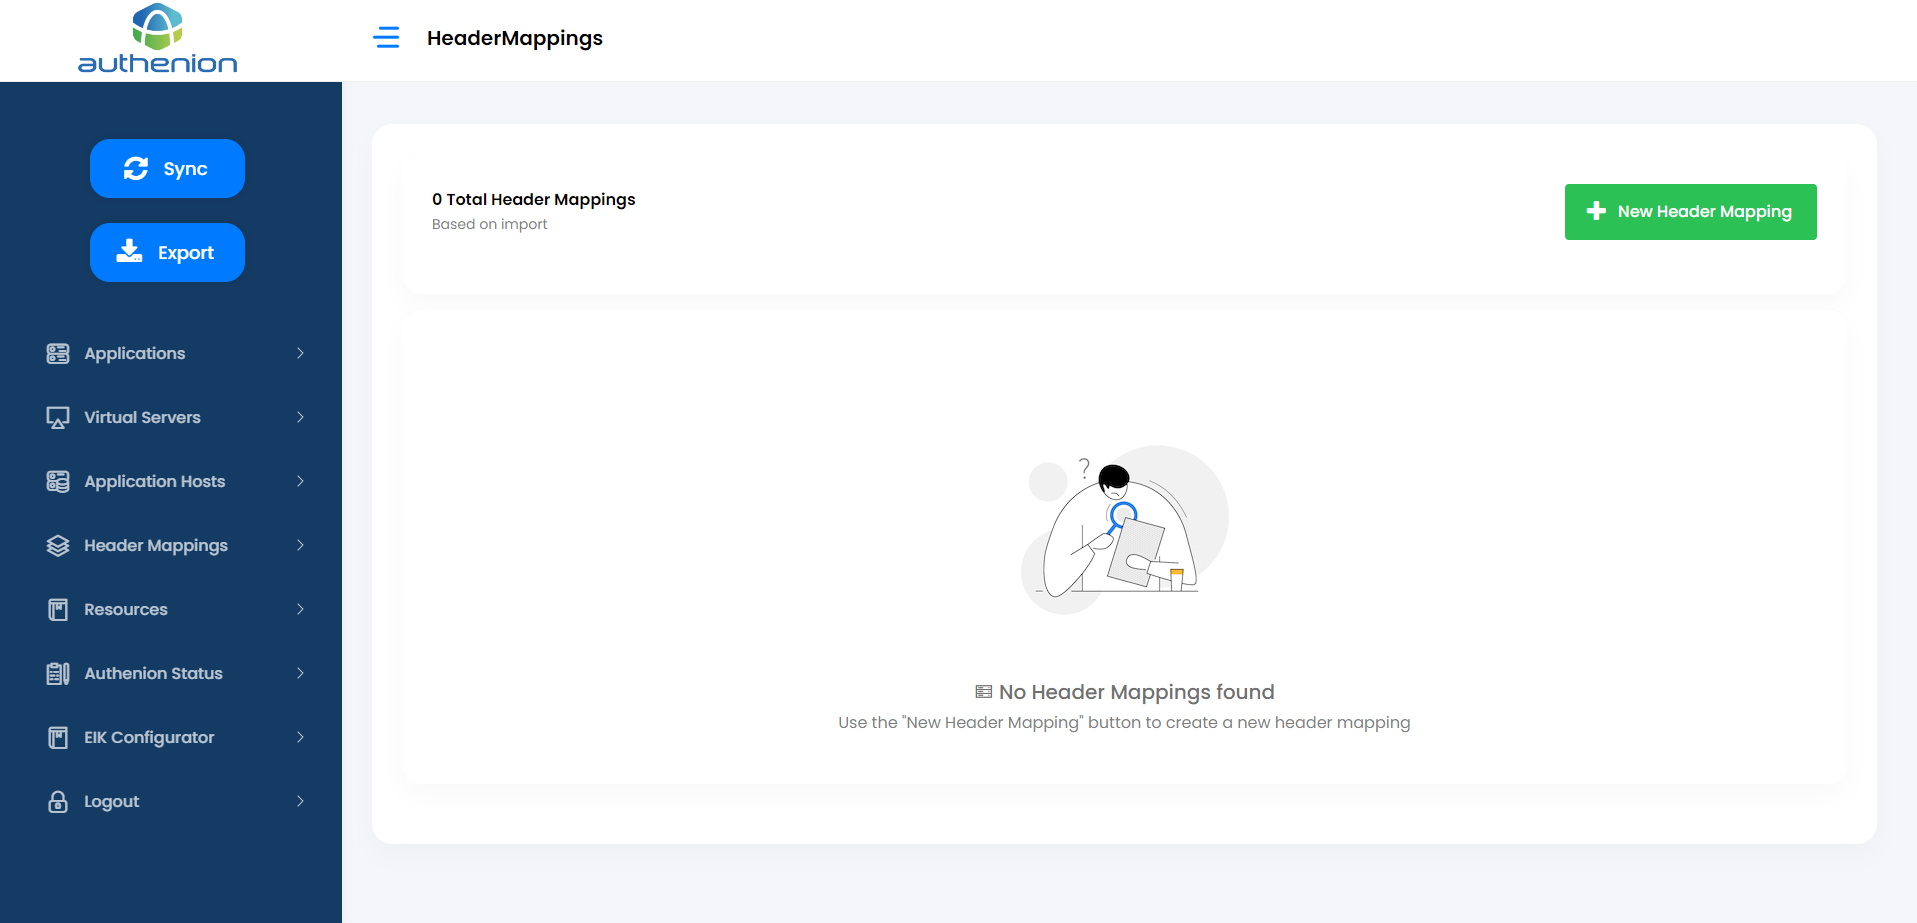
Adding Header Mapping
Click Header Mappings on the sidebar menu.
Click the “+New Header Mapping” button on the Header Mappings page.
Enter the following details to create a header mapping for your target application.
Unique ID (auto generated)
Headers
REMOTE_USER
uid
-
Click Save to complete the Header Mappings configuration.
For example:
| Configurations | Values |
|---|---|
|
ID |
|
|
Name |
|
|
App Header |
|
|
OIDC Claims |
|

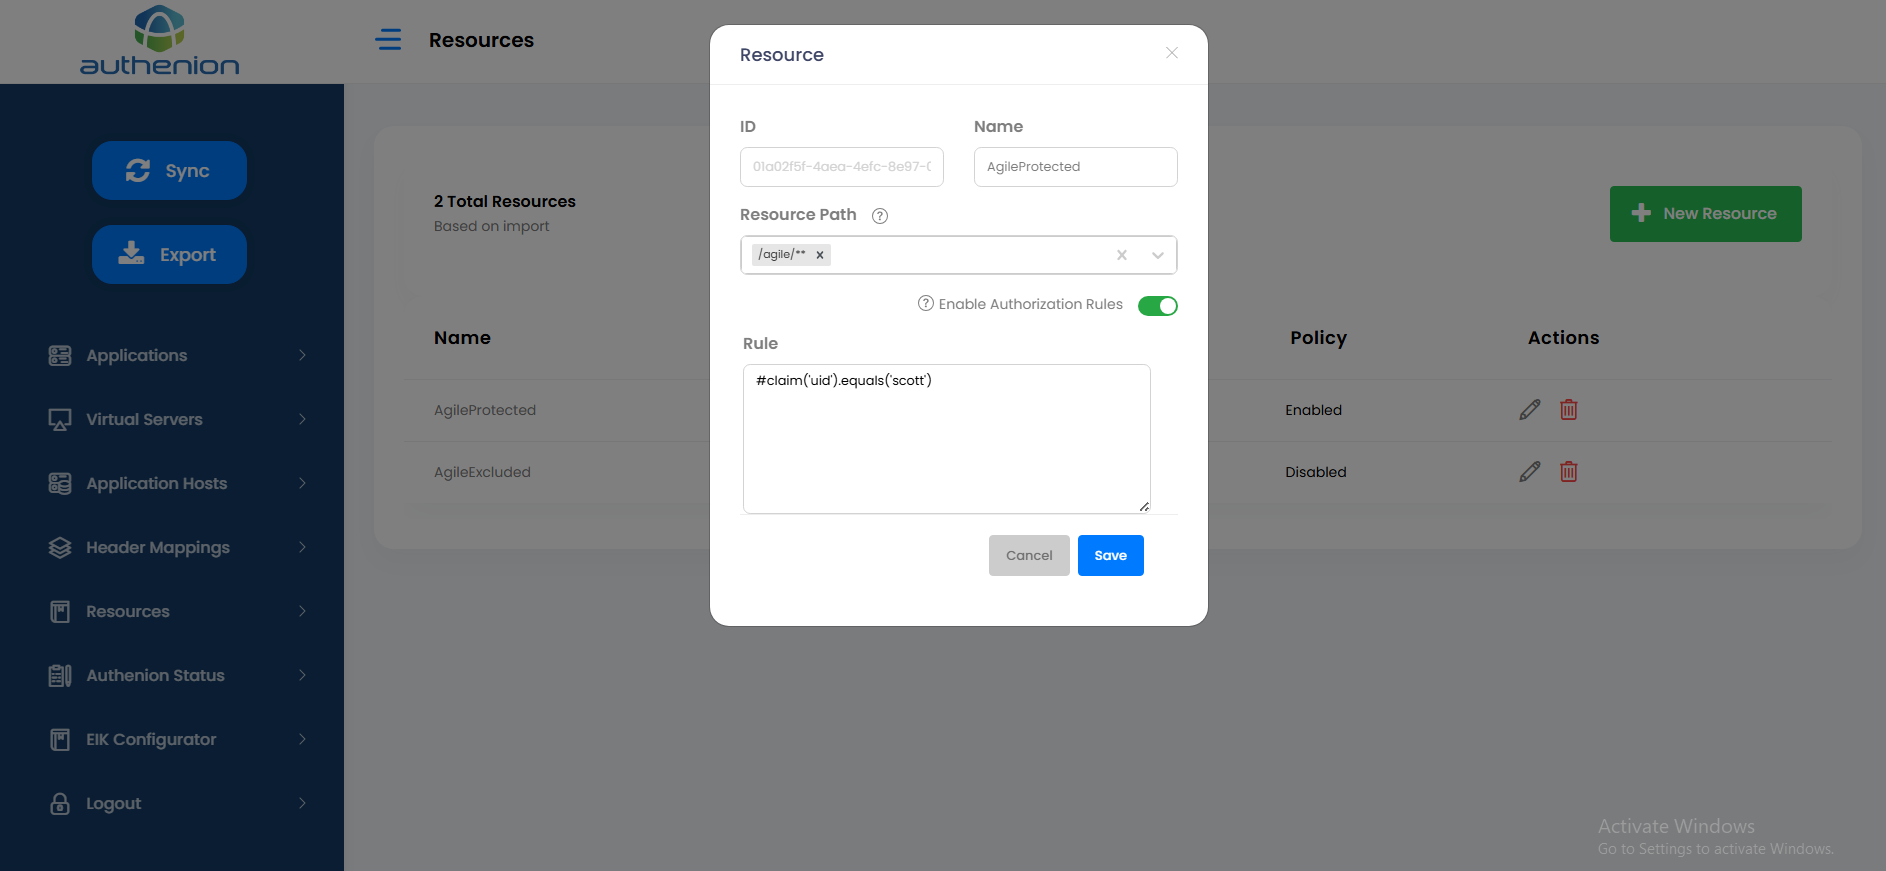
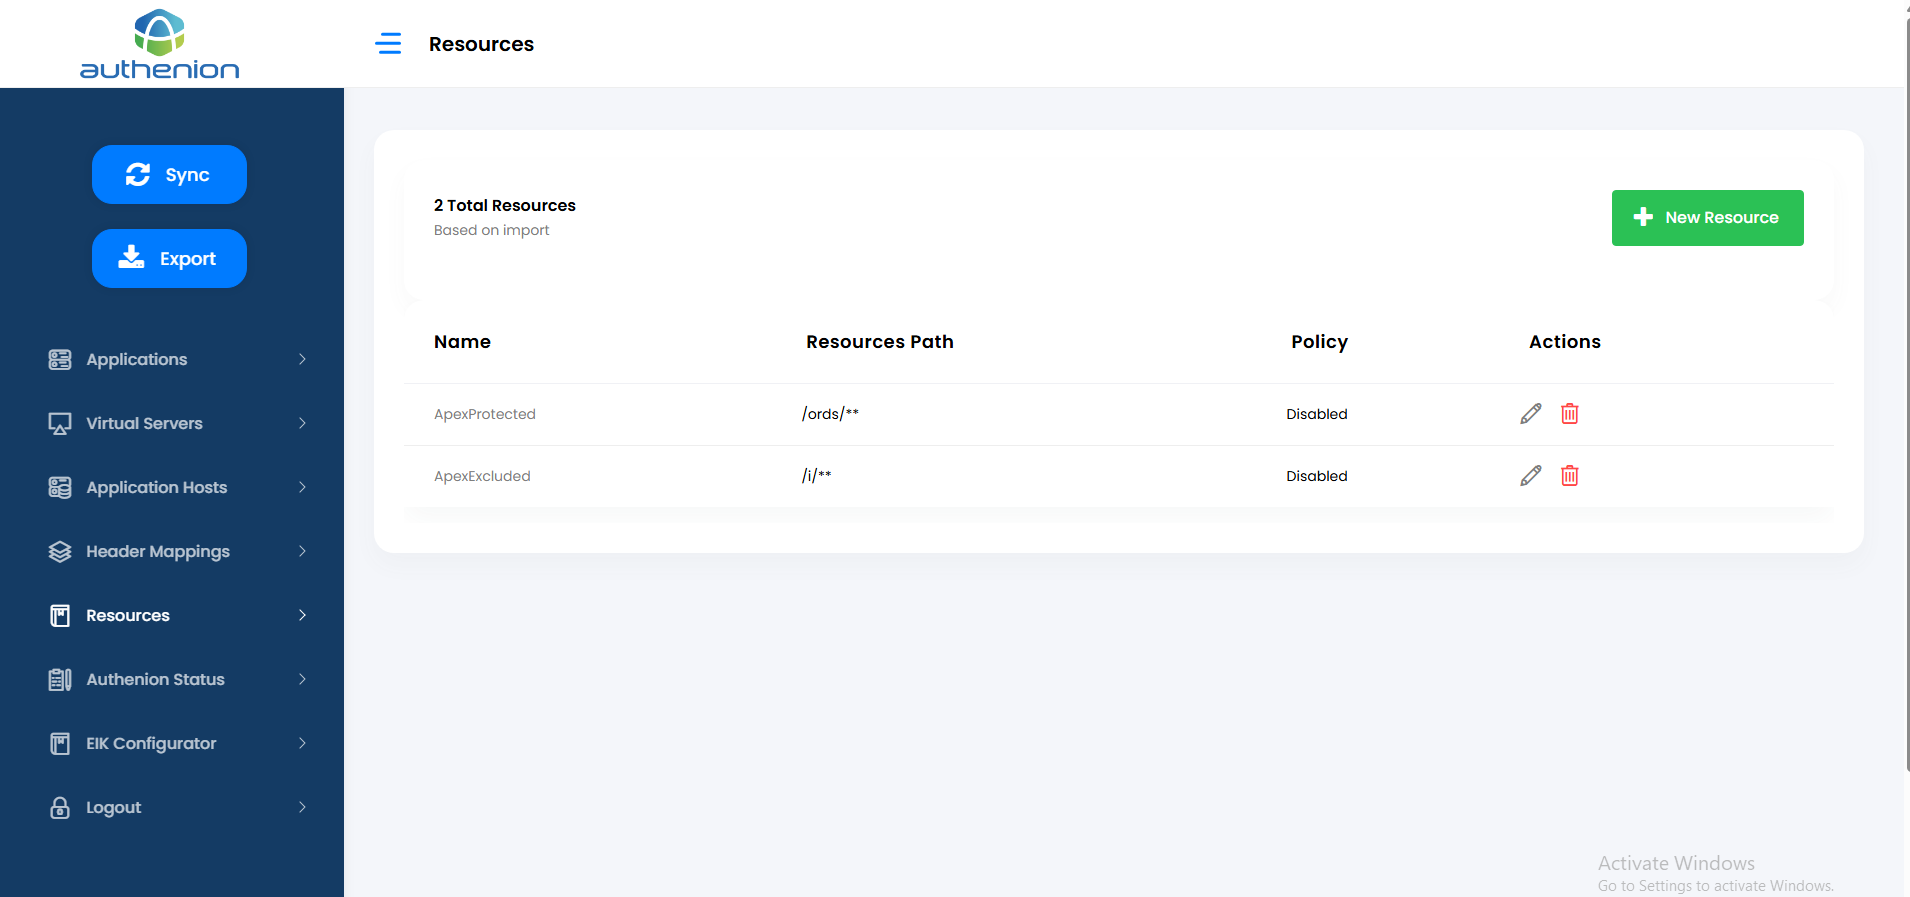
10. Resources
Resources are the components/URI of the applications. The resources can be mapped as either protected or excluded resources in an application.

Adding Resources
Click Resources on the sidebar menu.
Click the “+New Resource” button on the Resources page.
Enter the following details to create a Resources for your target application.
Unique ID (auto generated)
AgileProtected
/agile/** (Resource Path starts with a ‘/’. Multiple resource paths can be added)
Toggle (Enable/Disable Authorization Rules)
The Authenion Rules Engine allows you to define and manage access policies for your applications and resources. It enables precise control over user access conditions and content modifications. (optional)
-
Click Save to complete the Resources configuration.
For example:
| Configurations | Values |
|---|---|
|
ID |
|
|
Name |
|
|
Resource Path |
|
|
Enable Authorization Rules |
|
|
Rule |
|

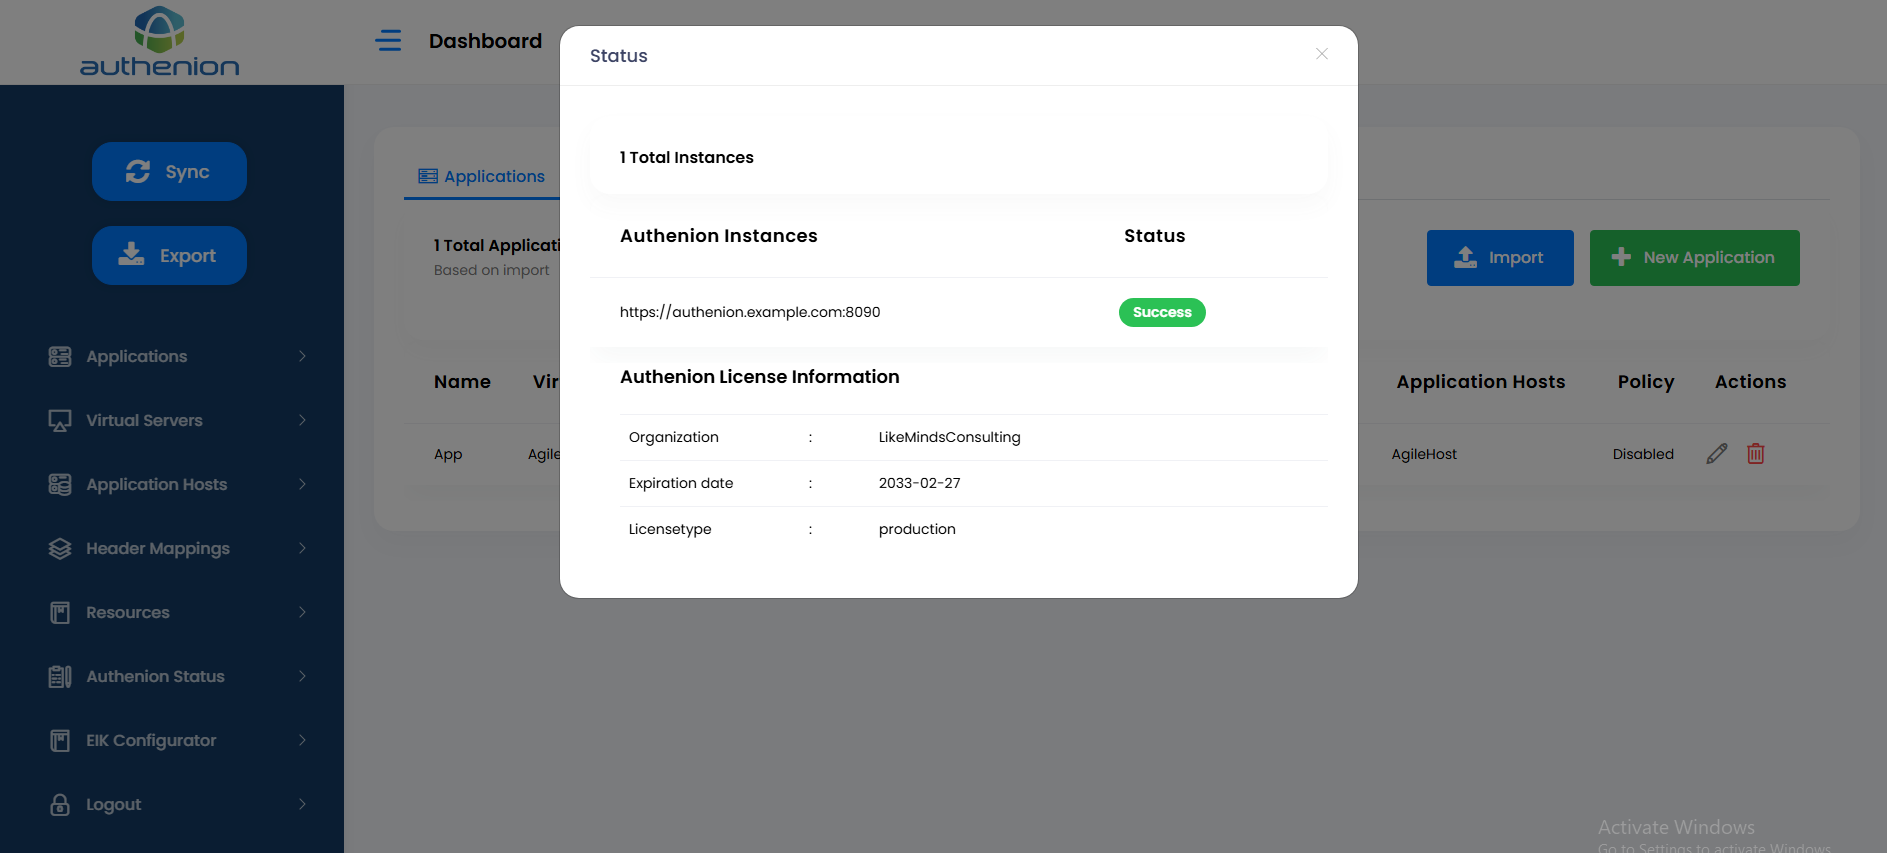
11. Authenion Status
The Authenion Status page shows the health of the Authenion Instance that is running in the Authenion server. This status page also displays your authenion license information.
Click Authenion Status on the sidebar menu to view the status of your Authenion application.
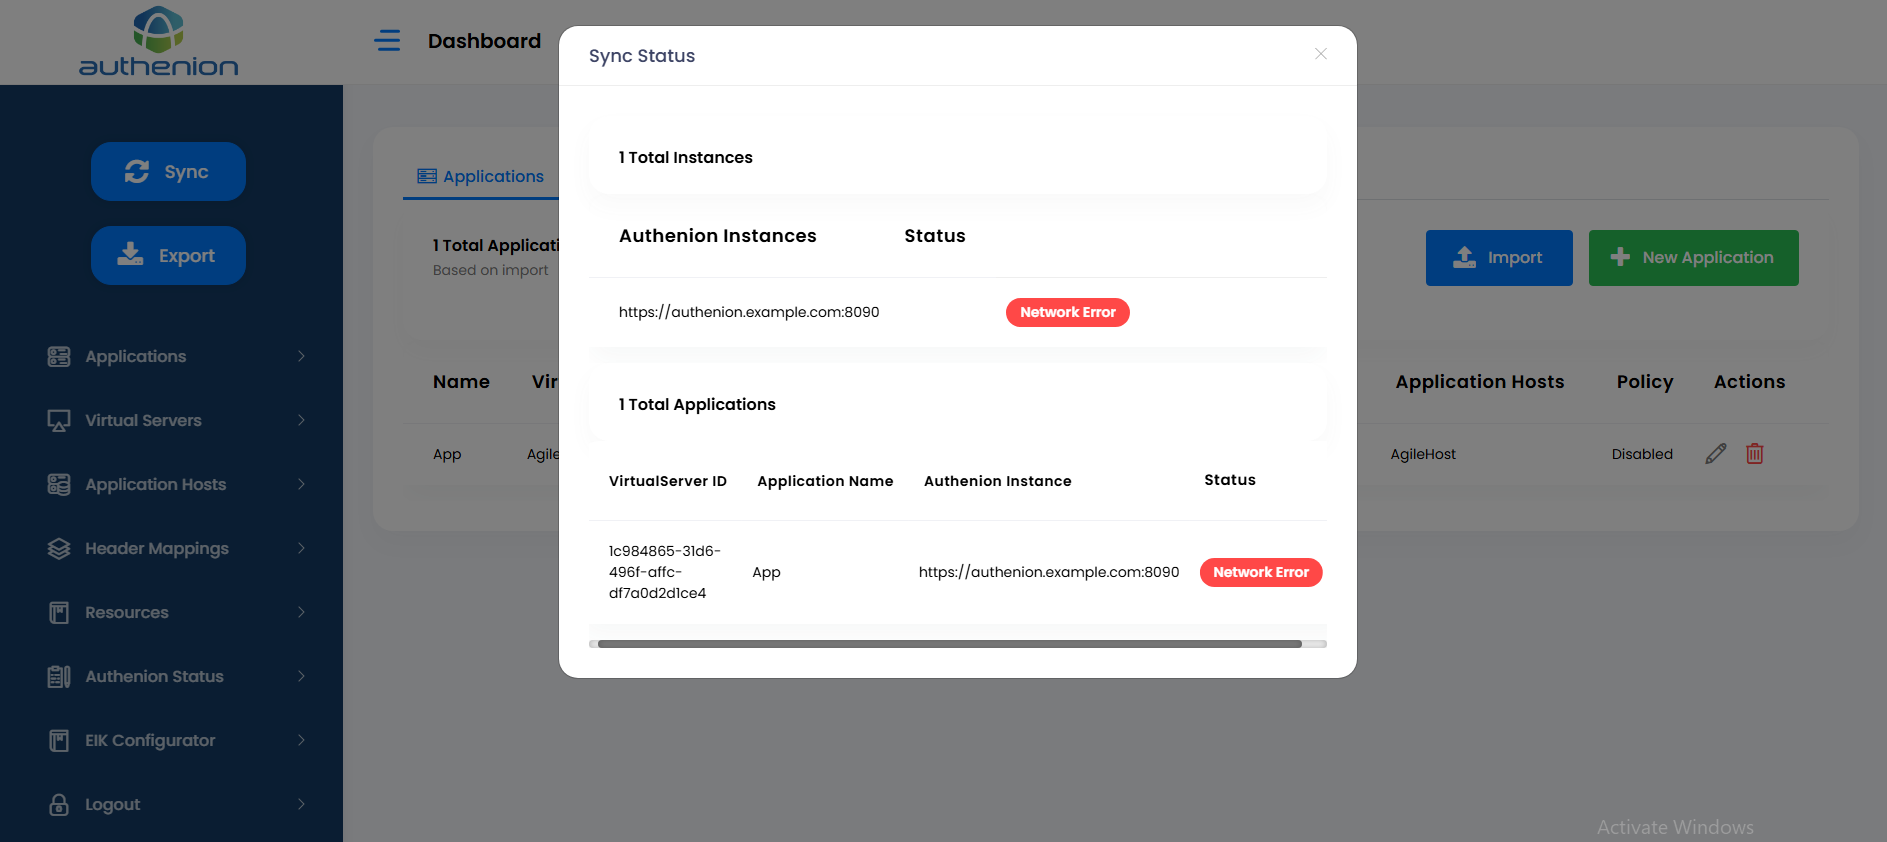
12. Sync & Export
Sync:
The Sync is a manual operation that lets you push all the configuration data from the Authenion UI back to the Authenion server. When you install Authenion for the first time, there will be no configuration data in the UI or in the Authenion server. The Sync operation should be triggered for both new configurations & modifications that we perform in the Authenion UI. Any changes which are not pushed from the UI to Authenion server will not be reflected until Sync operation is triggered manually.
Note: Add the JWKS endpoint to the 'agent-authorization.properties' file in the '/config/' directory.
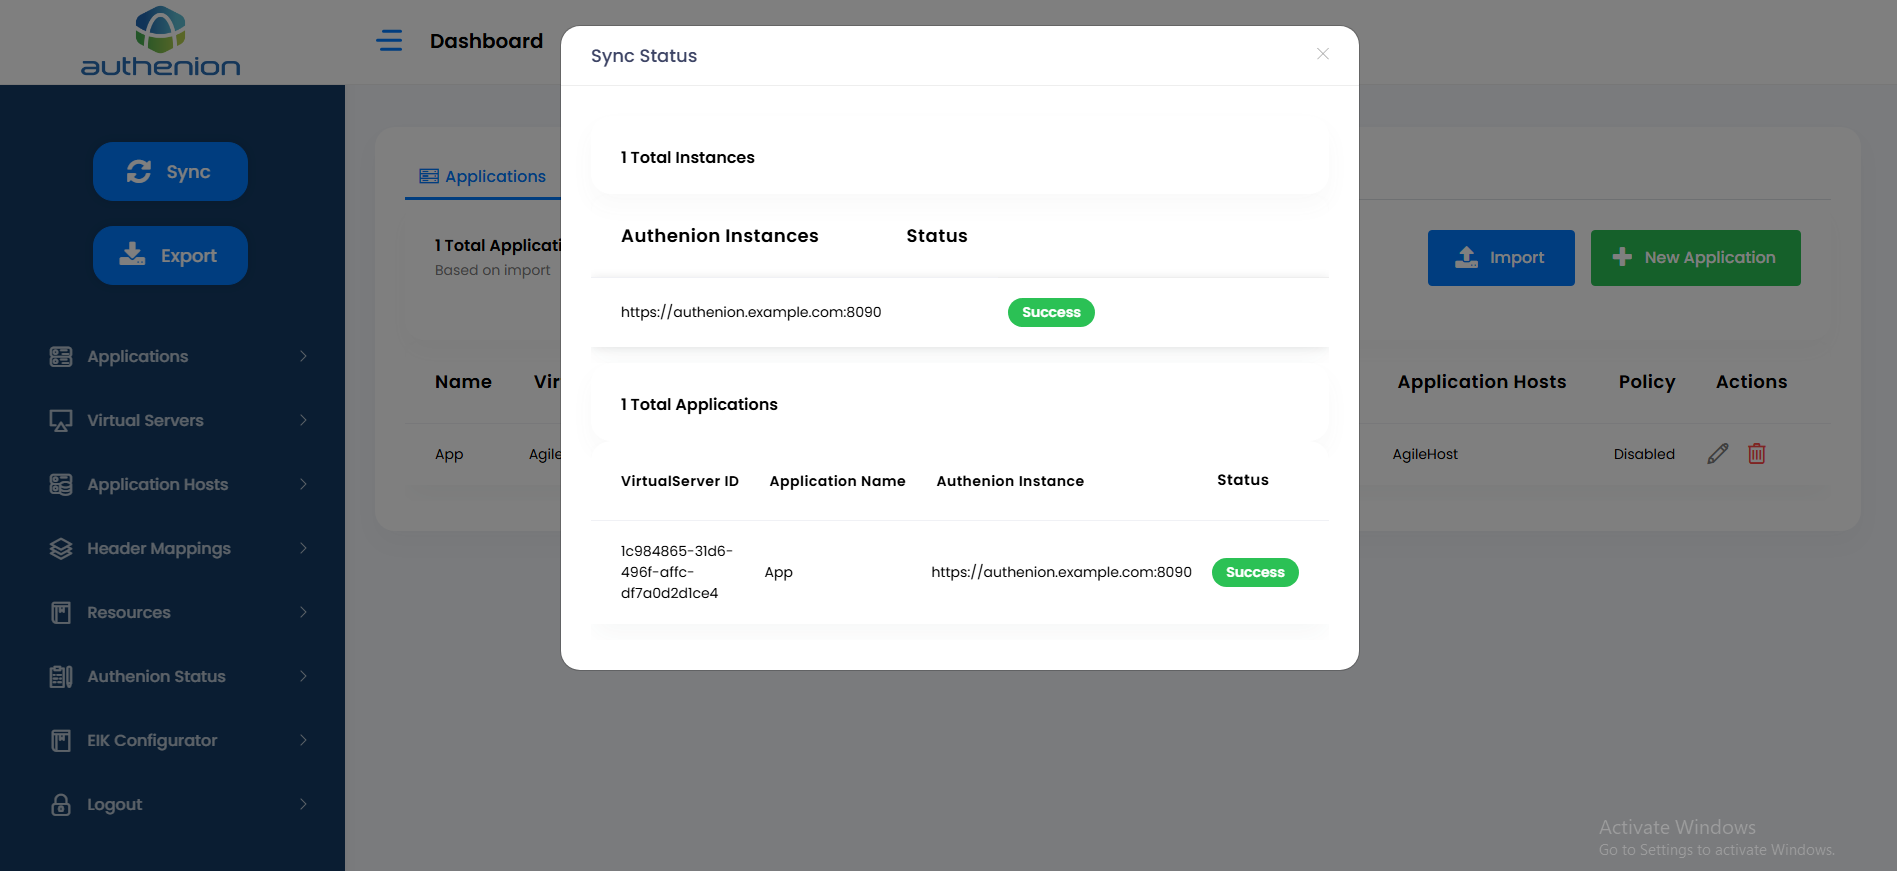
The Sync status will throw an error status when it can't reach the Authenion instance in the Authenion server.
Export:
The Export button is a quick operation that lets you download the current configurations from the UI. The exported data will be in the format of a JSON file. This file acts as a backup for the Authenion configuration data. The downloaded file name is export.json.
13. Authenion Health-check
To check the Authenion status through the heartbeat URL, enter the following URL in the browser. This can be used for monitoring the Authenion services.
14. User-Customized Templates
Email Page Templates
Authenion enables customization of user-facing pages, such as emails and forms, using HTML, CSS, JavaScript, and localization files with dynamic placeholders for messages and user-specific data.Templates are located in
1. email-forgotUsername.html
Purpose:This email template is sent to users who have forgotten their username.
Use:This email is sent when a user requests account recovery. It provides the username(s) associated with the registered email address, enabling the user to log in without creating a new account.
2. email-otpMessage.html
Purpose:This email template is used to send a One-Time Password (OTP) to users during login process.
Use: As part of multi-factor authentication (MFA), this email sends a one-time password (OTP) to verify the user’s identity and ensure secure login.
3. email-passwordChanged.html
Purpose:This email template is sent to confirm that the user’s password has been successfully changed.
Use:This email confirms the password change and helps detect unauthorized activity. If the password change wasn’t requested, it alerts the user to take immediate action to secure their account.
4. email-resetPassword.html
Purpose:This email template is used to send a password reset link to the user’s registered email address.
Use:This email provides a time-sensitive link to help users securely reset their password when a user forget their password or want to create a new one.
Login Page Templates
Login page templates in Authenion are located at <authenion_install_dir>/config/html/. These templates control the appearance of user-facing pages such as the login screen, forgot password form, and logout confirmation. You can customize these templates to match your branding and support multiple languages using message properties in the <authenion_install_dir>/config/html/locale/messages_en.properties file.
1. login.html
Purpose:This is the main login page where users enter their LDAP username and password.
Use:This page authenticates users by submitting their credentials to the server and provides links to reset a forgotten password or recover a username.
2. forgotPwd.html
Purpose:This page allows users to request a password reset link by entering their username.
Use:It sends a password reset email to the user with a time-limited link, allowing them to securely update their password.
3. signout.html
Purpose:This page is displayed after the user successfully logs out, confirming the logout action.
Use:It confirms the successful logout and provides a link to return to the homepage.
4. updatePassword.html
Purpose:This page allows users to set a new password after clicking the reset link sent to their email.
Use: It enables users to securely update their password, verifies that both passwords match, and submits the data to the server via AJAX. CSRF protection is included to ensure the request is secure and valid.
5. forgotUsername.html
Purpose:This page allows users to recover their forgotten username by entering their email address.
Use:The user submits their email address, and the system sends their registered username to the provided email address.
6. changedPwd.html
Purpose:This page is displayed after the user successfully changes their password.
Use:It notifies the user that their password has been successfully updated and provides a link to redirect them to the login page.
7. changePwd.html
Purpose:This page provides a form for users to change their password by entering their current password, new password, and confirming the new one. It includes validation to ensure the new passwords match.
Use:It allows users to update their password. After submission, the password is changed if successful, and appropriate success or error messages are displayed.
8. deviceRegistered.html
Purpose:This page confirms successful registration of an authenticator app for two-factor authentication (2FA). It displays a checkmark icon, a success message, and a "Close Window" button.
Use:This page appears after the authenticator app is successfully linked to the user account. It confirms completion of the registration and includes a "Close Window" button for the user to exit and continue using the application.
9. deviceOtp.html
Purpose:This page provides a secure OTP input form for verifying a user’s identity during multi-factor authentication (MFA). It supports TOTP and device-based methods like SMS or email, showing masked details to indicate the delivery method.
Use:This page appears when the user needs to enter a 6-digit OTP sent to their registered device or generated by an authenticator app. The user enters the code in separate fields, and upon submission, the OTP and device ID are sent to the server via AJAX for verification. If successful, the user is redirected to the /mfa/registered confirmation page; otherwise, they are redirected to /mfa/commit.
10. deviceSelection.html
Purpose:This page allows users to select a method for Multi-Factor Authentication (MFA), such as SMS, Email, TOTP. Once an option is selected, it is stored and a "Proceed" button appears for the user to continue.
Use:This page is part of the authentication process, allowing users to choose their MFA method. After selection, the form is submitted with the device ID to verify the method and continue to the next step.
11. enrollDevice.html
Purpose:This page is used to enroll a user in Multi-Factor Authentication (MFA). It displays a QR code for scanning with an authenticator app or allows manual entry of a secret key. After scanning or entering the key, the user submits the form to verify their OTP.
Use:This page is shown during the MFA enrollment process, where users set up an authenticator app by scanning the QR code or entering the secret key. After setup, the user proceeds to verify their OTP to complete the enrollment.
12. error.html
Purpose:This page displays a basic error message when an unexpected issue occurs, informing the user of the problem and advising them to try again later. It serves as a fallback page when something goes wrong in the system.
Use:This page handles unexpected errors or system issues, informing the user that something went wrong and advising them to try again later. It serves as a generic error page when no specific error message is available.
Connect with your Identity Provider
This configuration section is the 'first mile integration' of the Authenion integration mechanism. This section guides you to configure Identity/Token Providers in the Authenion administration console. The integration will be established through OAuth and OpenID Connect protocols.
1. PingFederate as the Token Provider
Pre-requisites
PingFederate application with IdP and OAuth/OIDC roles enabled.
Authorization server setup in PingFederate OAuth server setting.
A configured Ping Federate IdP adapter and/or authentication policy contract policy if required for authentication and grant mapping.
OAuth / OIDC Configurations
This setup will manage the configurations related to the OAuth client.
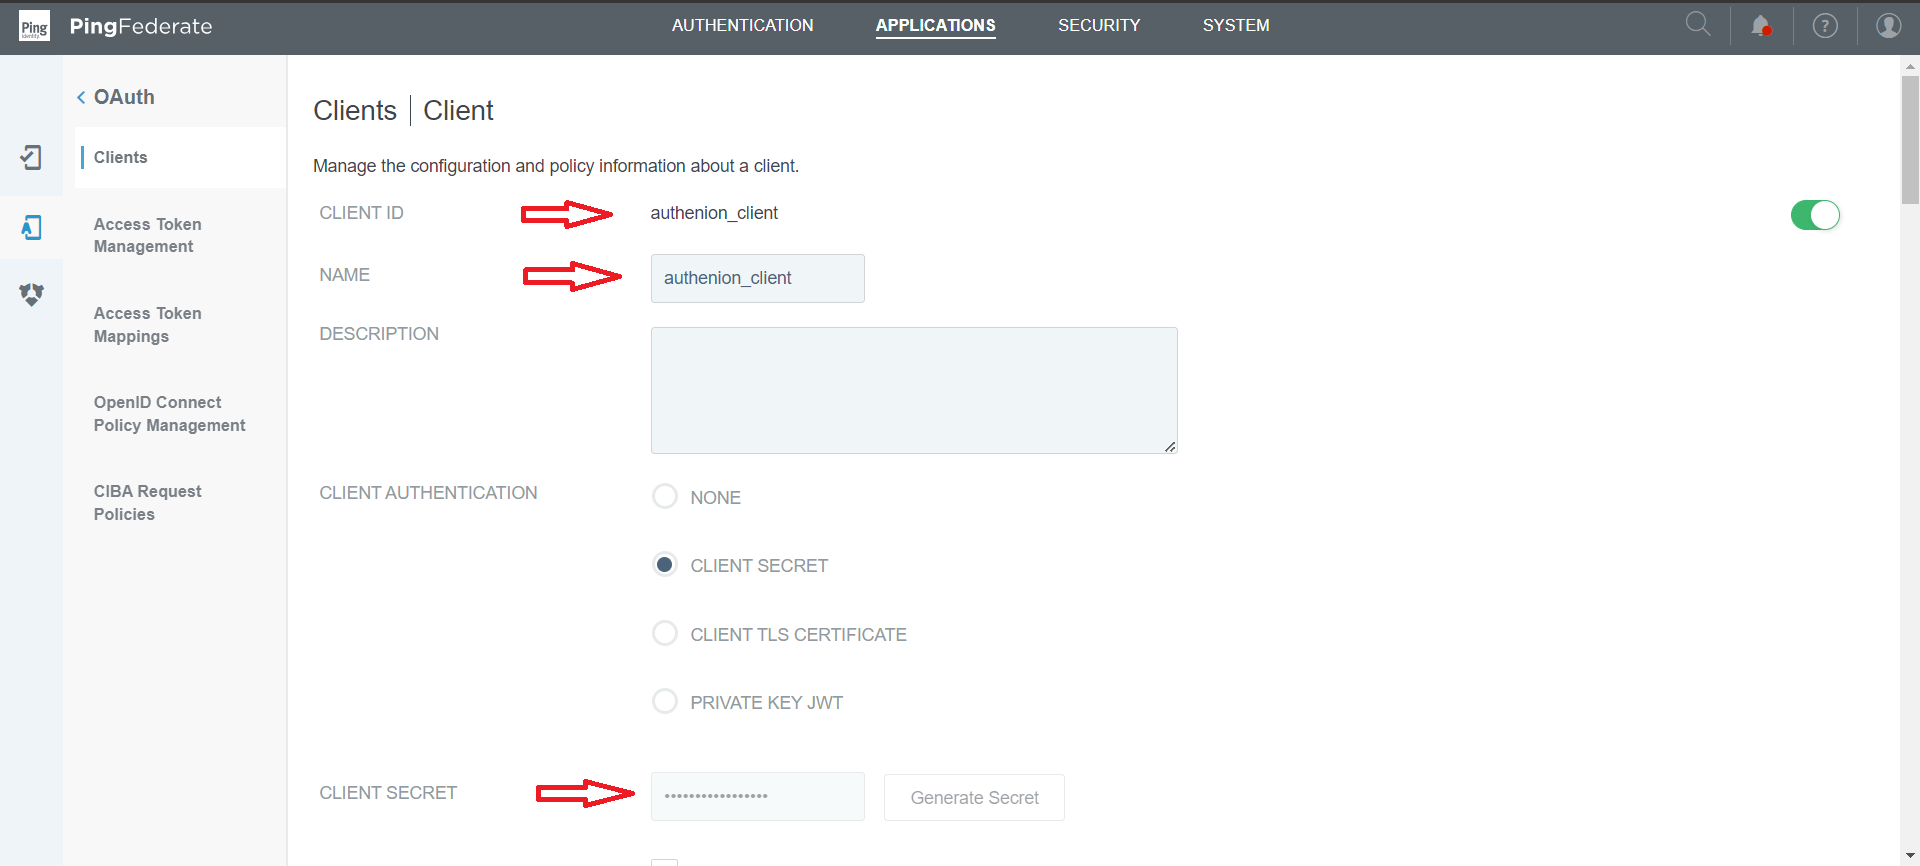
Create a new Client in PingFederate for Authenion.
Value to identify Client in PingFederate
Unique value to identify clients in PingFederate
A secret value known only to this Client and PingFederate
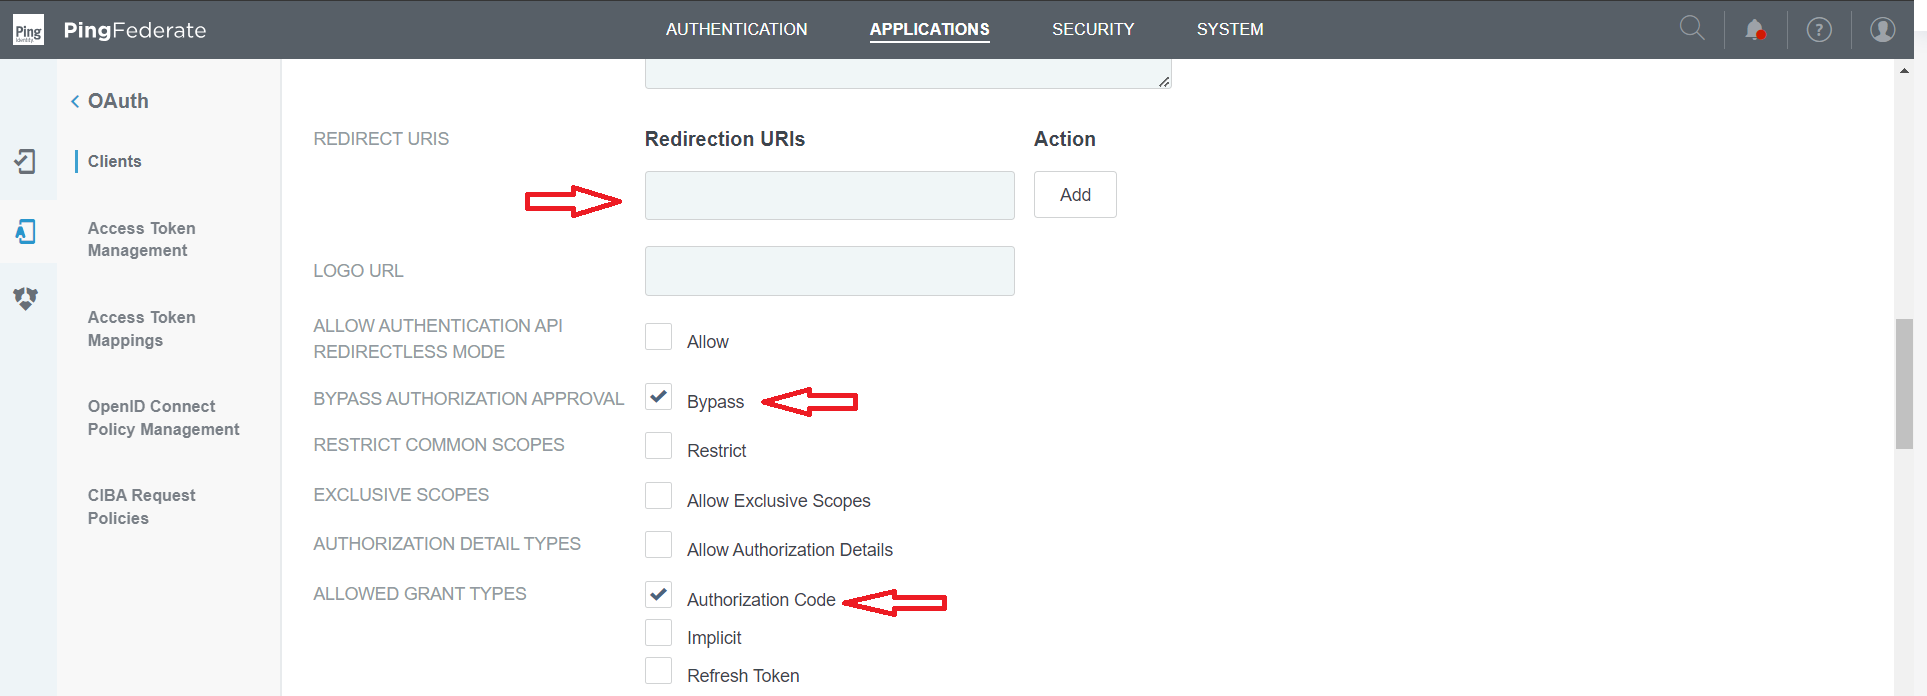
https://<authenion.example.com>:<port>/ssolibrary/oidc/callback
Enable checkbox for bypassing authorization consent screen
Enable Authorization Code checkbox
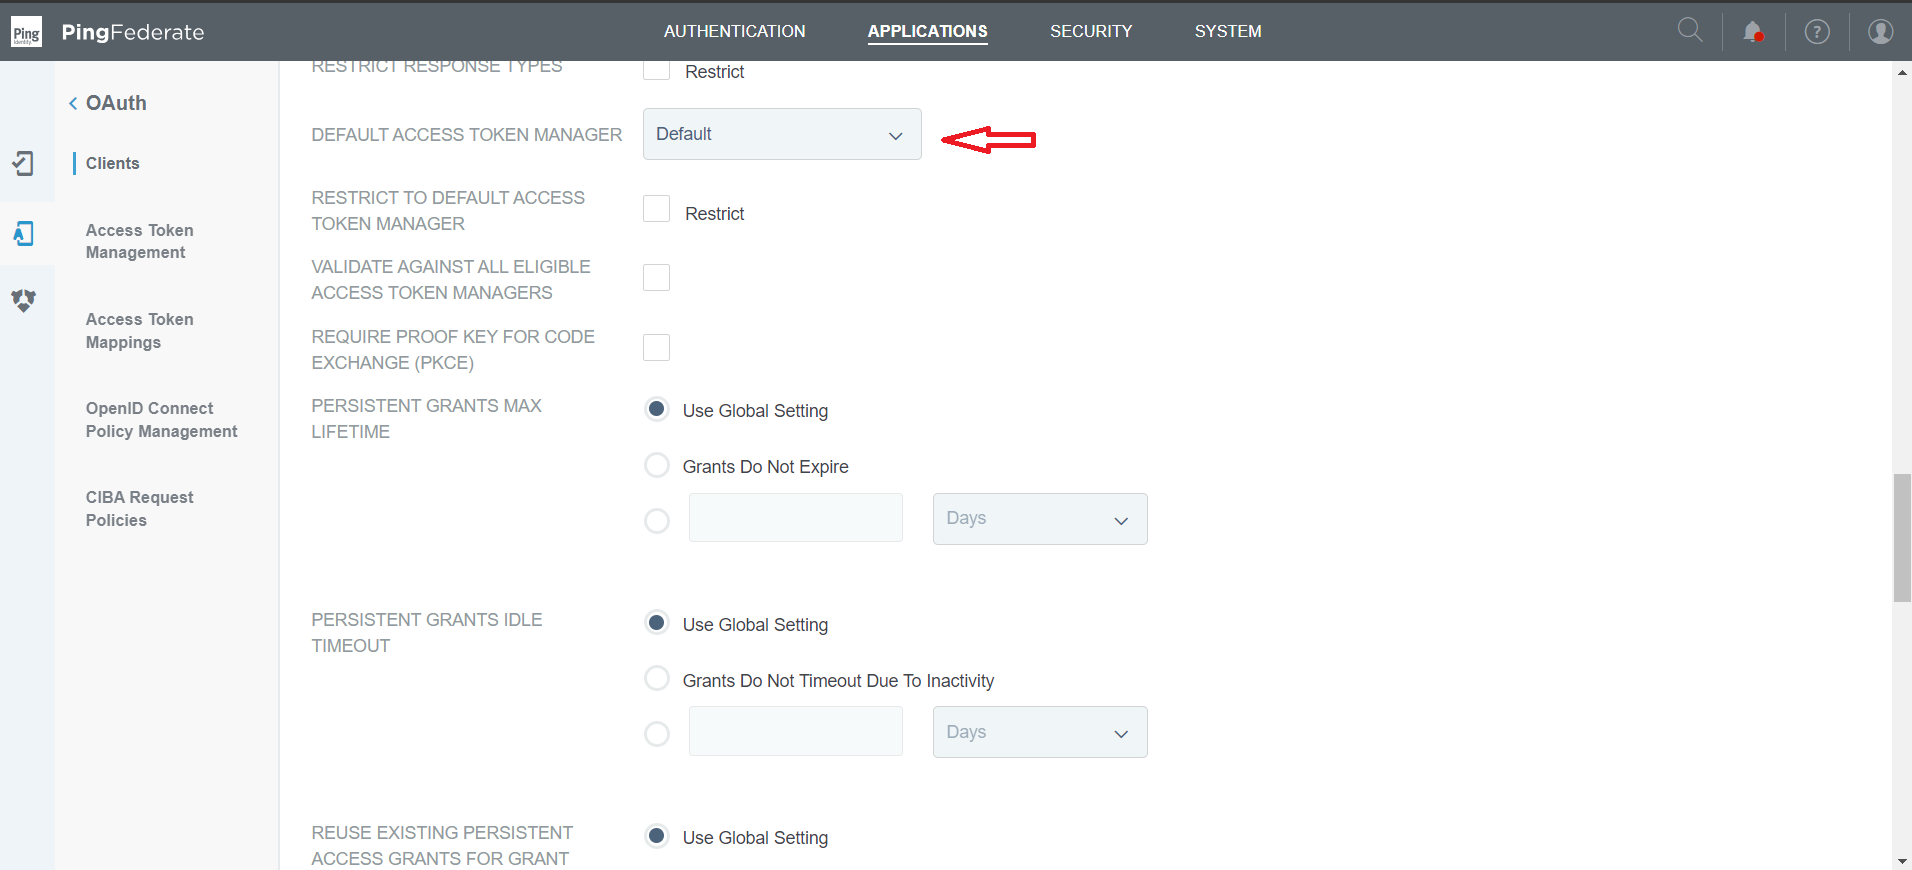
Select the access token to map with this client
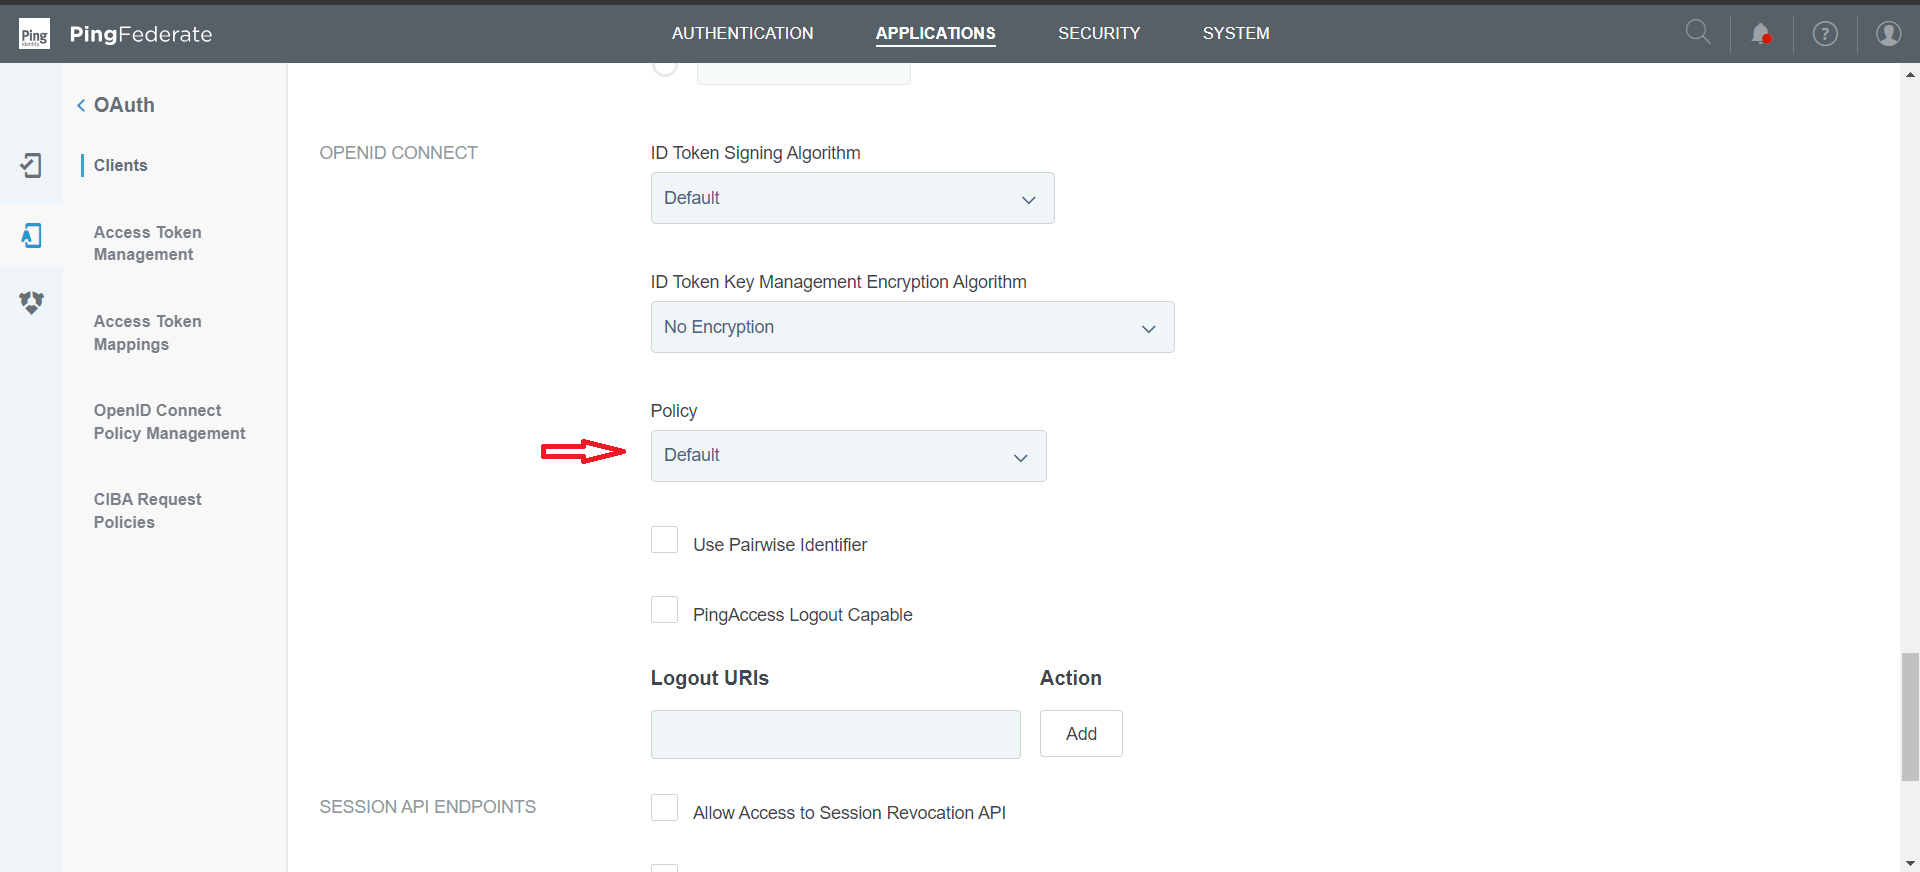
Select the OpenID Connect policy created earlier
Review the Client configurations and click Save.
Map an OpenID Connect Policy to this Client with the following information:
- username
Replicate the configurations if PingFederate is configured in a cluster.
| Configurations | Values |
|---|---|
|
Client Name |
|
|
Client ID |
|
|
Client Secret |
|
|
Redirect URIs |
|
|
Bypass Authorization Approval |
|
|
Allowed Grant types |
|
|
Default Access token manager |
|
|
OpenID Connect Policy |
|
For example:
In OpenID Connect Policy Management tab, create/modify the policy and add the attributes that need to be sent through id_token and userinfo endpoint.
Add the following attributes that need to be returned in the id_token and/or as claims through userinfo endpoint.
The above attributes can be mapped with their respective Scopes in the next page. For example, openid scope.
2. Microsoft Entra ID (formerly Azure Active Directory) as the Token Provider
Pre-requisites
Azure account with valid subscription.
App registration.
Client Secrets and Claim mappings.
Entra ID Configurations
The following will register Authenion as an OAuth/OIDC client application in Microsoft Entra ID (formerly Azure Active Directory) & establish a unidirectional trust relationship between Authenion and Microsoft identity platform. When the registration finishes, the Azure portal displays the Authenion application registration’s overview pane. You can find the Application ID which will also be used as the client_id when we connect Authenion & Entra ID through OAuth/OIDC.
App Registration
Login to the Azure portal.
In the Manage Microsoft Entra ID (formerly Azure Active Directory) section, click on view.
Click on +Add and then click on App Registration.
Give a display name for the app.
Select the tenant in which you want to register the Authenion application.
Add the following Authenion URI in the Redirect URI field. This is the location where Entra ID redirects the user’s request post authentication.
Click on Register.
Redirect URI: https://<authenion.example.com>/ssolibrary/oidc/callback
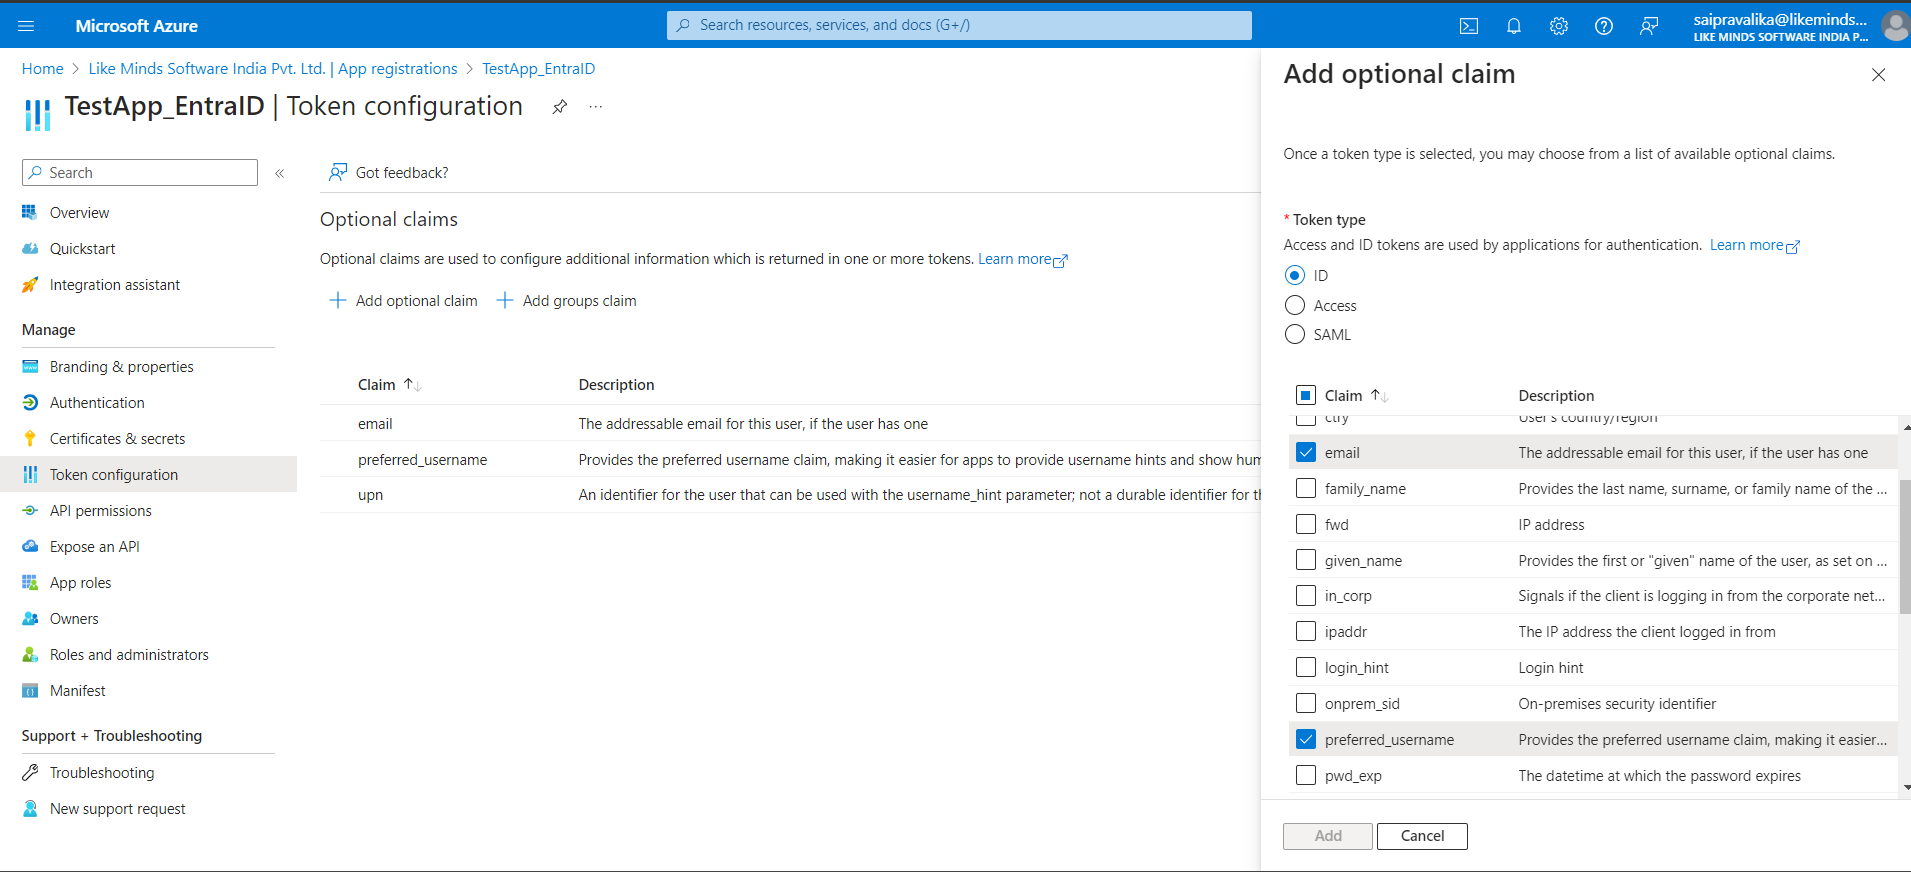
Token Configuration
From the side menu, click on Token configuration.
Click on + Add optional claim.
Select ID
Check the attributes - email, preferred_username.
Click on Add.
Note: In case a dialogue appears, check the box which says Microsoft graph.
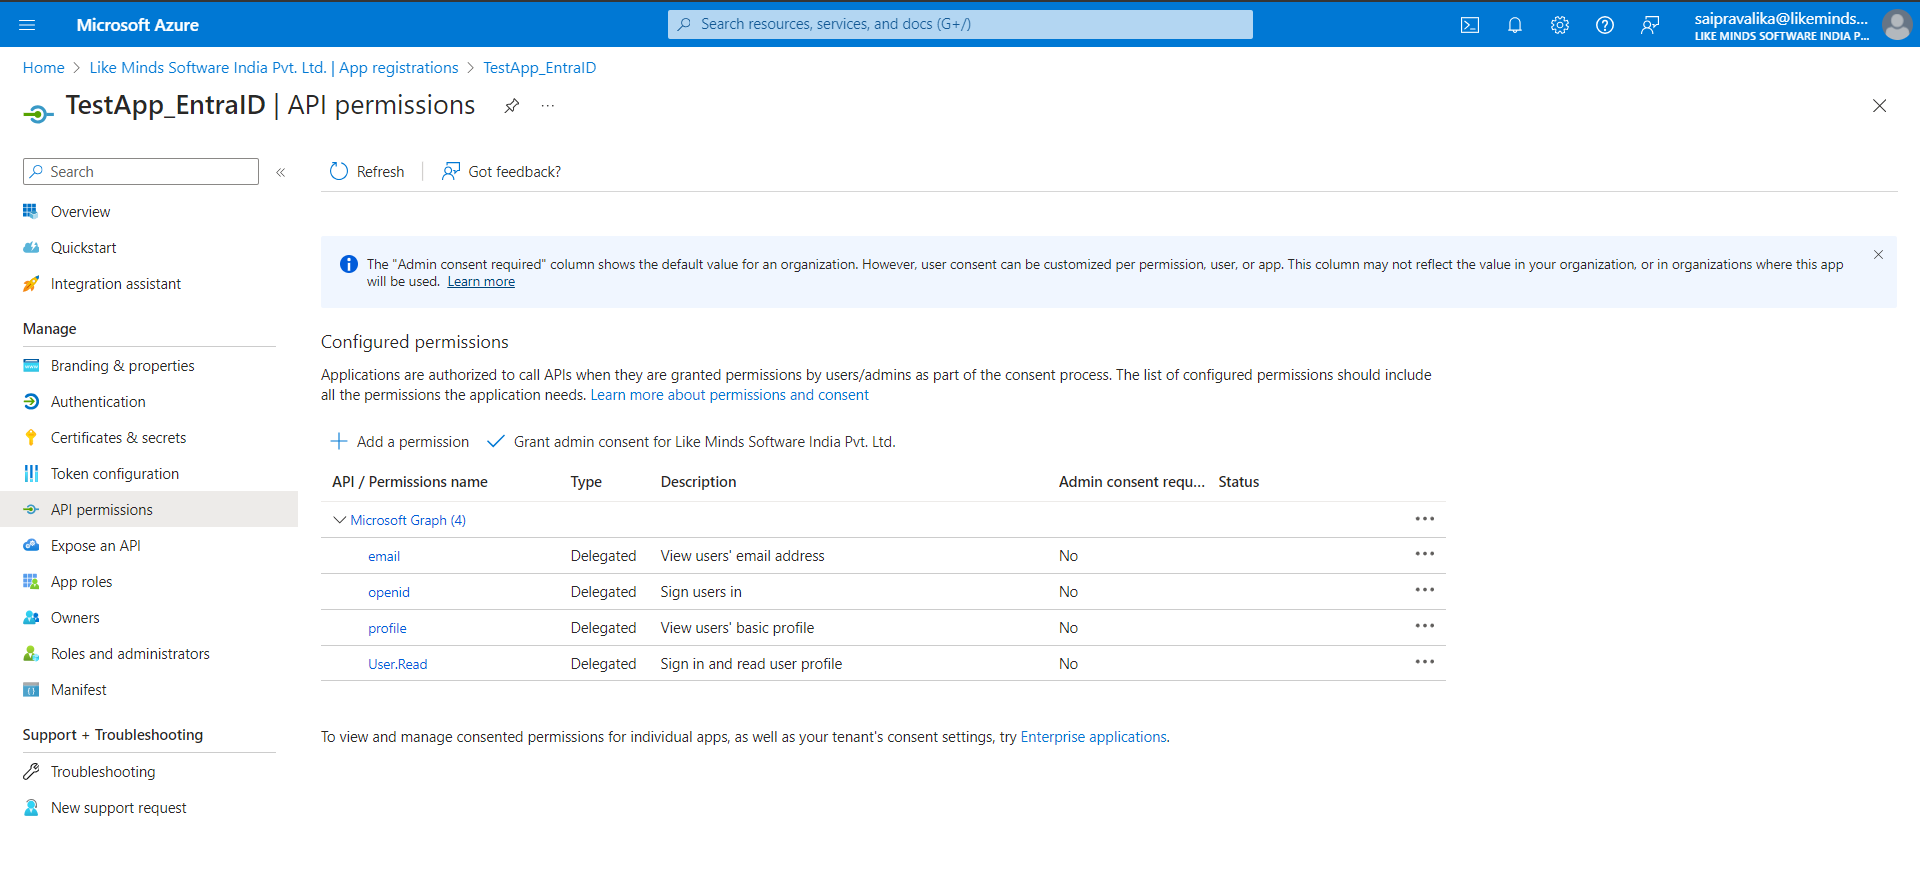
API Permissions
From the side menu, click on API permissions.
Click on + Add a permission.
Click on Microsoft Graph.
Click on delegated permissions.
Under "Openid permissions", check email, openid and profile.
Under "User", check "User.Read".
Click on Add permissions.
Certificates & Secrets
From the side menu, click on Certificates & secrets.
Click on Client secrets.
Click on + New client secret.
Enter some description for the client.
Set the expiry for the client.
Click on Add.
3. Keycloak as the Token Provider
Pre-requisites
Admin access to the Keycloak Administration Console.
Create Realm for your application (optional).
If using HTTPS, a valid SSL certificate is configured to secure communications (recommended for production).
OAuth / OIDC Configurations
This setup will manage the configurations related to the OAuth client.
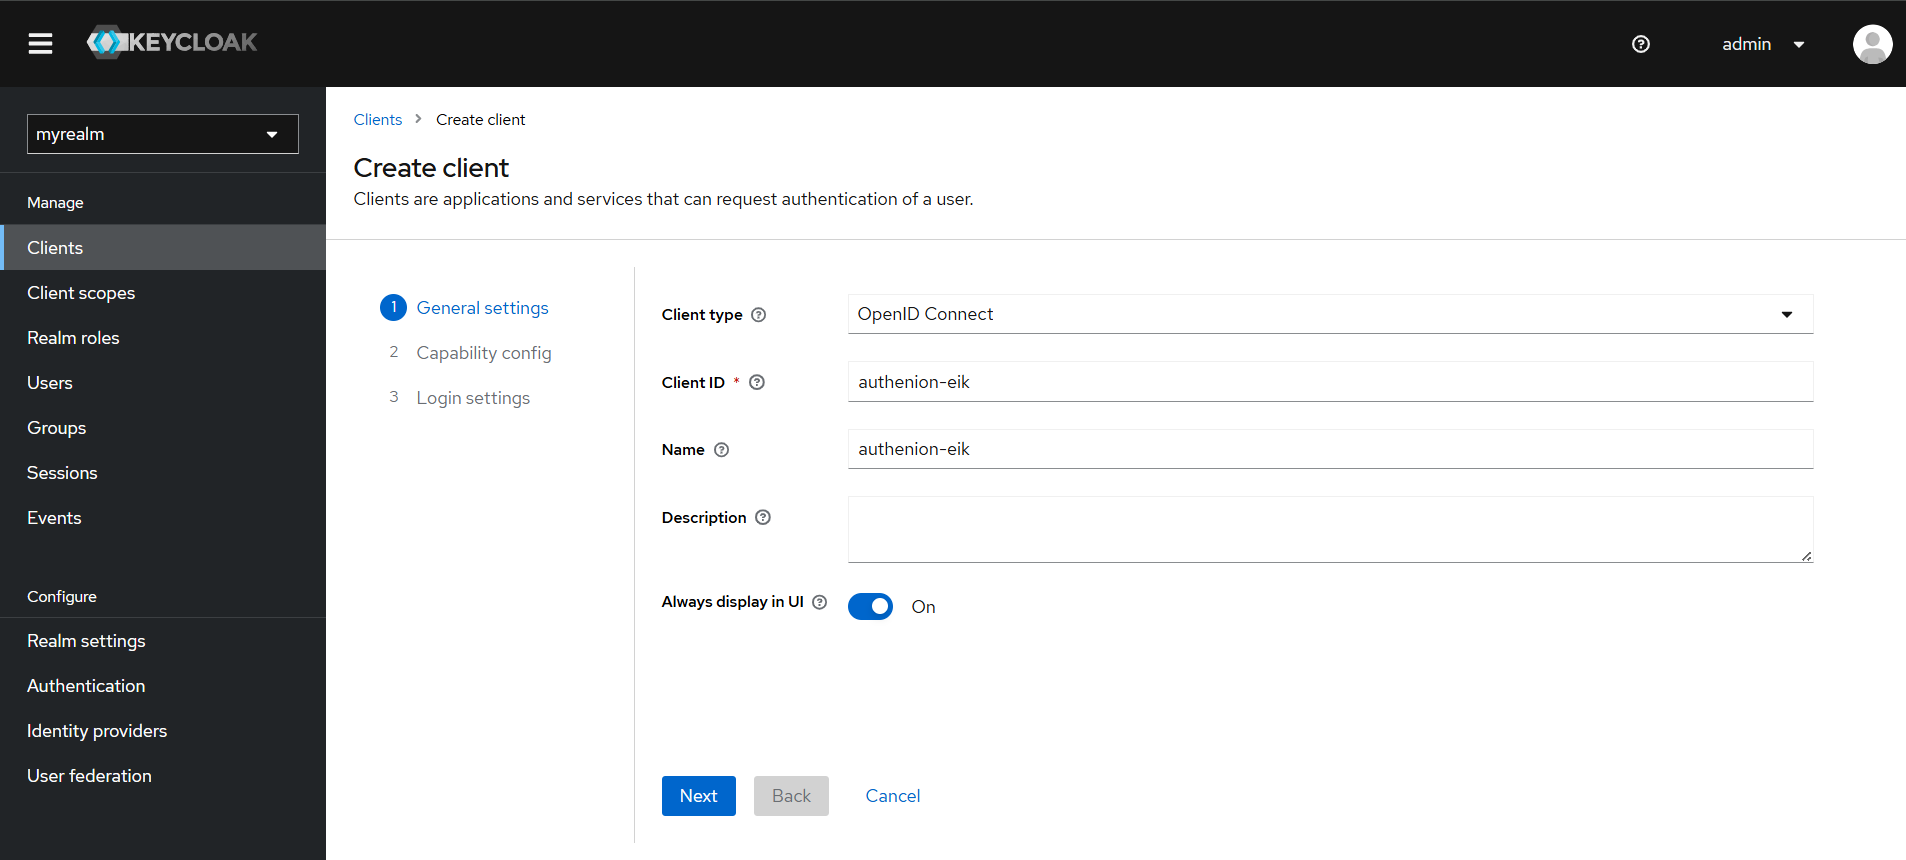
Create a new Client in Keycloak for Authenion-EIK.
Select OpenID Connect
Unique value to identify clients in keycloak
Value to identify Client in Keycloak
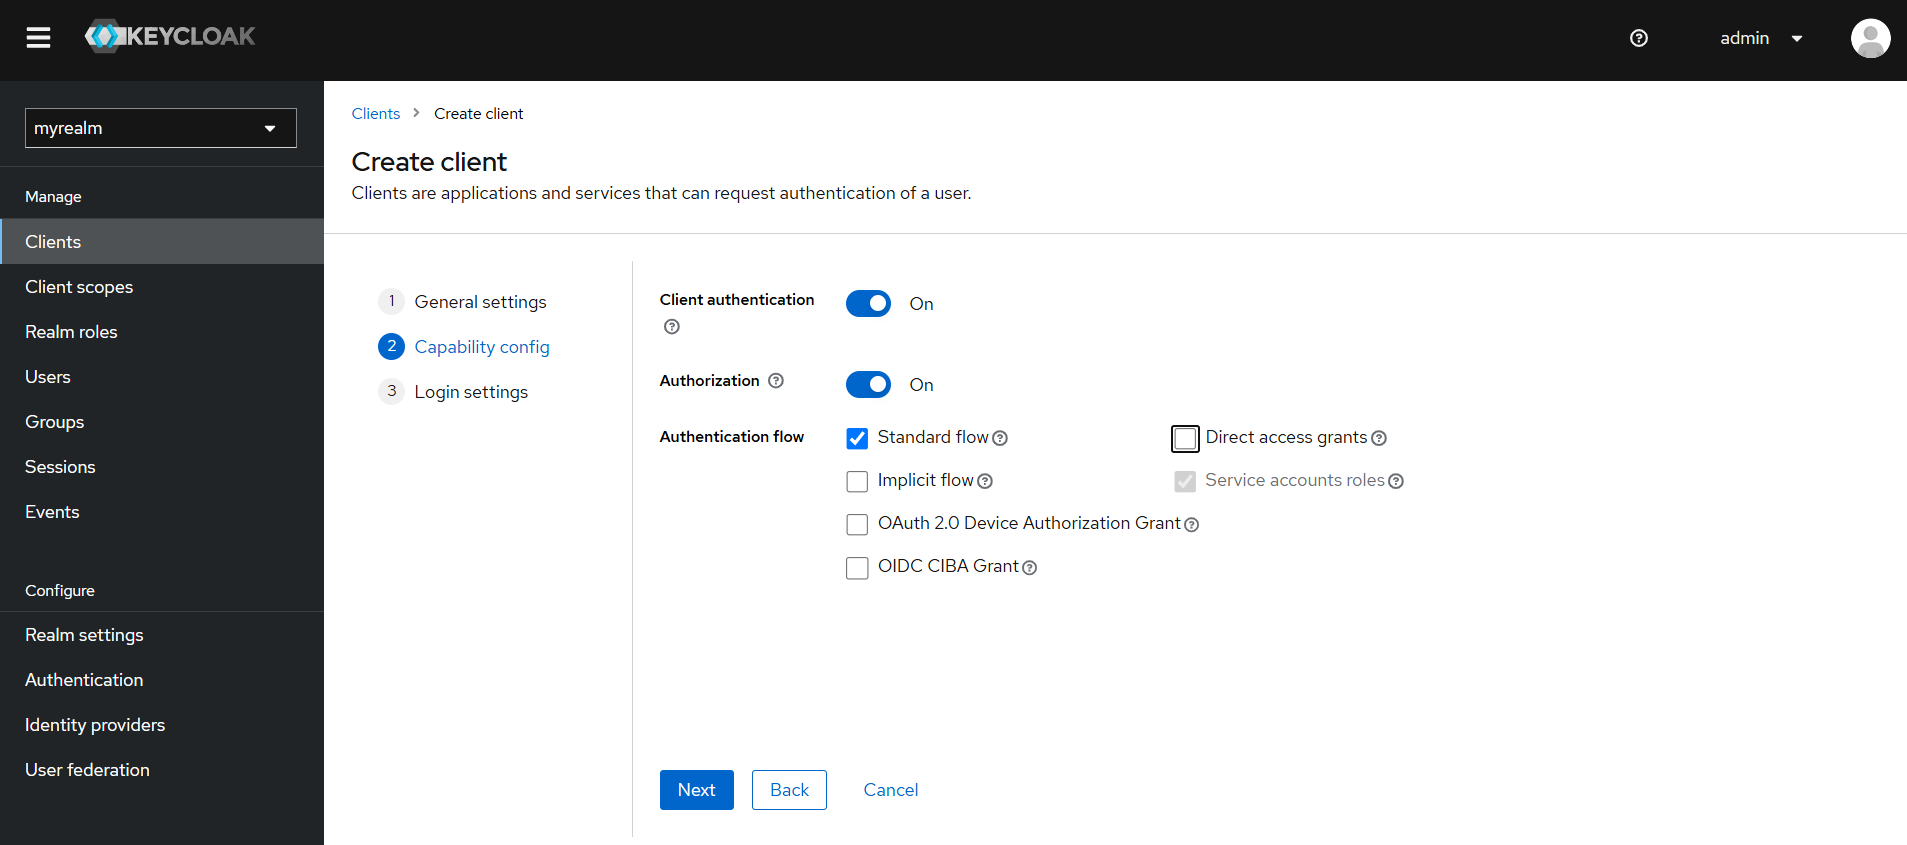
Enable the toggle to client as a confidential client
Enable/Disable fine-grained authorization support for a client
Select Standard Flow (Authorization Code Grant)
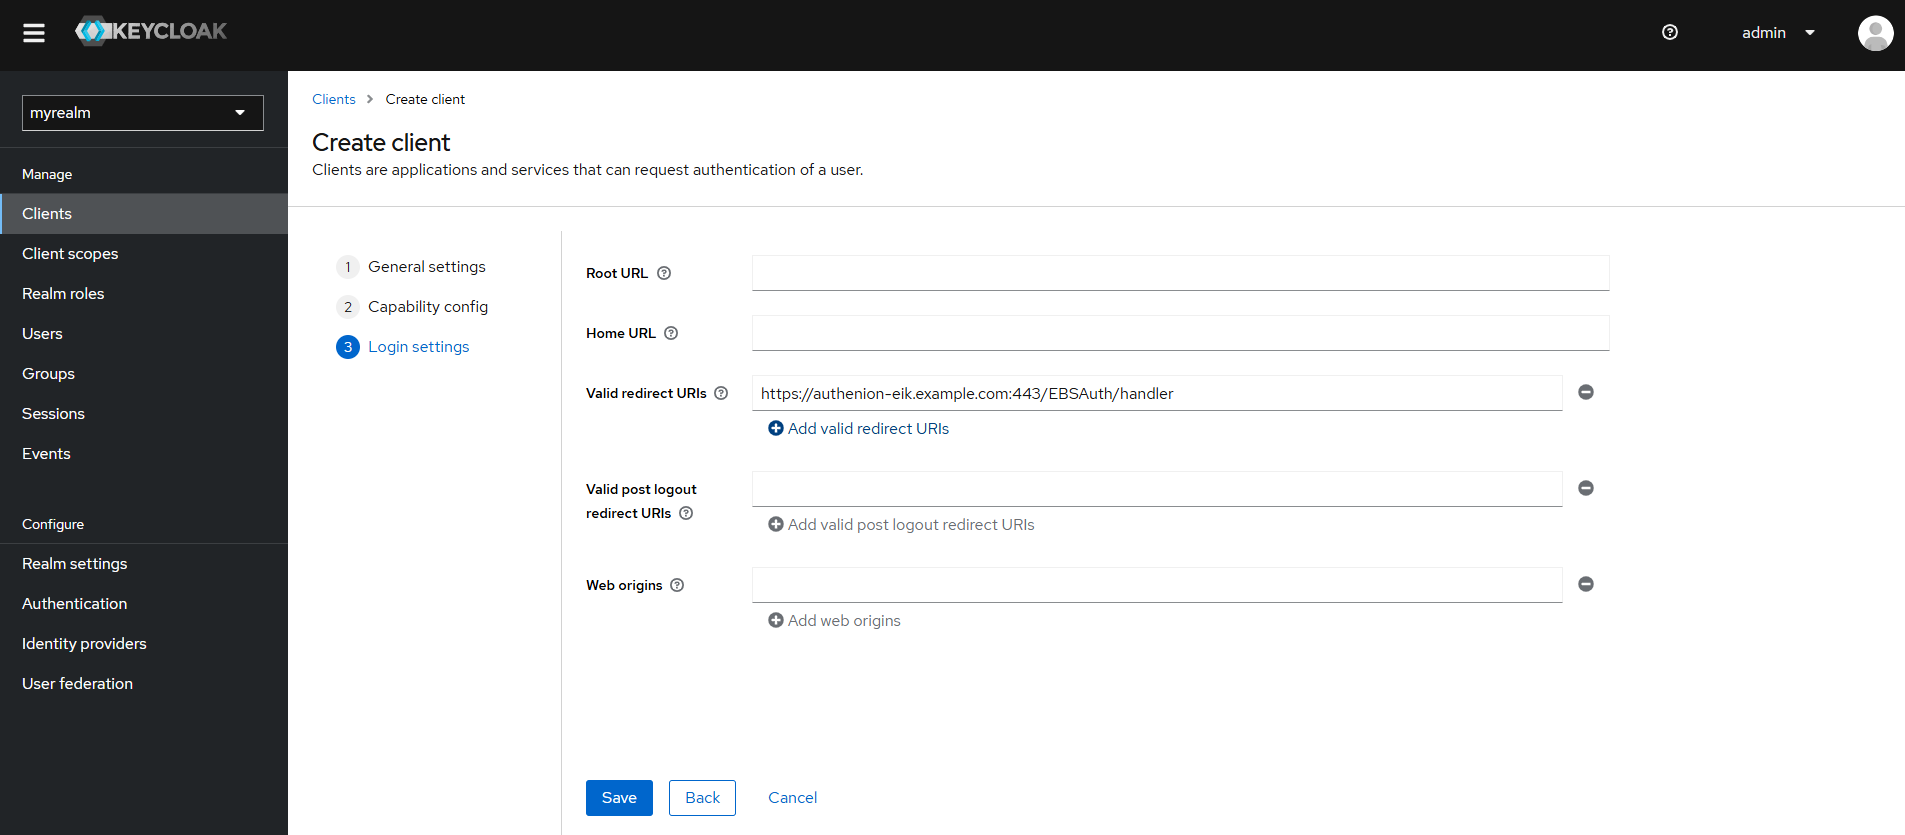
https://<hostname>:<port>/EBSAuth/handler
Review the Client configurations and click Save.
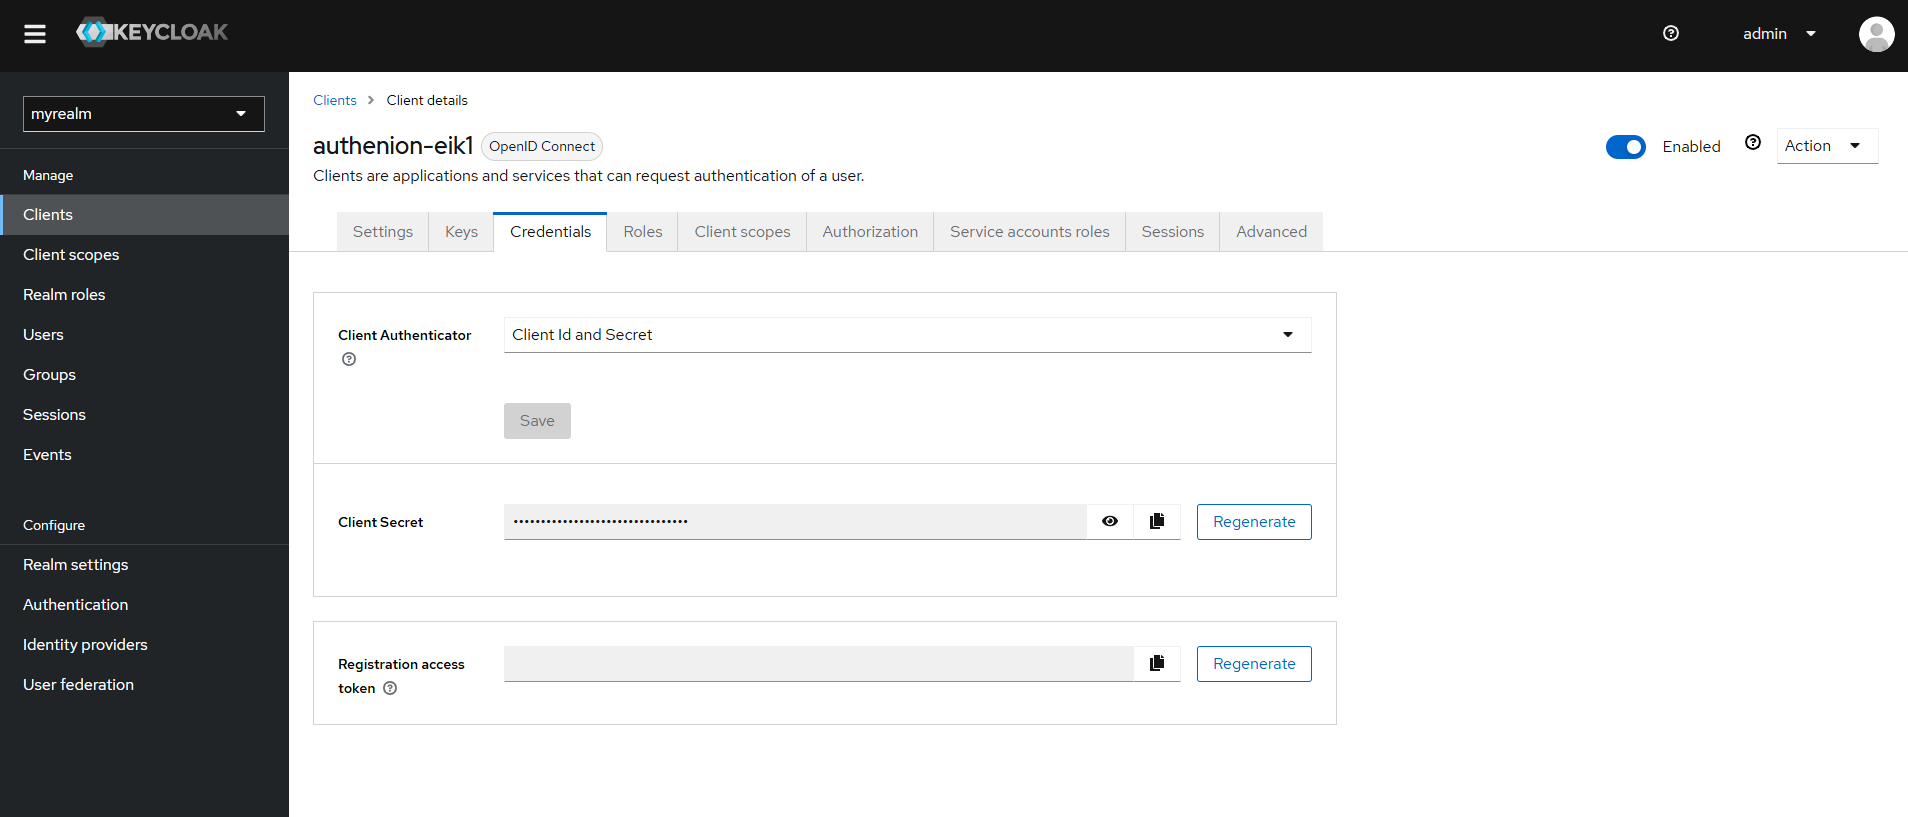
After saving the client configuration, Keycloak will generate a Client ID and a Client Secret.
Navigate to the Credentials tab to obtain the Client Secret, which is used for secure backend communication with the OIDC application in Keycloak.
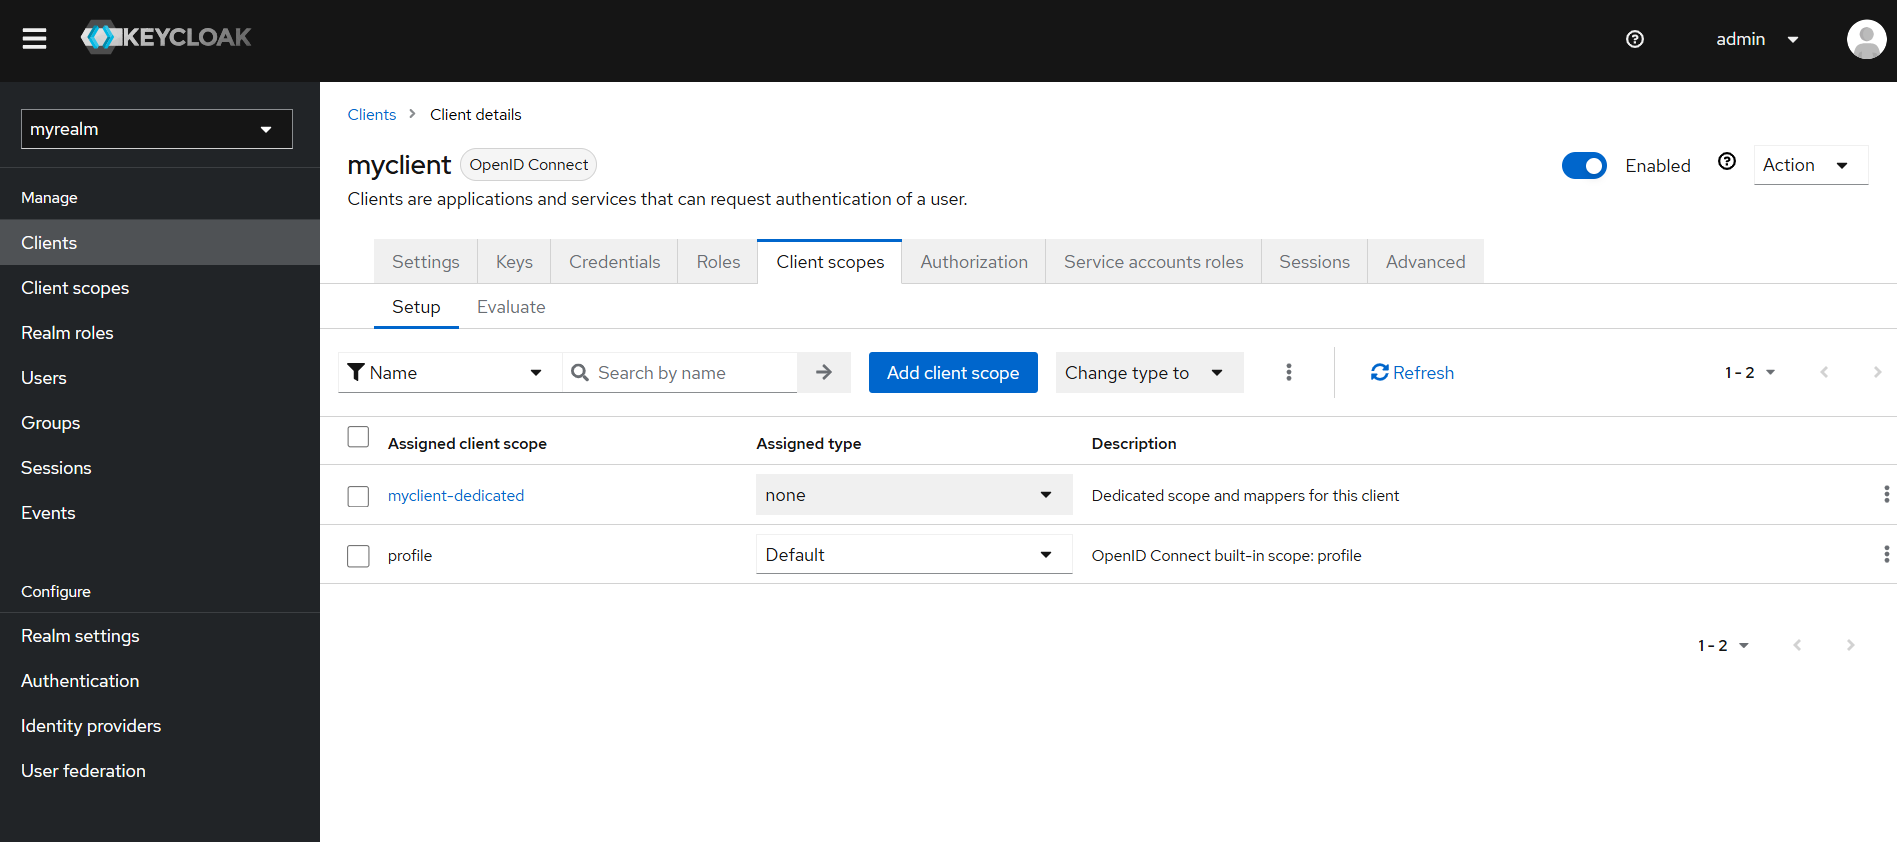
In the Keycloak Admin Console, go to Client Scopes. Either select an existing scope (e.g., profile) or create a new custom scope if needed.
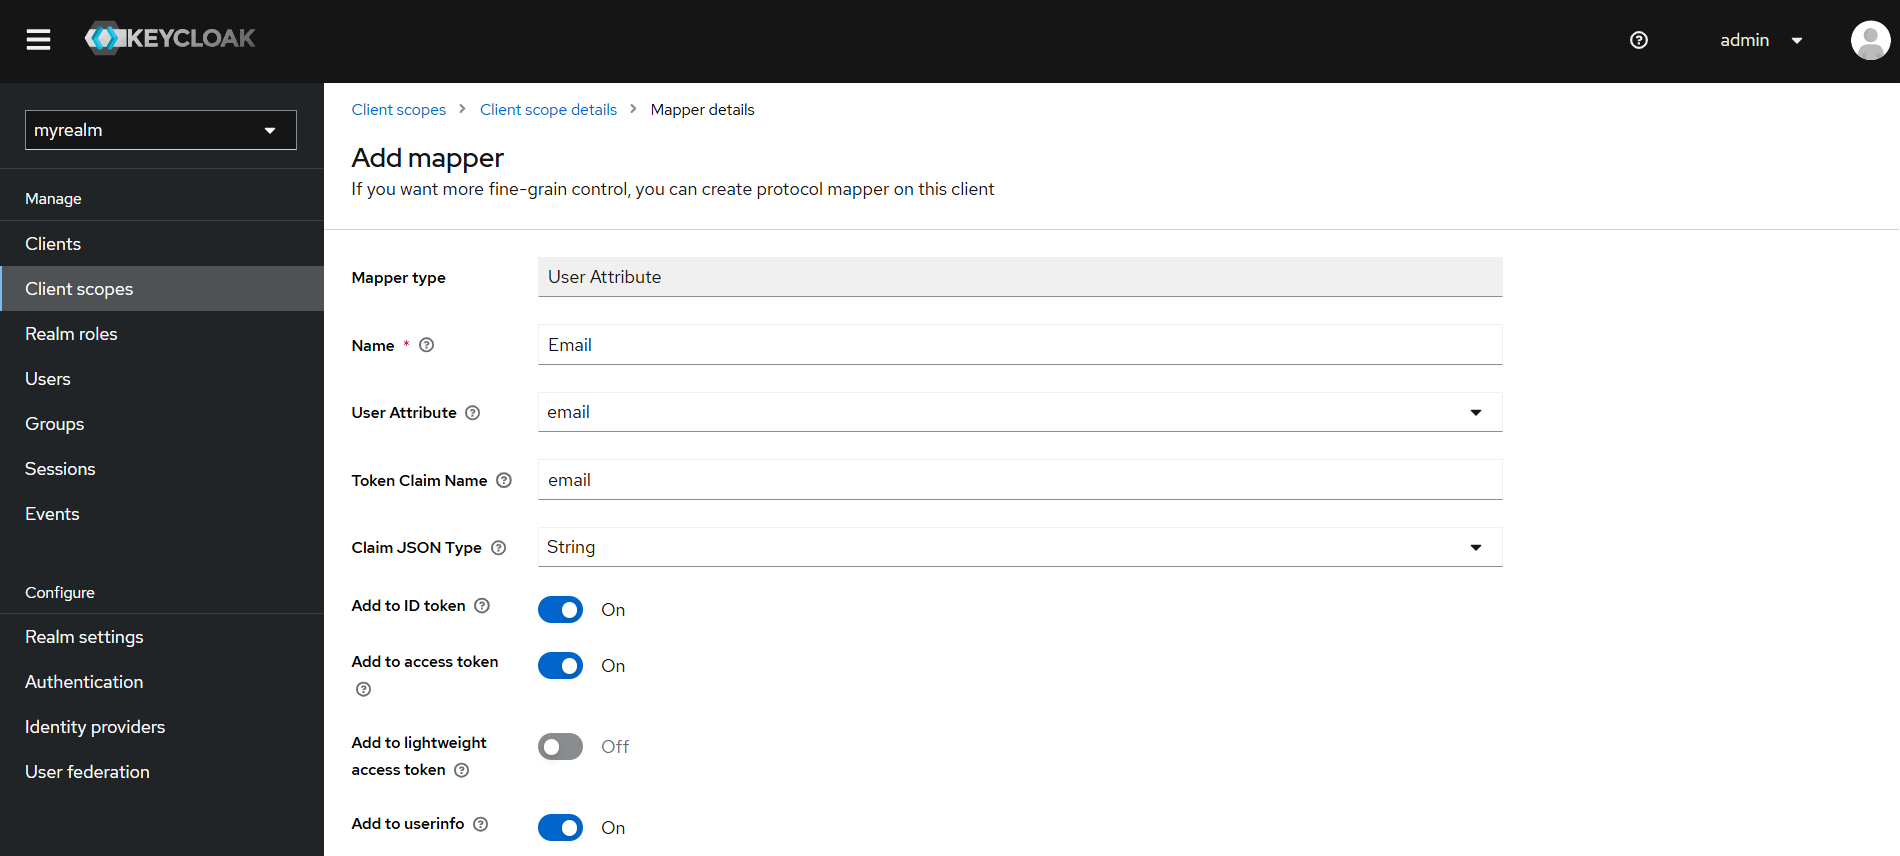
Under the selected Client Scope, open the Mappers tab and add a new mapper for each attribute.
- Set Mapper Type to User Attribute
- Set Token Claim Name to email
- Enable inclusion in ID token, Access token, and User Info (optional)
- Go to Clients, select your client, and assign the scope under either Default Client Scopes or Optional Client Scopes.
| Configurations | Values |
|---|---|
|
Client Type |
|
|
Client ID |
|
|
Name |
|
|
Client authentication |
|
|
Authorization |
|
|
Authentication flow |
|
|
Valid redirect URIs |
|
Mapping User Attributes to Tokens in Keycloak
Example – Add Email Attribute
Application Integration with Authenion
Once you have connected Authenion with your Identity Provider, you can integrate end-user's applications into Authenion for Single Sign-On (SSO). This configuration is the 'last mile integration' mechanism.
Authenion supports a large number of proprietary or third-party applications for Single Sign-On. Following are the list of applications certified to work with Authenion:
Oracle E-Business Suite
Oracle E-Business Suite SSO made easy with Authenion
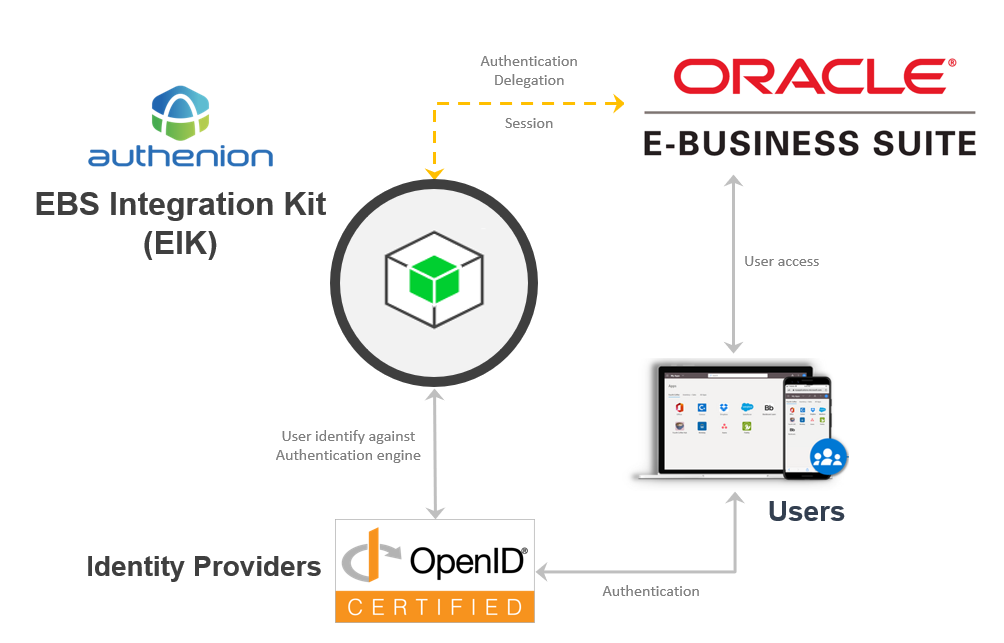
Oracle E-Business Suite (EBS) application is a special usecase for Single Sign-On (SSO). The Single Sign-On approach for Oracle EBS differ from other enterprise applications. Authenion enables SSO to Oracle EBS thorugh its plugin called 'EBS Integration Kit (EIK)'. This approach is secure & seamless and follows Oracle recommended changes on the application side.
Architecture
Configuration Steps
The following sections describes the configuration steps required for Authenion-EIK setup and Oracle EBS setup for Single Sign-On.
1. Pre-requisites
Install the recommended Java version on the server. Verify that the operating system version and all other System Requirements are met.
Identity Provider with OIDC configuration and Endpoints
Oracle EBS environment
Note: The user-facing endpoint for EIK must be on the same domain as the EBS application(e.g., ebs.company.com and eik.company.com).
2. SSO Integration Workflow
| Tasks | Description |
|---|---|
|
File System Preparation |
Create a folder with user defined name Eg;(EBSAuth) its a Config path for Authenion-EIK implementation. |
|
Generate DBC file & DBConfig.properties |
DBC file can be generated in EBS Server and dbConfig.properties file which has the parameter to establish connection with EBS Database. |
|
Identity Provider Configurations |
Register an OAuth Client with Authorization code flow in your Identity Provider for Authenion-EIK. Add user attributes such as username, email, etc., into the ID_TOKEN or Userinfo claims (The claim value you add here should match the authentication attribute in Oracle EBS.) |
|
Generate EIKAuth.config file |
EIKAuth.config file can be generated in Authenion Admin console with the details of the Identity Provider configured in the above section |
|
Deployment of the EBS Integration Kit (EIK) |
Authenion-EIK plugin should be deployed in the server with necessary config files with it |
|
Configure EBS System Profile parameters |
Oracle EBS system profiles for enabling Single Sign-On. These changes are done as per Oracle recommended configuration |
Database User Creation
Create an application user in the Oracle E-Business suite application. Set the Username value as EIKUSER and assign 'UMX|APPS_SCHEMA_CONNECT' role to this user account.
Using DBC file and dbConfig.properties
In this section we can generate DBC file and updating DB params in properties file. These files helps to establish a connection between Authenion-EIK and EBS Database server.
For generting DBC file in your EBS server, refer the link to create DBC file Link to create DBC file
Update the below parameters in dbConfig.parameters, Provided sample values, you can change based on your Database
Get DBC file and dbConfig.properties files and place it in above created Config path(Eg: /home/user/EBSAuth/)
Below two parameter settings are Mandatory
| DB Parameters | Values |
|---|---|
|
eik.username |
EIKUSER(EIK Username with Schema Connect Role which was created earlier) |
|
eik.password |
*******(EIK Username's password) |
Below parameter settings are optional
| DB Parameters | Values |
|---|---|
|
db.maxConnections |
50(Maximum number of DB Connections in Pool) |
|
db.minConnections |
10(Minimum number of DB Connections in Pool) |
|
db.initialConnections |
10(Db Connection pool size to start with) |
|
db.connectionTimeout |
30(Db Connection pool timeout in seconds) |
|
db.validationInterval |
30(timeInterval (in seconds) between checks to enforce the timeout properties) |
|
db.connectionFactory |
oracle.jdbc.pool.OracleDataSource(Jdbc connection factory name defaults to oracle.jdbc.pool.OracleDataSource) |
Generate EIKAuth.config File
The EIKAuth.config file helps to establish connection between Authenion and the Identity Provider.
The EIKAuth.config file can be generated from the Authenion Admin console. You can access the Authenion Admin console through https://launch.authenion.com (or) on-premises.
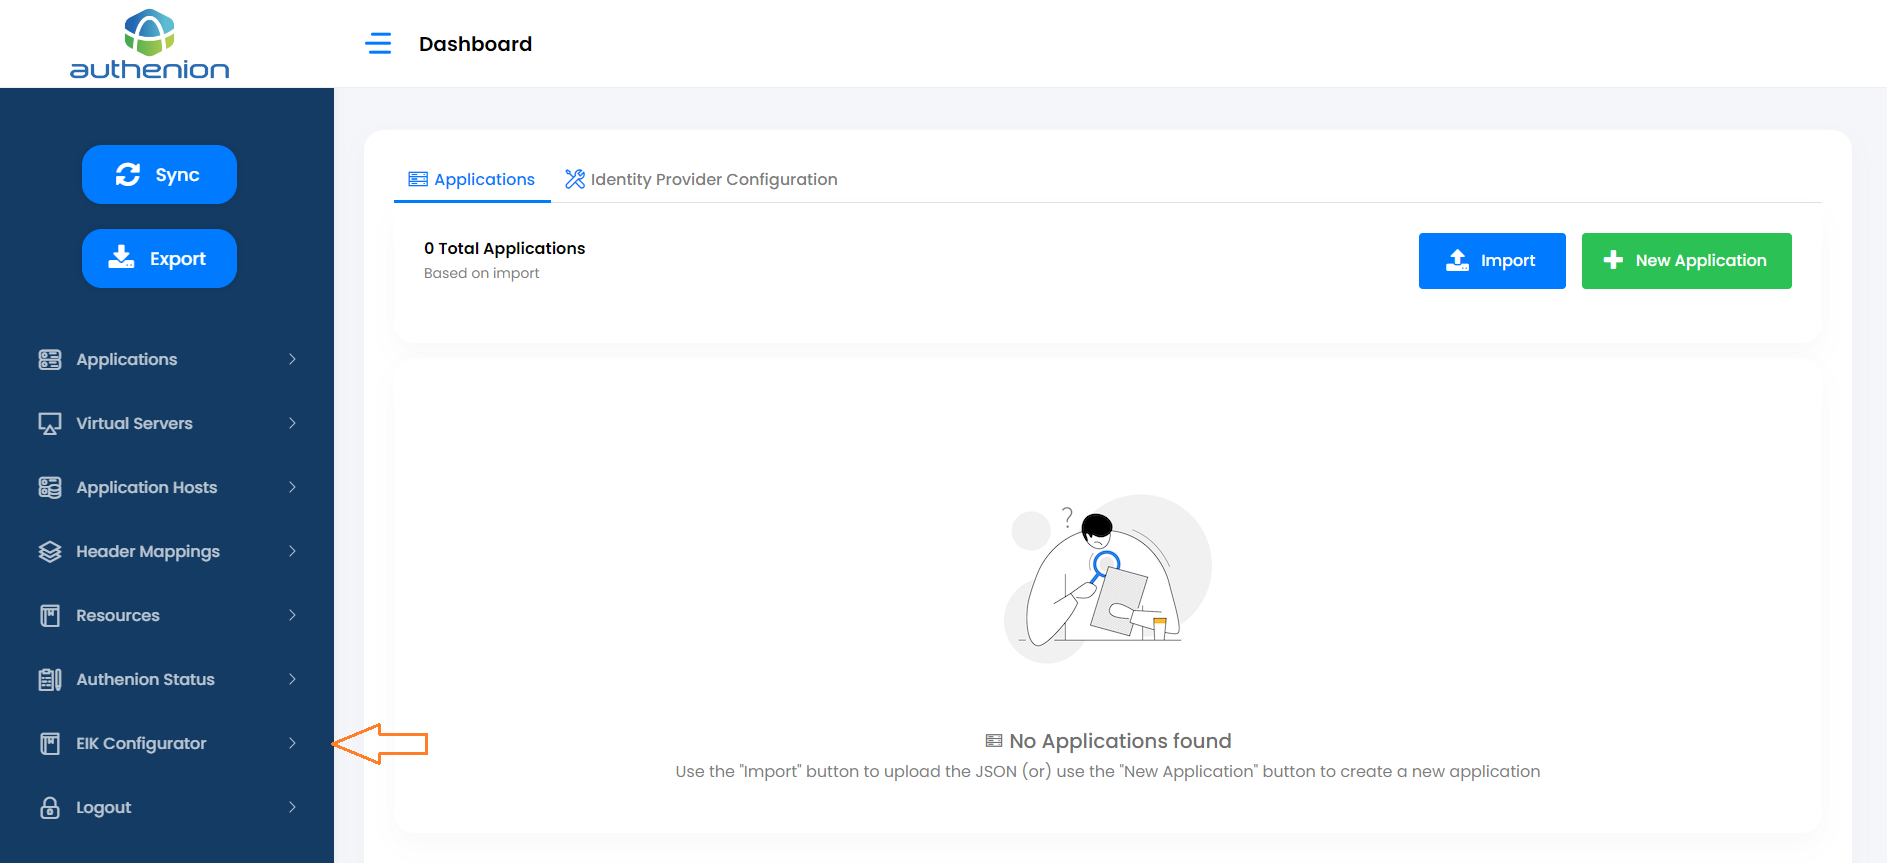
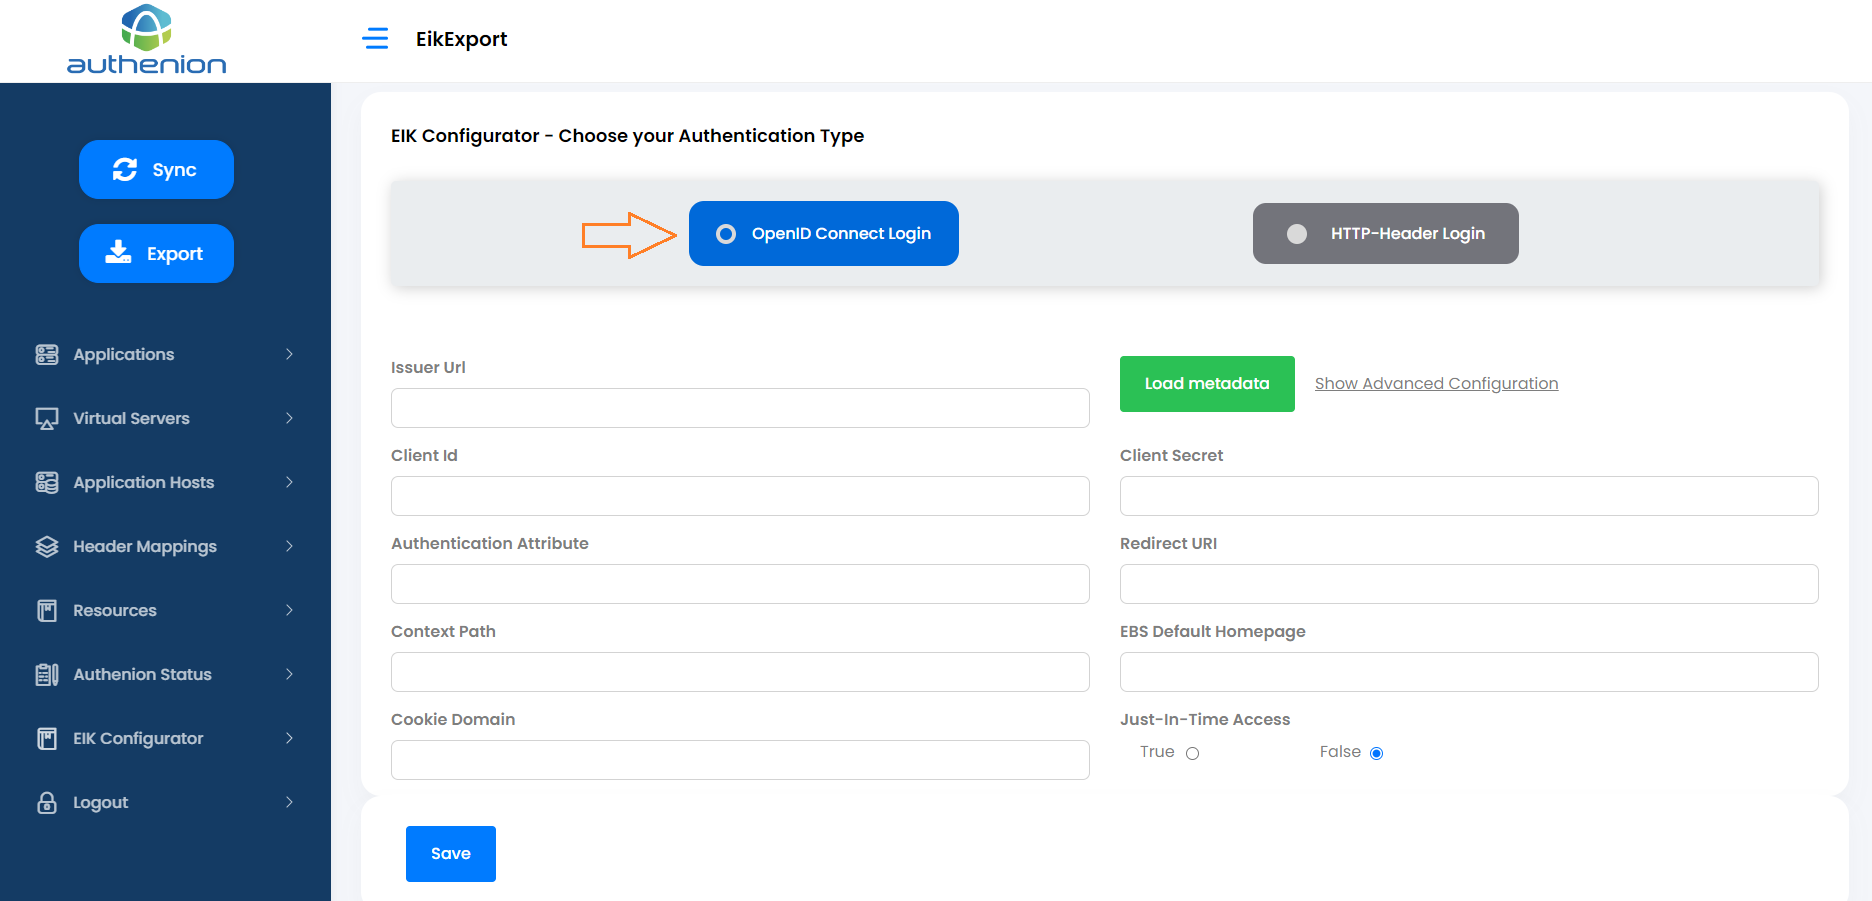
Login to the Authenion Admin console.
On the Dashboard page, click 'EIK Configurator' on the Sidebar menu.
Select the Authentication type as 'OpenID Connect Login'.
In the 'Issuer Url' field, enter your Identity Provider's Issuer value and click 'Load metadata'. This will automatically load the required Authorization server endpoints.
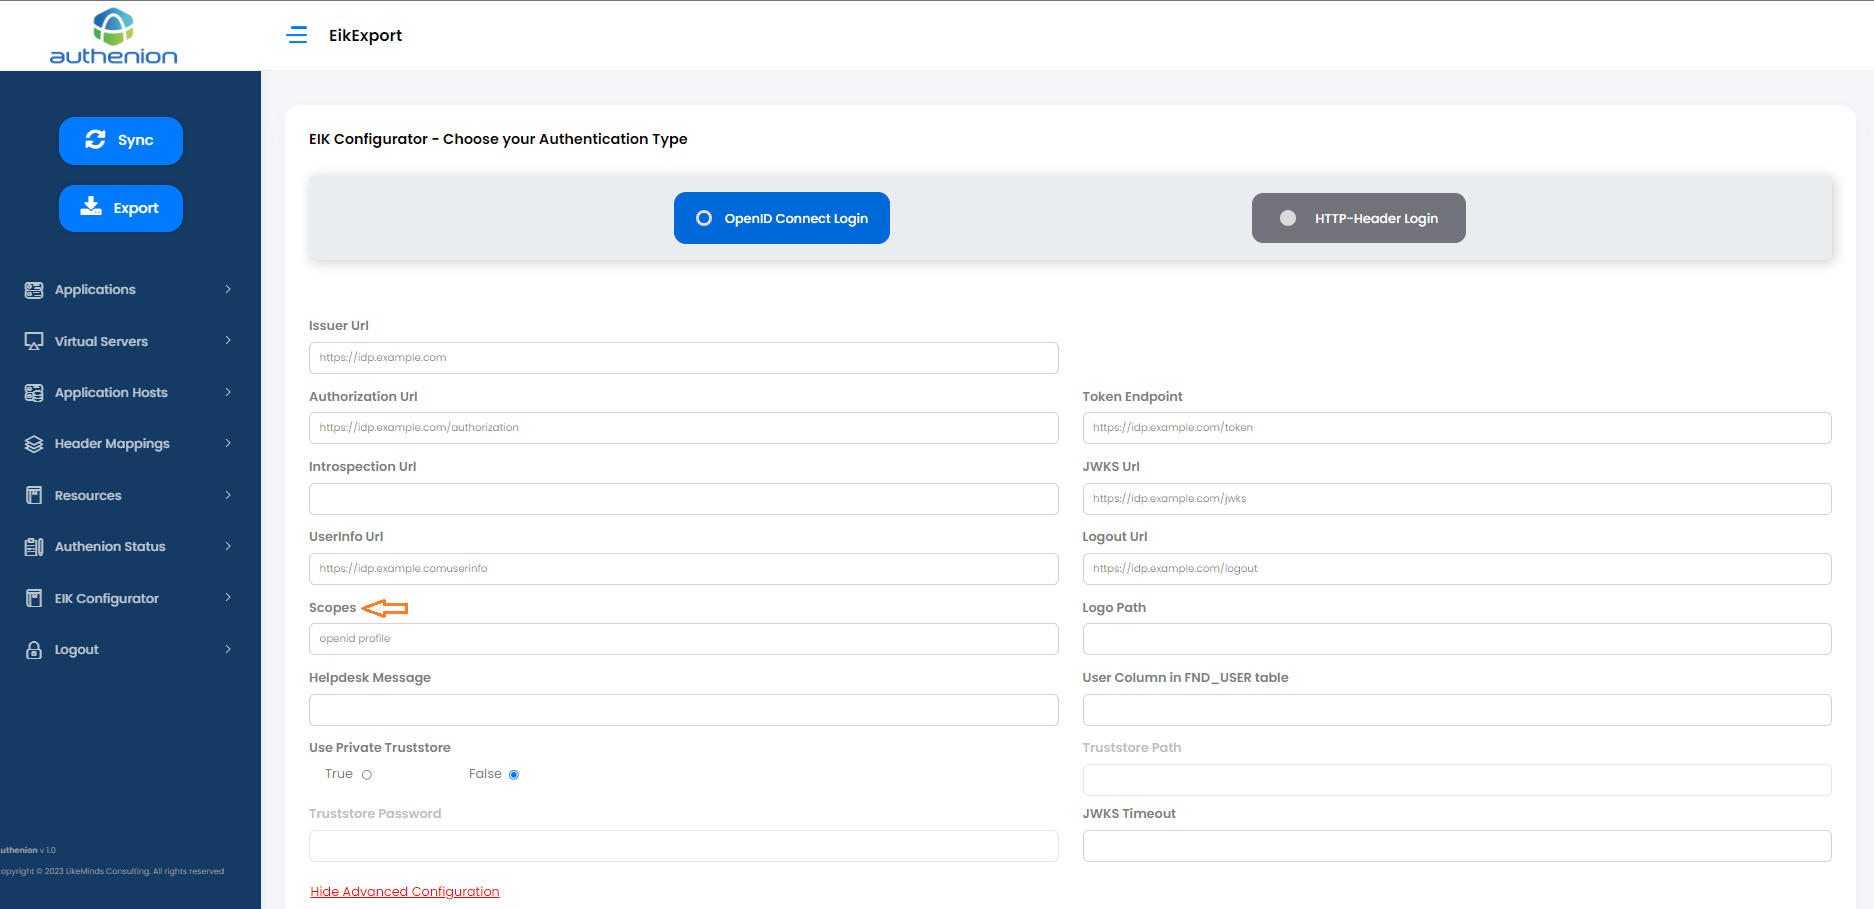
Click 'Show Advanced Configuration' next to the 'Load metadata' button.
Enter the value for 'Scopes' field. For example, 'openid'. This field supports multiple values entered with a space as mentioned in the screenshot below.
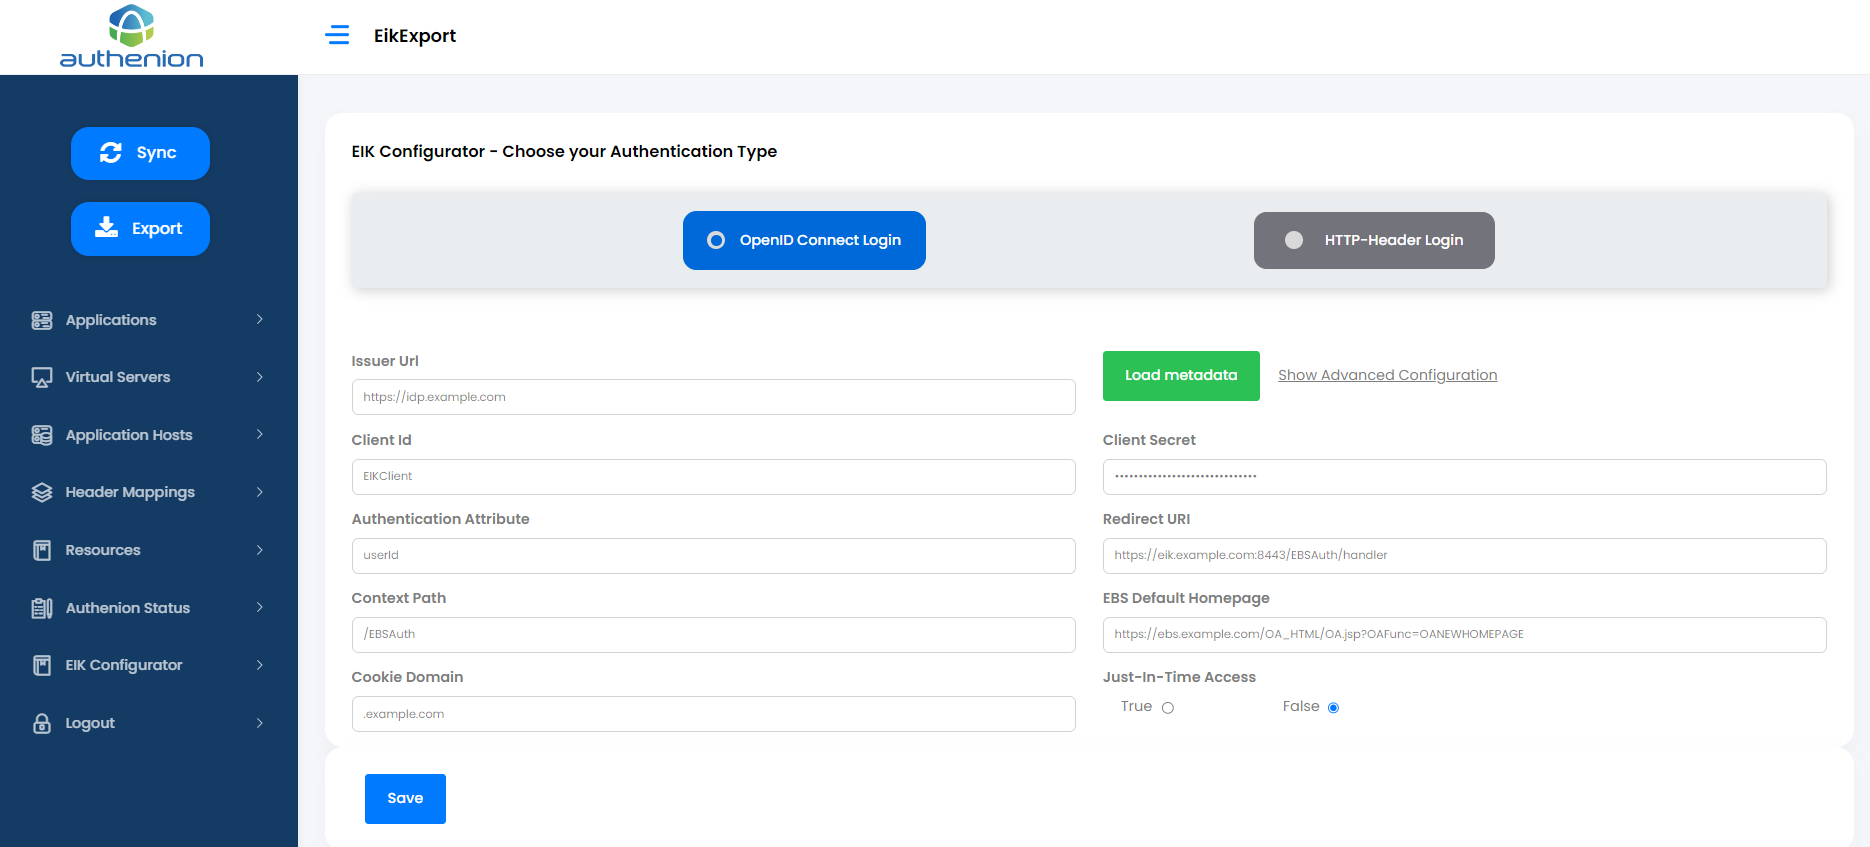
Enter the details for rest of the fields as mentioned below in the table.
After entering the above values, click the 'Save' button. This will download a file named 'EIKAuth.config'.
Copy the downloaded 'EIKAuth.config' file to a Config path(/home/user/EBSAuth)in the server. This file will be used in the EIK deployment section later.

| Configurations | Values |
|---|---|
|
Client ID |
Unique value to identify Authenion-EIK in your Authorization server. For example, EIKClient |
|
Client Secret |
A secret value known only to this Authenion-EIK client and your Authorization server. |
|
Authentication Attribute |
User attribute name (OAuth/OIDC claim) that should be returned from your Identity Provider. For example, userId |
|
Redirect URI |
Callback URL for Authenion-EIK. For example, https://eik.example.com:8842/EBSAuth/handler |
|
Context Path |
Authenion-EIK plugin's deployment filename. The plugin filename is 'authenion-eik.jar' /EBSAuth |
|
EBS Default Homepage |
Oracle E-Business application homepage URL. The example format is, https://ebs.example.com/OA_HTML/OA.jsp?OAFunc=OANEWHOMEPAGE |
|
Cookie Domain |
Domain value of the Oracle EBS application. For example, .example.com |
|
Just-In-Time Access |
If you want EIK to perform user provisioning (Just-In-Time) to your Oracle EBS application. Default value is, false |
|
User Column in FND_USER table(Optional) |
Column name in the FND_USER table for the User record validation Eg: email |
This is one of the additional feature which is Just in Time provisioning externally and it allows us to create the provisioner according to the requirement.
The User details for the JIT Provisioning can be obtained through OIDC claims.
In OIDC provider, add the appropriate scope and map the user attributes to the scope and make it available as part of the UserInfo claims.
Create a folder named 'plugins' under Config path (/home/user/EBSAuth) and place the Provisioning JAR file in the ‘/plugins’ directory inside EIK and restart the application server to take effect.
Deploy Authenion-EIK
This section guides you through the deployment steps for Authenion - EBS Integration Kit.
Login to the Like Minds Support Portal and download the required binaries to complete the EIK deployment.
The following are the list of files that will be downloaded as part of the installation package.
authenion-eik.jar
security.properties
log4j2.xml
startup.properties
dbConfig.properties
Login to the server and move to Config path(Eg; /home/user/EBSAuth) to place config files(startup.properties,log4j2.xml,security.properties,DBC file,dbConfig.properties) for Authenion-EIK implementation.
Obtain or download the Authenion-EIK license from the Like Minds Support portal. Copy the license file 'ebsauth.lic' and move it to EBSAuth folder.
Open startup.properties and update with the below settings
app.context = /EBSAuth(User defined context path)
tcp.ip.address = 0.0.0.0(0.0.0.0 means the server will listen on all available network interfaces.If you want to bind to a specific IP,replace 0.0.0.0 with the desired IP address.)
tcp.ip.port = 8842(User defined port, make sure that port is not blocked by a firewall and is not used by another service)
Locate the authenion-eik.jar file and Copy the file in any preferred location and execute the below command
Repeat the steps above in all the servers, if you have H/A environment setup.
Eg: /home/user/EBSAuth/
Eg: /home/user/EBSAuth/
Follow the below steps to enable Authenion-EIK in https(Optional)
Get a keystore.p12 file and place it in Config path directory.
Open startup.properties file and update the below following lines(to enable HTTPS)
server.ssl.key-store= (path to)/keystore.p12
server.ssl.key-store-password=keystore-password
server.ssl.key-store-type=PKCS12
server.ssl.key-alias=eikservercert
server.ssl.enabled=true
server.ssl.protocol=TLS
server.tomcat.redirect-http-to-https=true
Execute the below jar file command
Repeat the steps above in all the servers, if you have H/A environment setup.
Eg:/home/user/EBSAuth/
Note: A single Authenion-EIK deployment will connect with only one Oracle EBS Application for SSO. However, if you have requirements to connect with multiple Oracle EBS environments for SSO, you can deploy multiple instances of Authenion-EIK in the same server by changing the 'Context Path'. For example, you can follow the above steps 1 to 14 by adding new folder with different contextpath name like EBSAuthDEV & EBSAuthPRD and point to appropriate Oracle EBS application environments.
Configure Oracle EBS System Profile options
This section will guide you to configure the system profile options that enable Single Sign-On to the Oracle E-Business Suite application. These system profile options are Oracle recommended for enabling SSO with any providers.
Login to the Oracle E-Business suite application as a 'System Administrator'
Navigate to 'System Profile' in System Administration. Edit the following system profile options as mentioned in the table:
After modifying the above system profile options, restart the Oracle E-Business suite application & database services. After successful restart of the services, you can test the Single Sign-On login.
Testing: Enter your Oracle EBS application url in a browser. The browser will redirect your request to the Identity Provider for authentication. Upon successful authentication, you will be redirected back to the Oracle EBS application homepage with your assigned roles & responsibilities.
This completes the setup for Authenion-EIK & Oracle E-Business suite integration for Single Sign-On.
| Configurations | Values |
|---|---|
|
Application SSO Type |
SSWA w/SSO |
|
Application Authenticate Agent |
For example, https://eik.example.com:8842/EBSAuth |
|
Application SSO Login Types |
Both |
|
Application SSO Auto Link User |
Enabled |
|
Application SSO LDAP Synchronization |
Disabled |
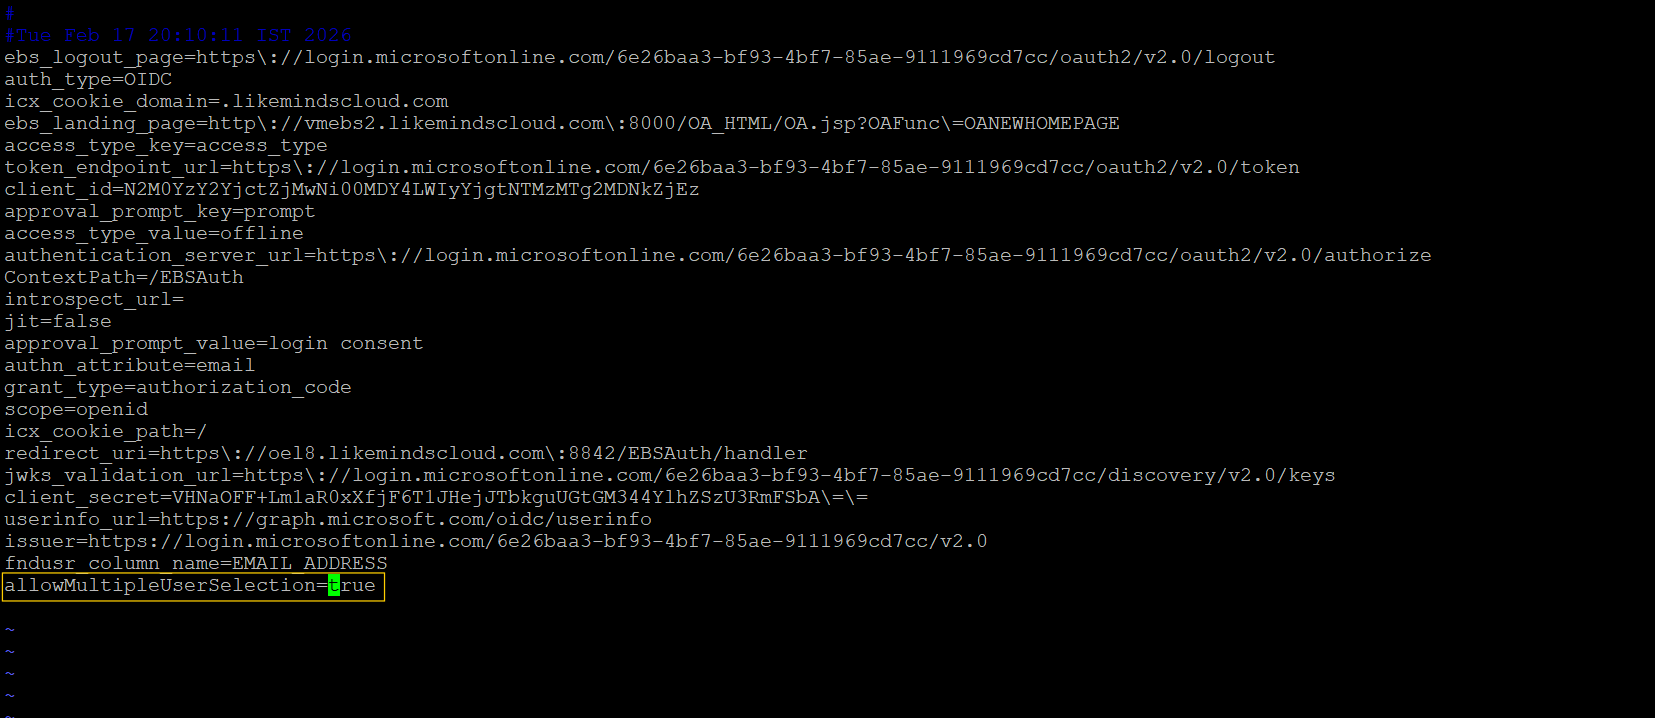
MultiUser Login
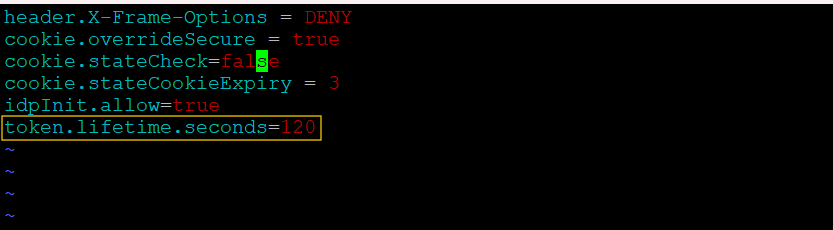
- Open the EIKAuth.config file and ensure that allowMultipleUserSelection is set to true to enable multi-user login functionality.
-
Open the security.properties file and configure the token.lifetime.seconds attribute. The default value is 120 seconds, which defines how long the multi-user selection page remains active before it expires (optional).
-
After completing the above configuration, the user selection page will be displayed, allowing users to select from multiple accounts and log in to the application.

Template Customization
- The Error template and Multi-User Selection page can be customized as required under EBSAuth/html/ (HTML files) and EBSAuth/web/static/css/main.css (CSS file).
Oracle Application Express (APEX)
Oracle APEX SSO with Authenion
Oracle APEX is a web-based integrated development environment which simplifies the process of building applications and pages. It supports the use of HTTP Header variables to identify a user and to create a session for the user in Oracle APEX application.
Architecture
Configuration Steps
The following sections describes the configuration steps in Authenion & Oracle APEX application for Single Sign-On.
1. Pre-requisites
'First-mile' integration (connecting Authenion to an identity provider).
Firewall requirements between APEX, Authenion and IdP servers.
2. SSO Integration Workflow
| Tasks | Description |
|---|---|
|
Virtual Server in Authenion will be the user-facing URL of the Oracle APEX application. Virtual Server is defined by the hostname and port |
|
|
Application Host details is about the server responsible for hosting the Oracle APEX application and its components |
|
|
Headers Mappings in Authenion are used to send one or more user attribute values to Oracle APEX application as HTTP Header variables |
|
|
Resources in Authenion are the Oracle APEX application components that requires different security levels. APEX application can be configured with 'Protected' & 'Excluded' resources as per the requirements |
|
|
This setup in Authenion will register a unique entry for the Oracle APEX application |
|
|
Oracle APEX configuration that needs to be done for its application modules independently inside the Apex administration workspace |
Following are the configurations that needs to be done in the Authenion Administrative Console to onboard the Oracle APEX application for Single Sign-On.
Virtual Server
Following is an example configuration of a Virtual Server for Oracle APEX application.

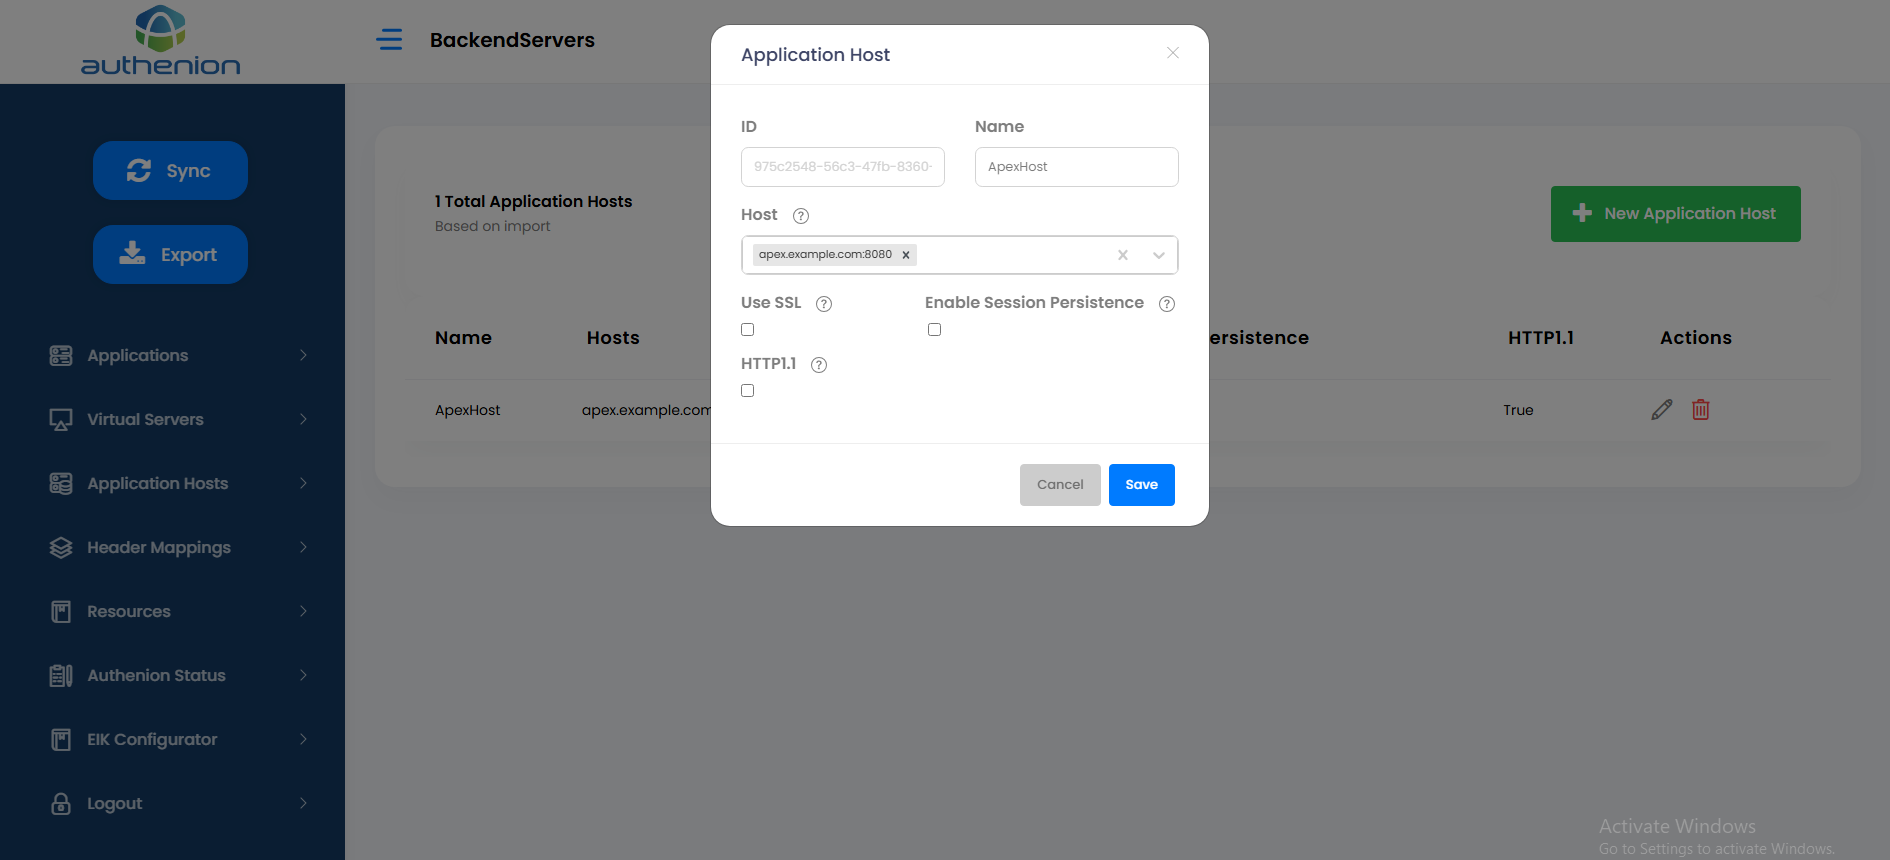
Application Host
Following is an example configuration of an Application Host in Authenion for Oracle APEX application.
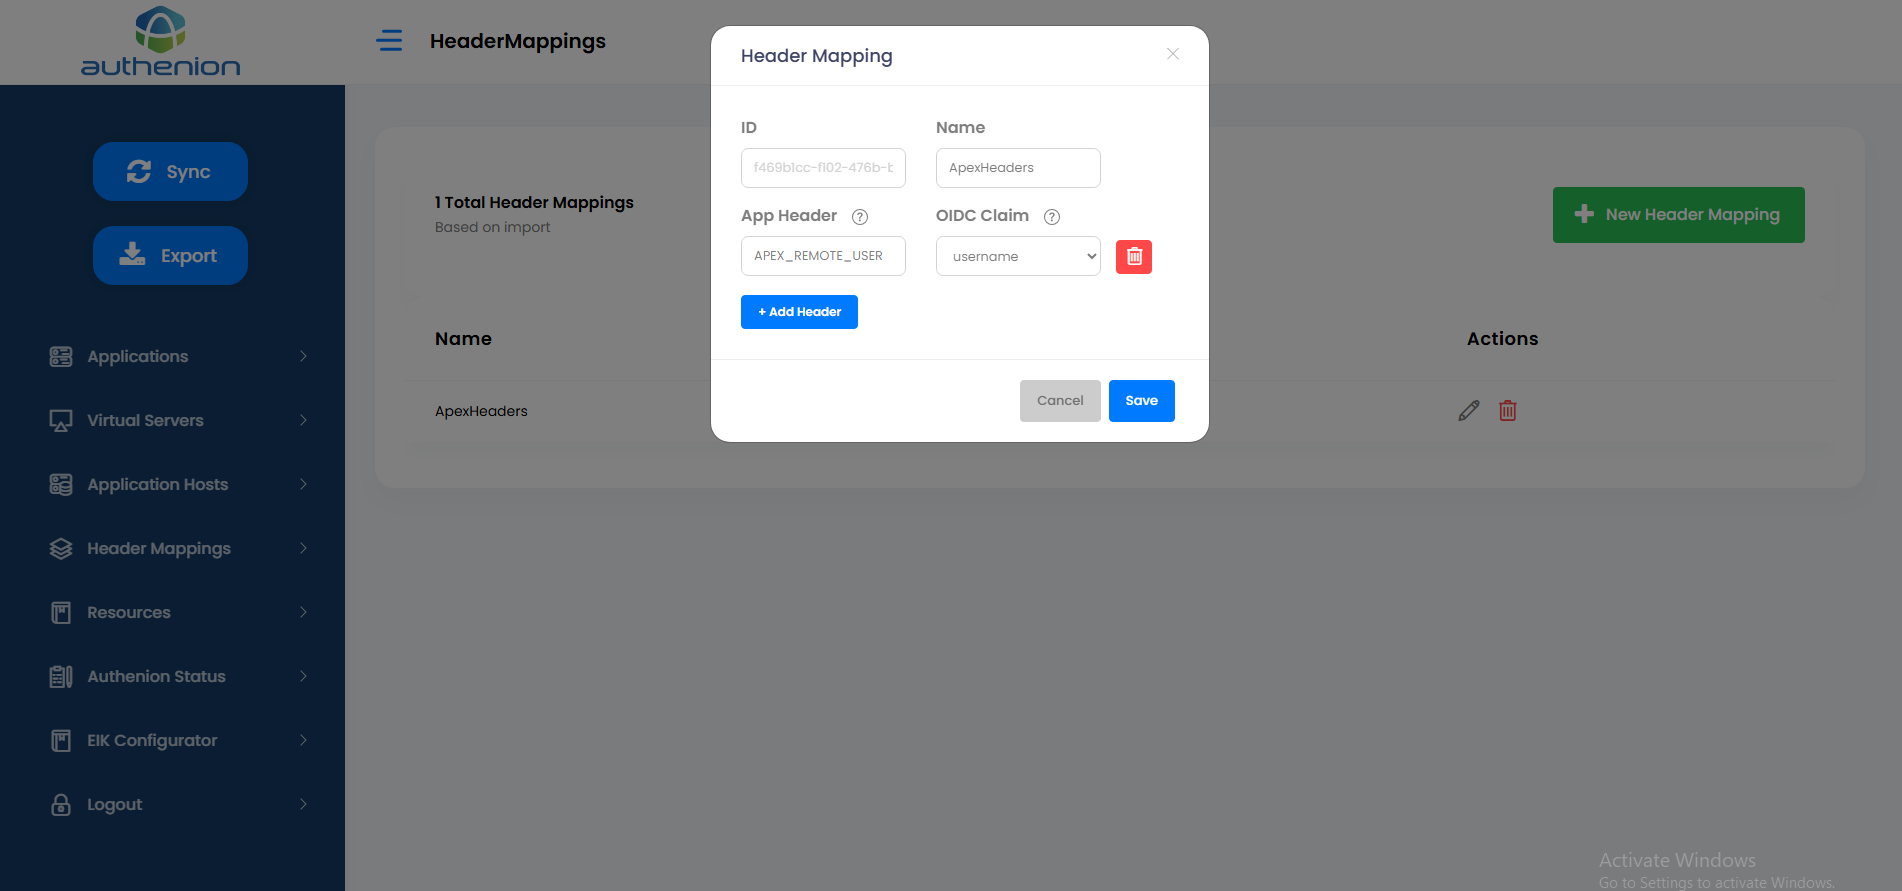
Header Mapping
Following is an example configuration of a Header Mapping for Oracle APEX application.
Resources
Following is an example configuration of Protected & Excluded Resources in Authenion for Oracle APEX application.
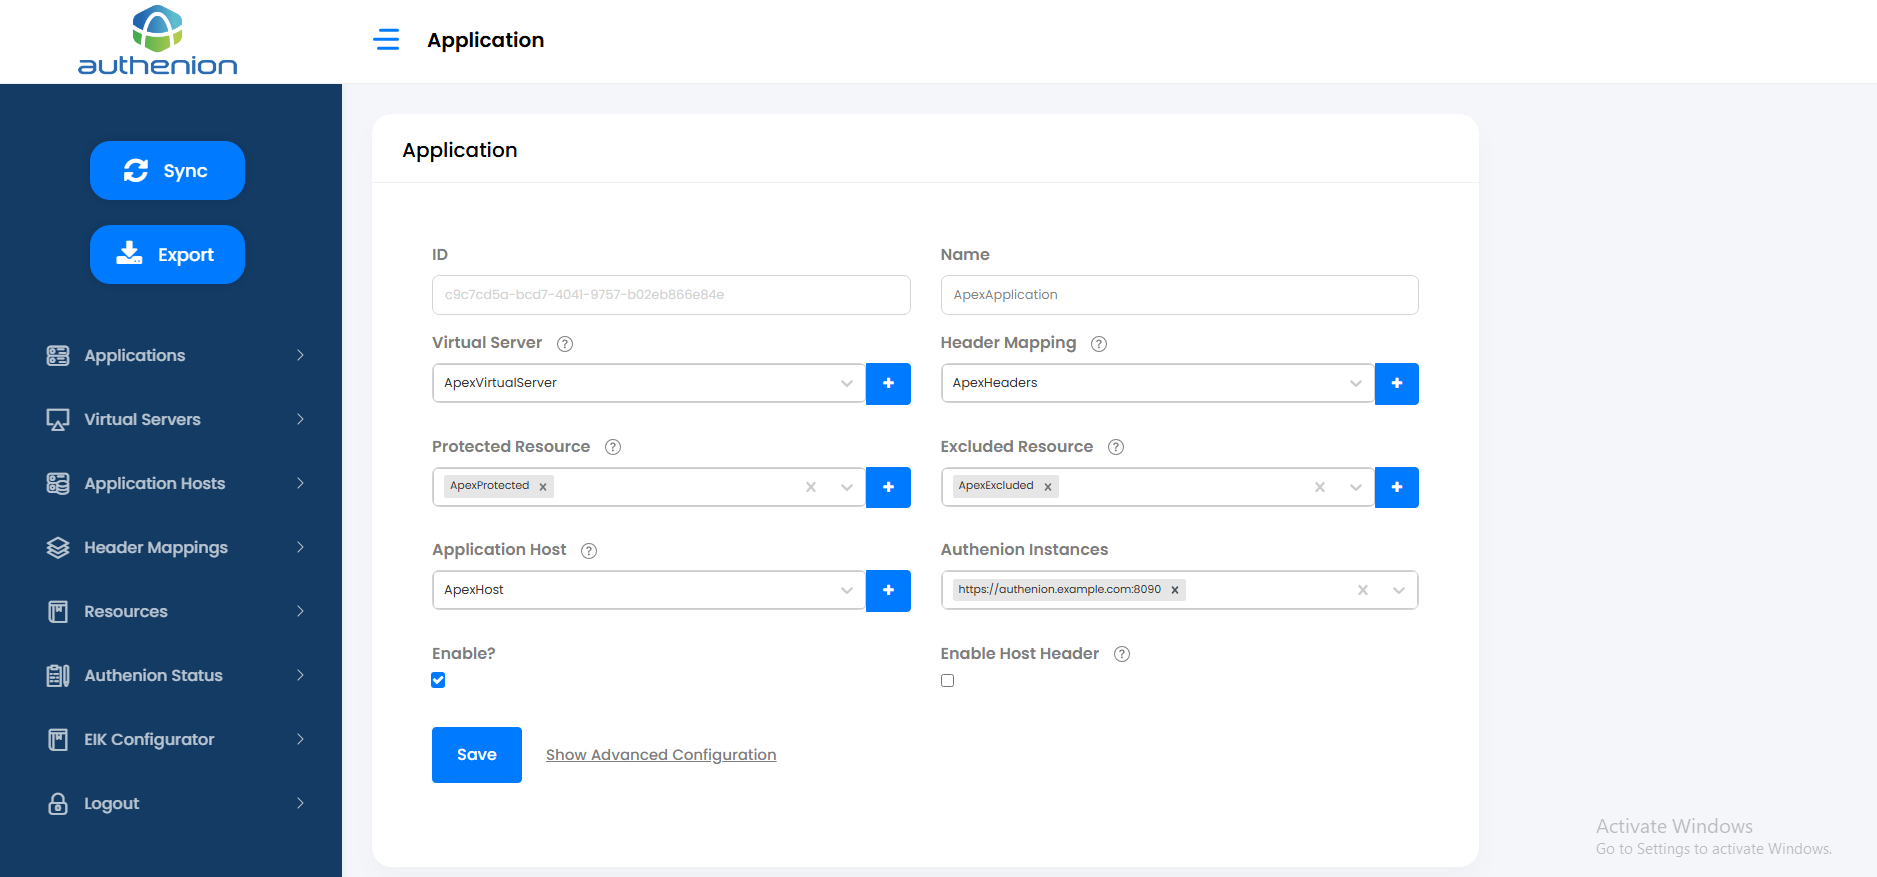
Registering an Application for Oracle APEX in Authenion
Following is an example configuration of creating an Application in Authenion for Oracle APEX.
| Configuration | Values |
|---|---|
|
Name |
Apex |
|
Virtual Server |
ApexVirtualServer |
|
Header Mapping |
ApexHeaders |
|
Protected Resource |
ApexProtected |
|
Excluded Resource |
ApexExcluded |
|
Application Host |
ApexBackend |
|
Authenion Instances |
Auto populated |
SSO Setup in Oracle APEX Application
Oracle APEX administrators can configure the available HTTP Header authentication schemes in APEX workspace to enable Single Sign-On with Authenion. The authentication schemes should be configured per APEX application and need to set its status as current. Click here to refer the Oracle Document.
Login to the Oracle APEX administrative console.
On the workspace homepage, click the App Builder icon.
Select the APEX application for which Single Sign-On needs to be enabled.
On the Application home page, click Shared Components.
Under Security, select an existing scheme or create a new scheme.
Modify the following fields in the authentication scheme.
Scheme Type - Select 'HTTP-Header' variable
HTTP Header Variable Name - 'APEX_REMOTE_USER'
Click Save
Repeat steps 1 to 6 to enable SSO login for Oracle APEX application.
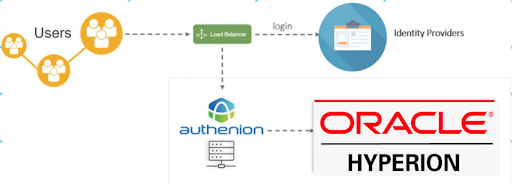
Oracle Hyperion
Oracle Hyperion SSO with Authenion
Oracle Hyperion is a centralized planning, budgeting, and forecasting tool that integrates different operational planning processes and enhances business predictability.
Architecture
Configuration Steps
The following sections describes the configuration steps in Authenion & Oracle Hyperion application for Single Sign-On.
1. Pre-requisites
'First-mile' integration (connecting Authenion to an identity provider).
Firewall requirements between Hyperion, Authenion and IdP servers.
2. SSO Integration Workflow
| Tasks | Description |
|---|---|
|
Virtual Server in Authenion will be the user-facing URL of the Oracle Hyperion application. Virtual Server is defined by the hostname and port |
|
|
Application Host details is about the server responsible for hosting the Oracle Hyperion application and its components |
|
|
Headers Mappings in Authenion are used to send one or more user attribute values to Oracle Hyperion application as HTTP Header variables |
|
|
Resources in Authenion are the Oracle Hyperion application components that requires different security levels. Hyperion application can be configured with 'Protected' & 'Excluded' resources as per the requirements |
|
|
This setup in Authenion will register a unique entry for the Oracle Hyperion application |
|
|
Oracle Hyperion configuration that needs to be done for its application modules independently inside the Hyperion administration workspace |
Following are the configurations that needs to be done in the Authenion Administrative Console to onboard the Oracle Hyperion application for Single Sign-On.
Virtual Server
Following is an example configuration of a Virtual Server for Oracle Hyperion application.

Application Host
Following is an example configuration of an Application Host in Authenion for Oracle Hyperion application.

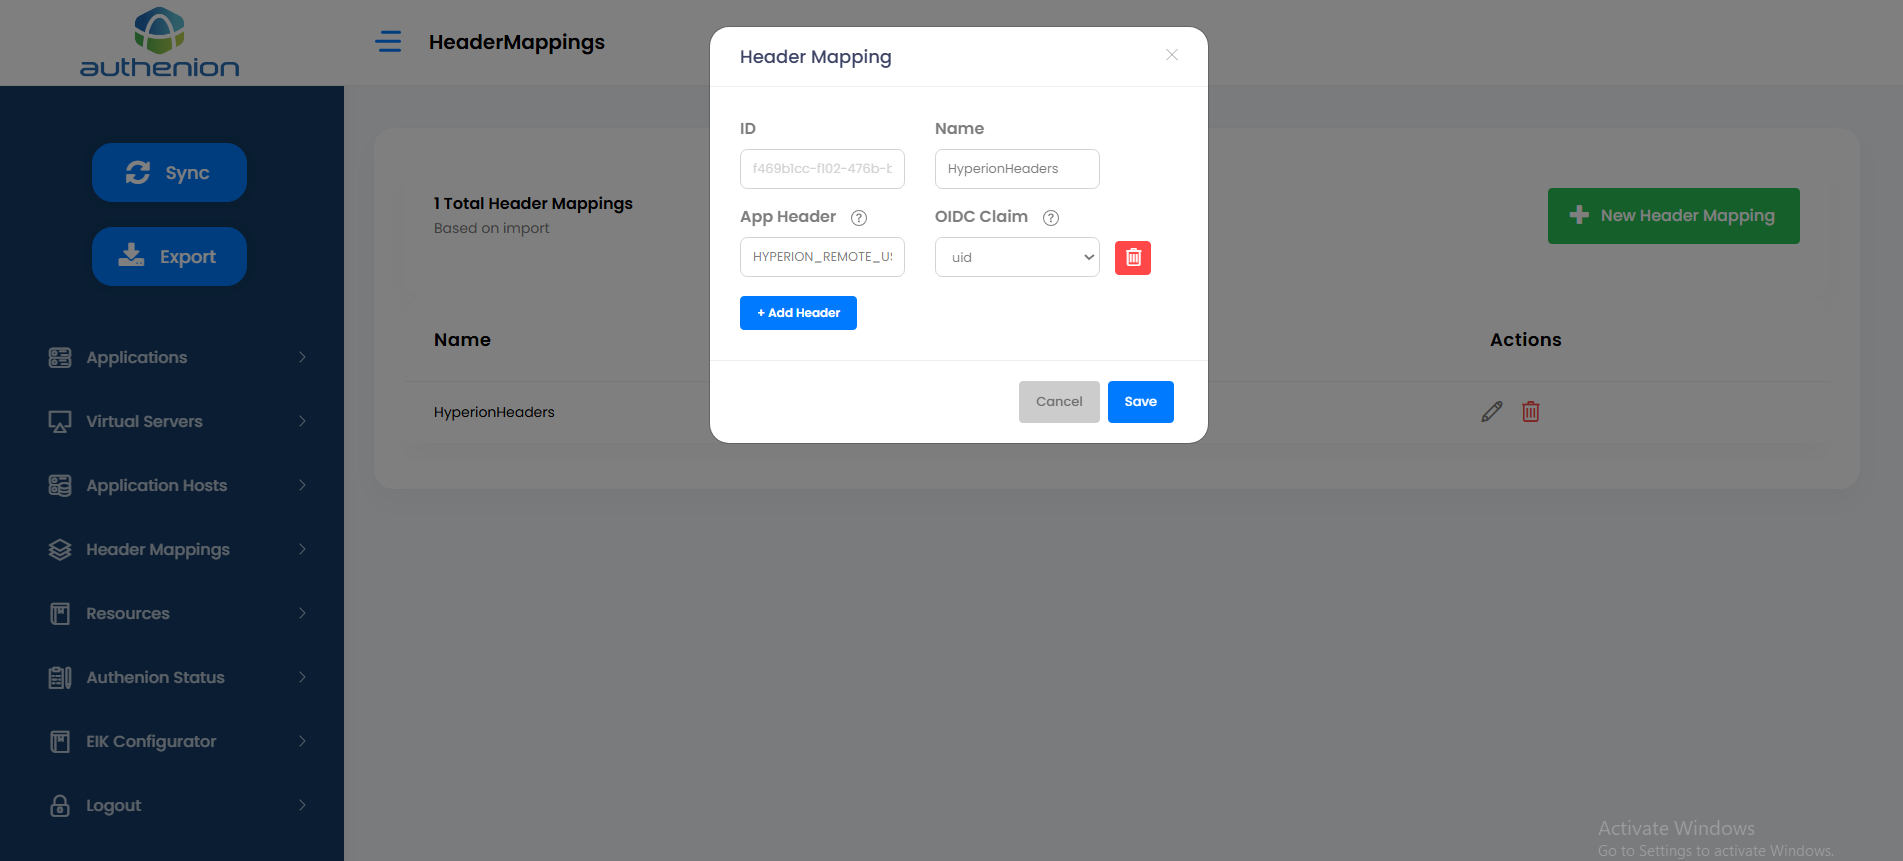
Header Mapping
Following is an example configuration of a Header Mapping for Oracle Hyperion application.
Resources
Following is an example configuration of Protected & Excluded Resources in Authenion for Oracle Hyperion application.

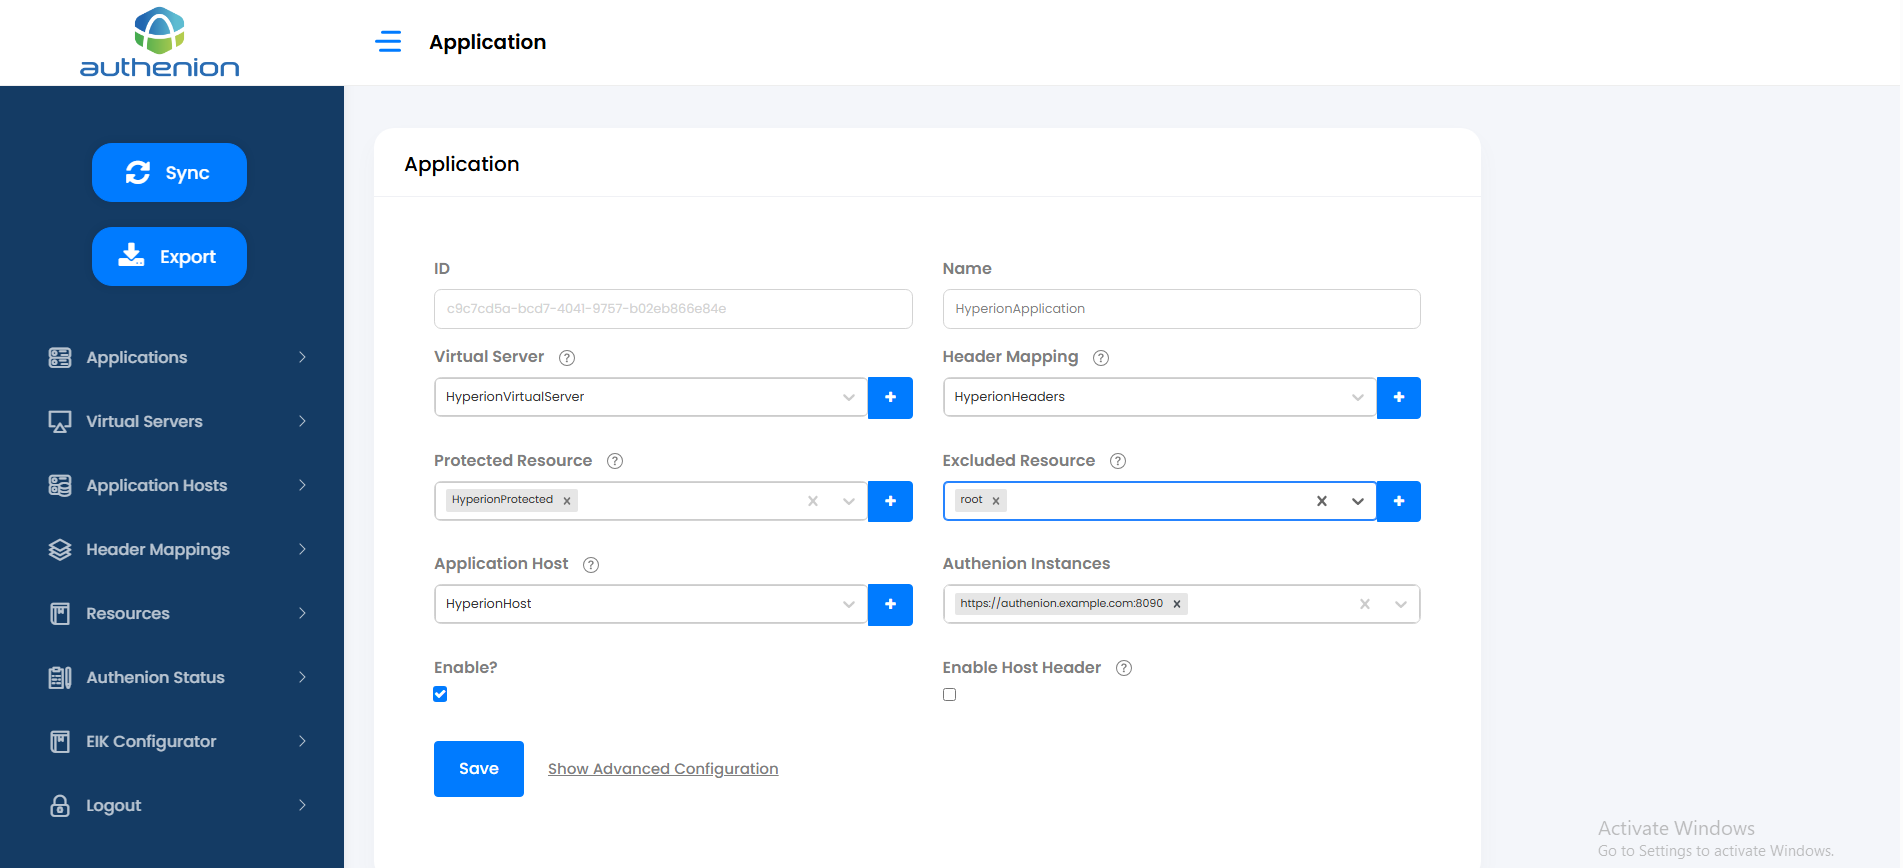
Registering an Application for Oracle Hyperion in Authenion
Following is an example configuration of creating an Application in Authenion for Oracle Hyperion.
| Configuration | Values |
|---|---|
|
Name |
Hyperion |
|
Virtual Server |
HyperionVirtualServer |
|
Header Mapping |
HyperionHeaders |
|
Protected Resource |
HyperionProtected |
|
Excluded Resource |
HyperionExcluded |
|
Application Host |
HyperionBackend |
|
Authenion Instances |
Auto populated |
SSO setup in Oracle Hyperion Application
Hyperion application can be integrated with Authenion for Single Sign-On. Following setup allows you to enable SSO to Hyperion application.
-
Access Oracle Hyperion Shared Services Console as a System Administrator. See Launching Shared Services Console.
-
Select Administration, and then Configure User Directories.
Click Security Options.
-
In the Single Sign-On Configuration section:
Select the Enable SSO check box
-
From SSO Provider or Security Agent drop-down list, select Other
-
From SSO Mechanism drop-down list, select Custom HTTP Header and then specify the name of the header that the security agent passes to EPM System (‘HYPLOGIN’).
-
Click OK
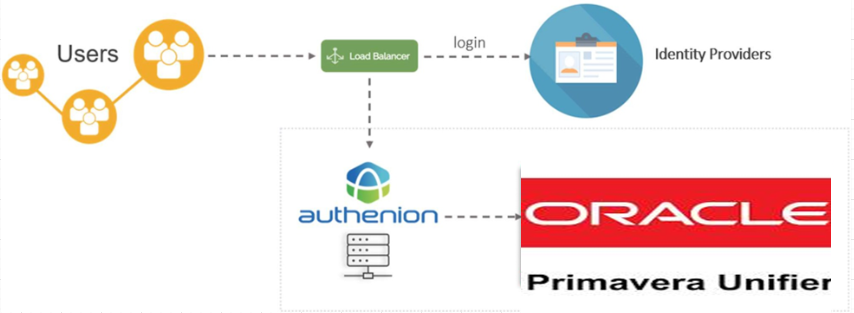
Oracle Primavera Unifier
Oracle Unifier SSO with Authenion
Oracle Primavera Unifier allows customers to digitize and automate their capital asset planning and execution processes, which helps improve profitability, operational reliability, and risk management.
Architecture
Configuration Steps
The following sections describes the configuration steps in Authenion & Oracle Unifier application for Single Sign-On.
1. Pre-requisites
'First-mile' integration (connecting Authenion to an identity provider).
Firewall requirements between Unifier, Authenion and IdP servers.
2. SSO Integration Workflow
| Tasks | Description |
|---|---|
|
Virtual Server in Authenion will be the user-facing URL of the Oracle Unifier application. Virtual Server is defined by the hostname and port |
|
|
Application Host details is about the server responsible for hosting the Oracle Unifier application and its components |
|
|
Header Mappings in Authenion are used to send one or more user attribute values to Oracle Unifier application as HTTP header variables |
|
|
Resources in Authenion are the Oracle Unifier application components that requires different security levels. Unifier application can be configured with 'Protected' & 'Excluded' resources as per the requirements |
|
|
This setup in Authenion will register a unique entry for the Oracle Unifier application |
|
|
Oracle Unifier configuration needs to be done for its application modules independently inside the Unifier administration workspace |
Following are the configurations that needs to be done in the Authenion Administrative Console to onboard the Oracle Unifier application for Single Sign-On.
Virtual Server
Following is an example configuration of a Virtual Server for Oracle Unifier application.

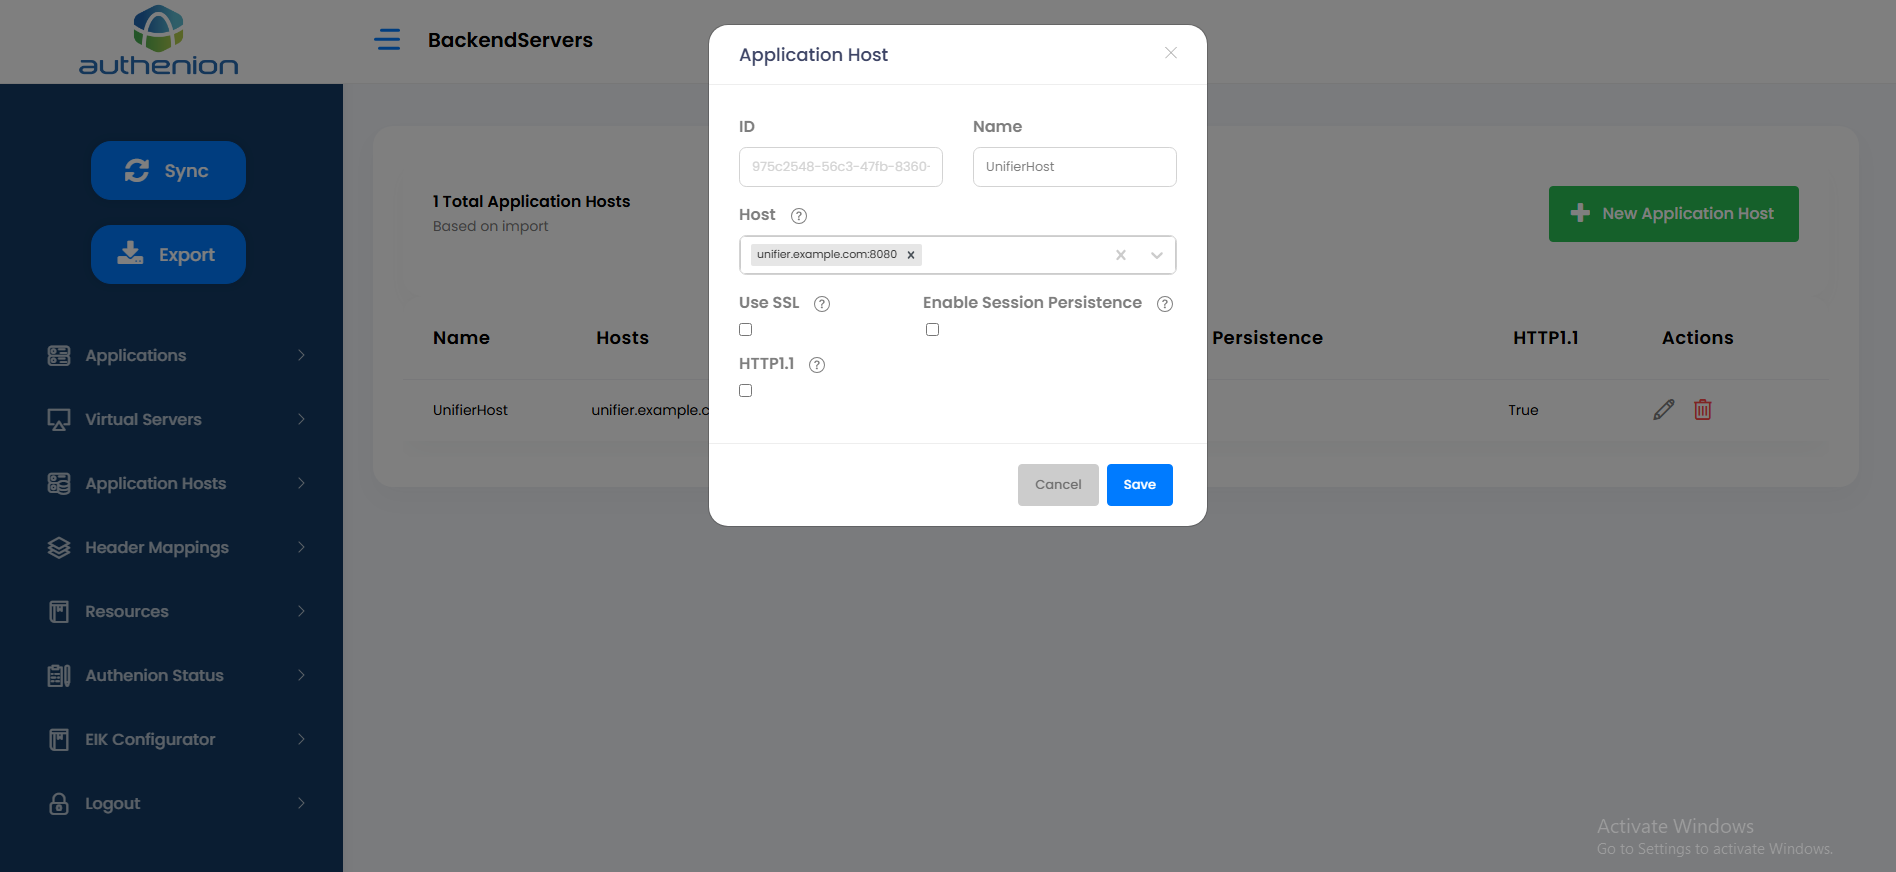
Application Host
Following is an example configuration of an Application Host in Authenion for Oracle Unifier application.
Header Mapping
Following is an example configuration of a Header Mapping for Oracle Unifier application.

Resources
Following is an example configuration of Protected & Excluded Resources in Authenion for Oracle Unifier application.

Registering an Application for Oracle Unifier in Authenion
Following is an example configuration of creating an Application in Authenion for Oracle Unifier.
| Configuration | Values |
|---|---|
|
Name |
Unifier |
|
Virtual Server |
UnifierVirtualServer |
|
Header Mapping |
UnifierHeaders |
|
Protected Resource |
UnifierProtected |
|
Excluded Resource |
UnifierExcluded |
|
Application Host |
UnifierBackend |
|
Authenion Instances |
Auto populated |

SSO Setup in Oracle Unifier Application
The following setup enables SSO login to the Unifier application.
Create a property file called custom.properties and load it along with the skire.properties file.
The custom.properties file must define the following three SSO configuration properties:
Set the name of the header that will contain a valid Unifier username:
Set your logoff redirect URI after user logs out of Unifier:
(HTTP_header = 'remote_user')
SSO Logout URL = https://unifier.example.com/ssolibrary/oidc/logout
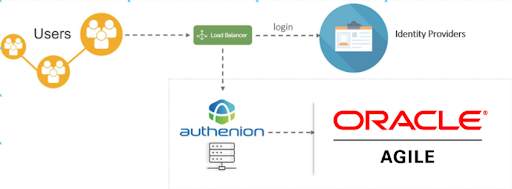
Oracle Agile PLM
Oracle Agile PLM SSO with Authenion
Agile PLM is designed to help its customers to make better product portfolio decisions, supply chain partners, collaborate across design, and accelerate new product introduction. It also provides features , processes and work flows such as approval processes for the data types and associated files.
Architecture
Configuration Steps
The following sections describes the configuration steps in Authenion & Oracle Agile PLM application for Single Sign-On.
1. Pre-requisites
'First-mile' integration (connecting Authenion to an identity provider).
Firewall requirements between Agile, Authenion and IdP servers.
2. SSO Integration Workflow
| Tasks | Description |
|---|---|
|
Virtual Server in Authenion will be the user-facing URL of the Oracle Agile PLM application. Virtual Server is defined by the hostname and port |
|
|
Application Host details is about the server responsible for hosting the Oracle Agile PLM application and its components |
|
|
Headers Mappings in Authenion are used to send one or more user attribute values to Oracle Agile PLM application as HTTP Header variables |
|
|
Resources in Authenion are the Oracle Agile PLM application components that requires different security levels. Agile PLM application can be configured with 'Protected' & 'Excluded' resources as per the requirements |
|
|
This setup in Authenion will register a unique entry for the Oracle Agile PLM application |
|
|
Oracle Agile PLM configuration that needs to be done for its application modules independently inside the Agile PLM administration workspace |
Following are the configurations that needs to be done in the Authenion Administrative Console to onboard the Oracle Agile PLM application for Single Sign-On.
Virtual Server
Following is an example configuration of a Virtual Server for Oracle Agile PLM application.
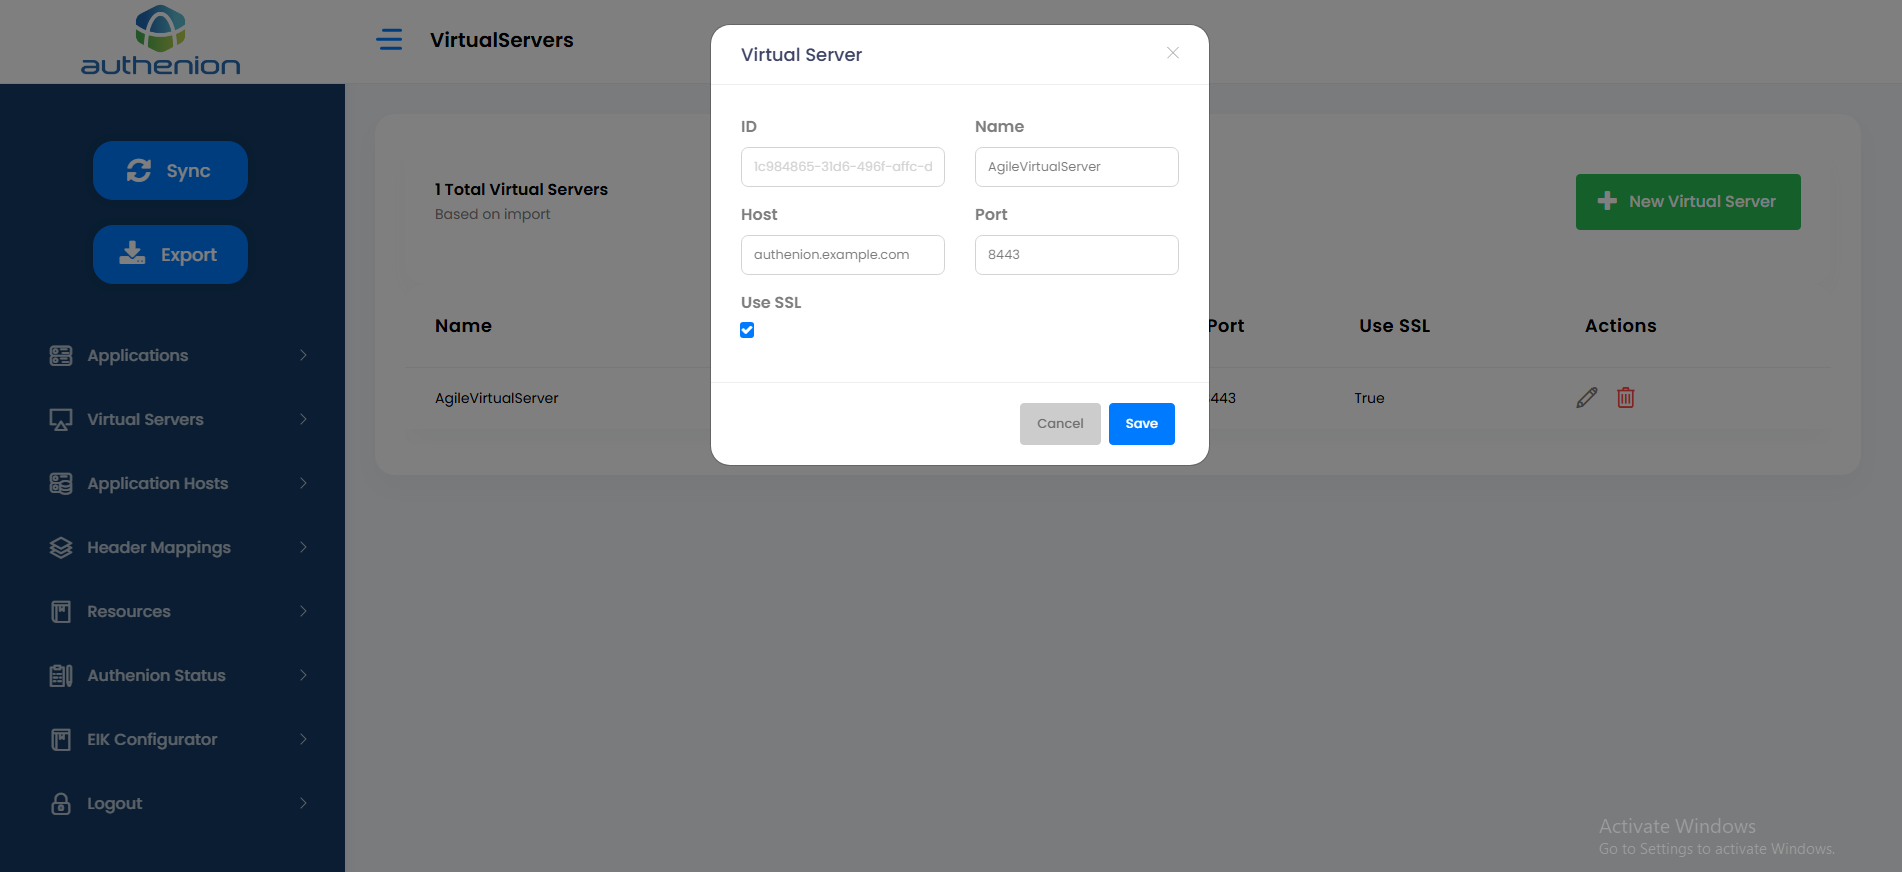
Application Host
Following is an example configuration of an Application Host in Authenion for Oracle Agile PLM application.
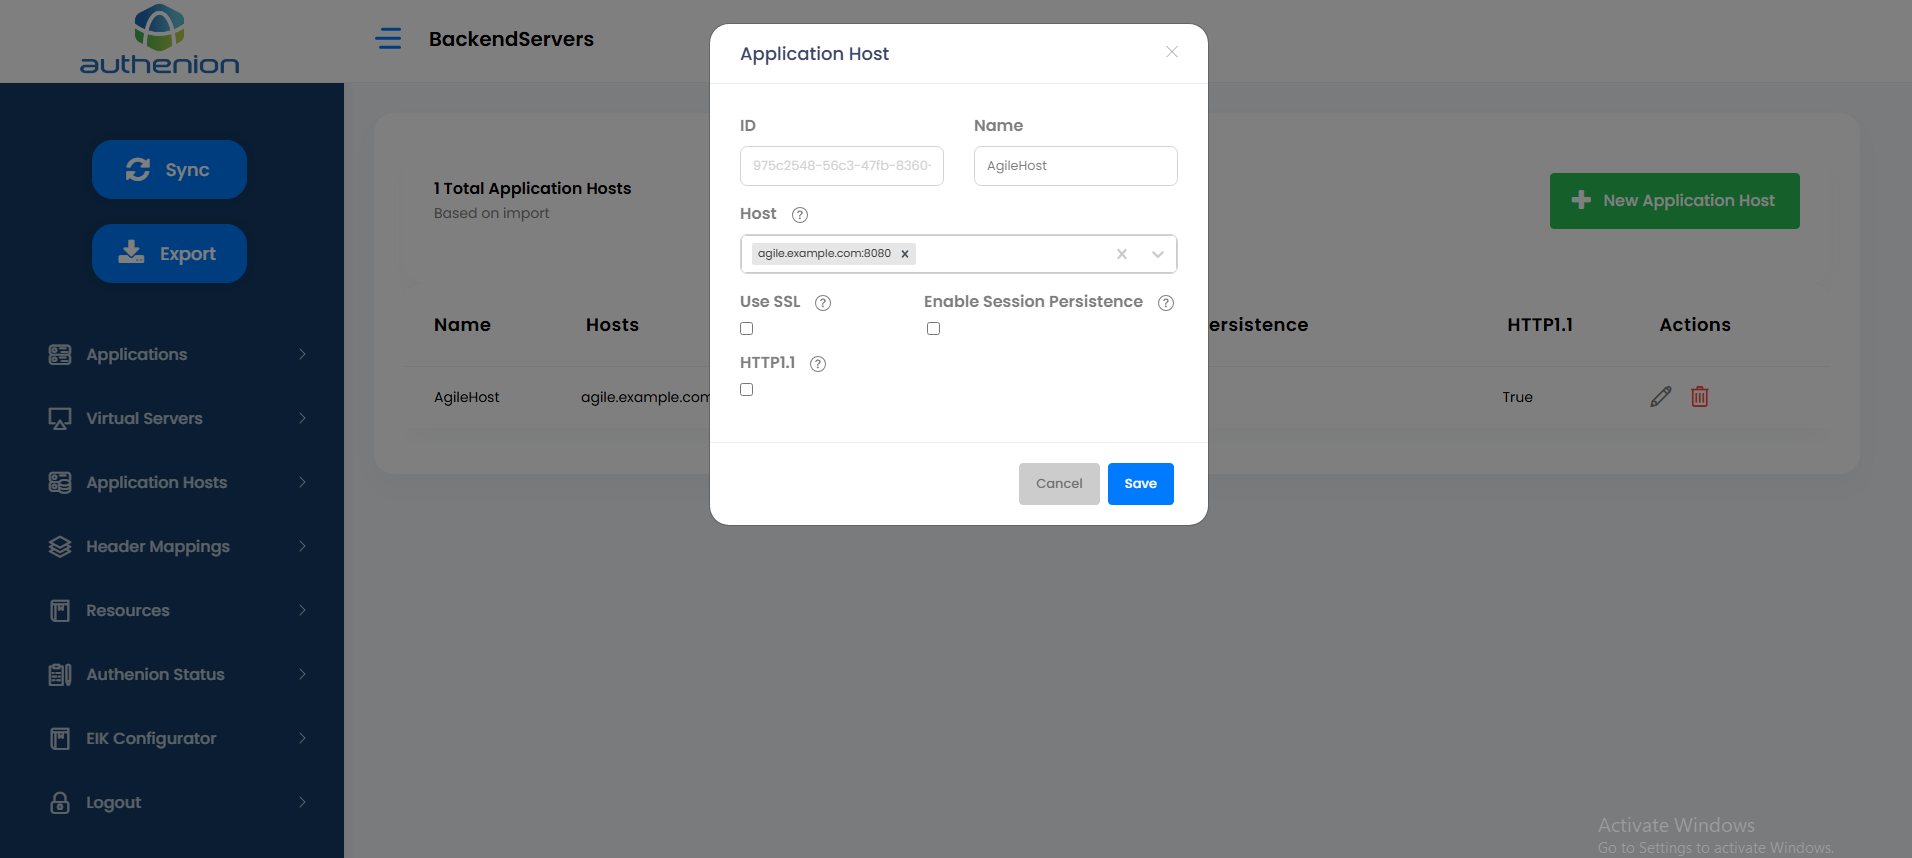
Header Mapping
Following is an example configuration of a Header Mapping for Oracle Agile PLM application.
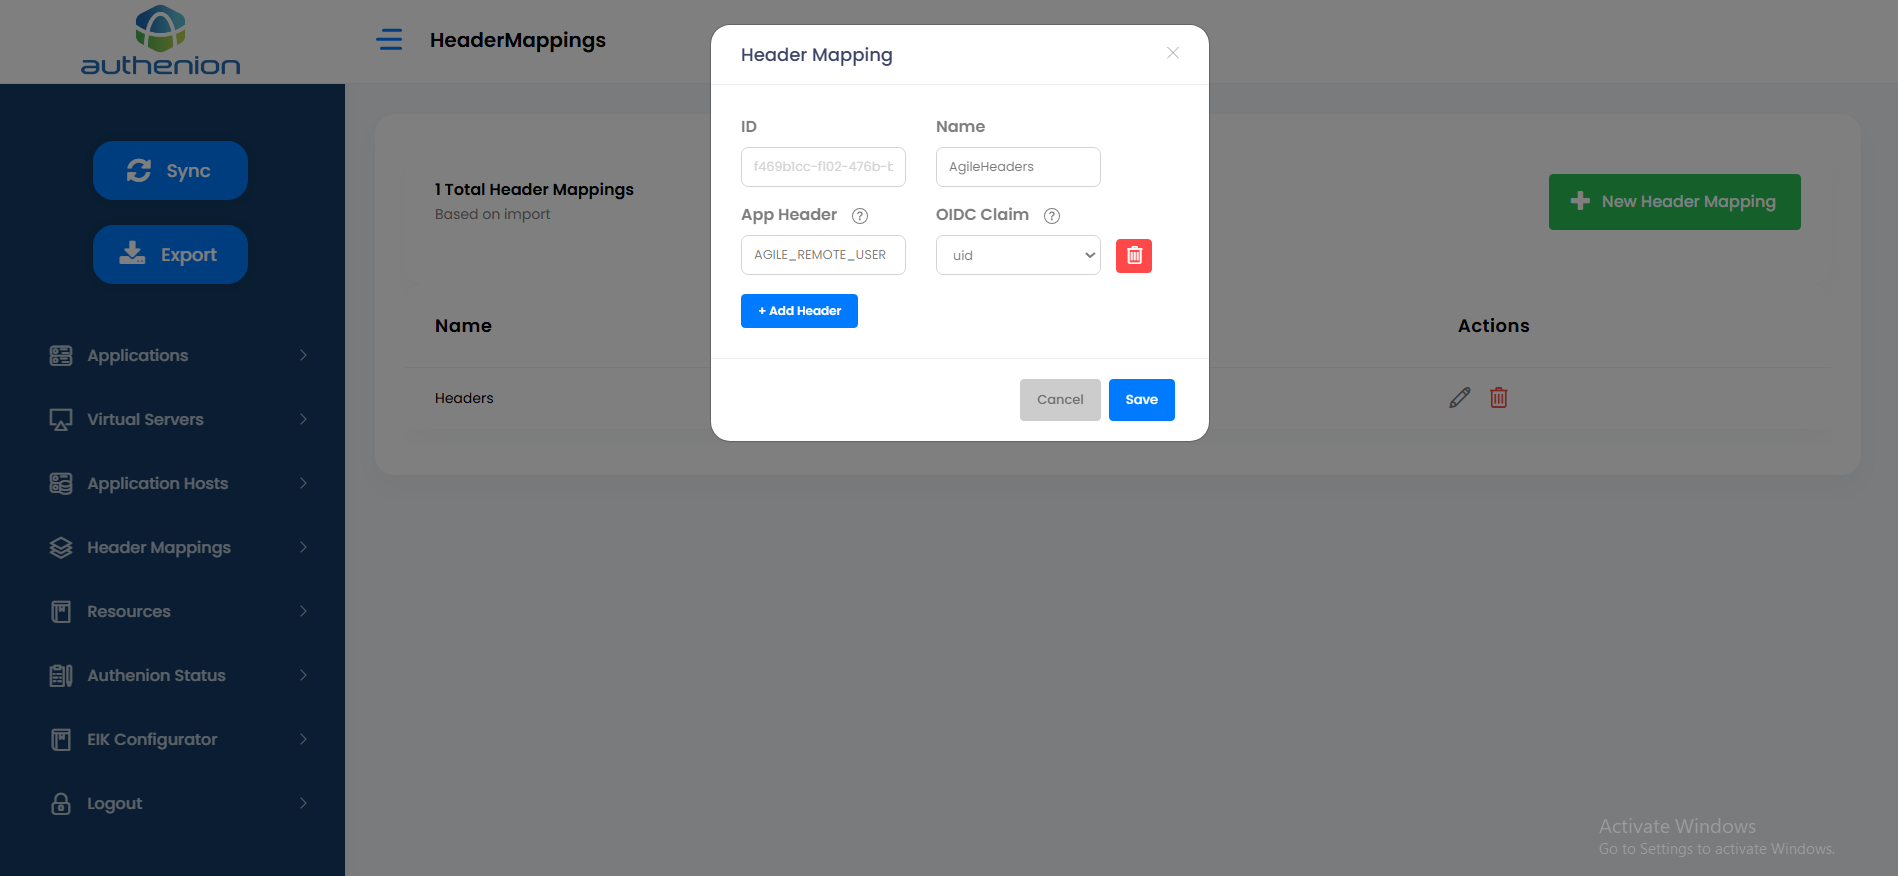
Resources
Following is an example configuration of Protected & Excluded Resources in Authenion for Oracle Agile PLM application.

Registering an Application for Oracle Agile PLM in Authenion
Following is an example configuration of creating an Application in Authenion for Oracle Agile PLM.
| Configuration | Values |
|---|---|
|
Name |
Agile PLM |
|
Virtual Server |
AgileVirtualServer |
|
Header Mapping |
AgileHeaders |
|
Protected Resource |
AgileProtected |
|
Excluded Resource |
AgileExcluded |
|
Application Host |
AgileBackend |
|
Authenion Instances |
Auto populated |
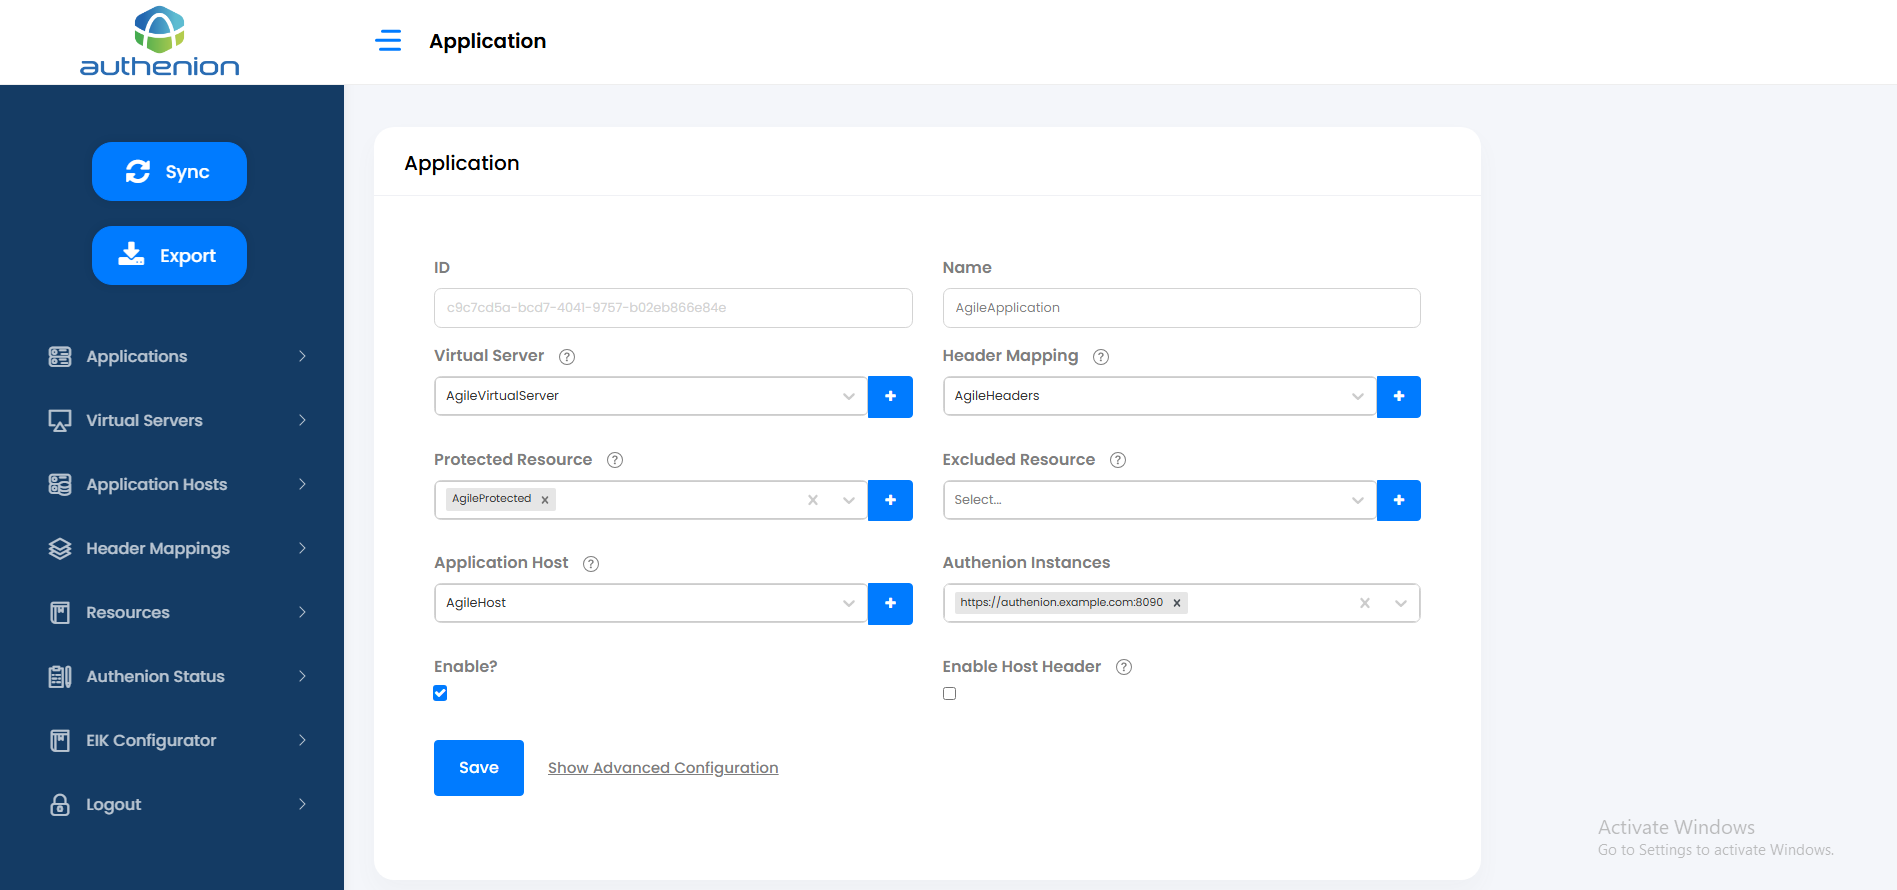
SSO setup in Oracle Agile PLM Application
Agile PLM application can be integrated with Authenion for Single Sign-On. Following setup allows you to enable SSO to Agile PLM application
Navigate to the WebLogic console where the Agile PLM application is installed and create AgileIdentityAsserter.
-
in WLS Console
Click Lock and Edit
Move to Summary of Security Realms >AgileRealm >Providers
Click New
Create AgileIdentityAsserter Authentication with "AgileIdentityAssertion" Provider
Open the added AgileIdentityAsserter
Select the Active type as ‘remote_user’ and Save.
Click Activate Changes.
Logout from the console
-
Open ‘agile.Properties’ file, and add the below settings: oam.header.name = remote_user oam.sso.logout.url = https://
:<443>/ssolibrary/oidc/logout -
Open the Web.xml (\application.ear\application.war\WEB-INF\ web.xml) and change auth-method as below:
client-cert, form -
Restart the WebLogic Application Server where the Agile Application is installed.
Login to Agile Java Client.
-
Navigate to the Location node.
Enter the Web Server Proxy URL
-
Restart the File Manager
Authenion as Proxy for EBS kit
Configuration Steps
1. Pre-requisites
Install Authenion and ensure its services should be running. Install Authenion
Deploy Authenion-EBS integration KIT in a machine and ensure their port is listening. Oracle E-Business Suite
2. SSO Integration Workflow
| Tasks | Description |
|---|---|
|
Virtual Server in Authenion will be the user-facing URL of the EIK application. Virtual Server is defined by the hostname and port |
|
|
Application Host details is about the server responsible for hosting the EIK application and its components |
|
|
Headers Mappings in Authenion are used to send one or more user attribute values to EIK application as HTTP Header variables |
|
|
Resources in Authenion are the EIK application components that requires different security levels. EIK application can be configured with 'Protected' & 'Excluded' resources as per the requirements |
|
|
This setup in Authenion will register a unique entry for the EIK application |
Virtual Server
Following is an example configuration of a Virtual Server for EIK application.
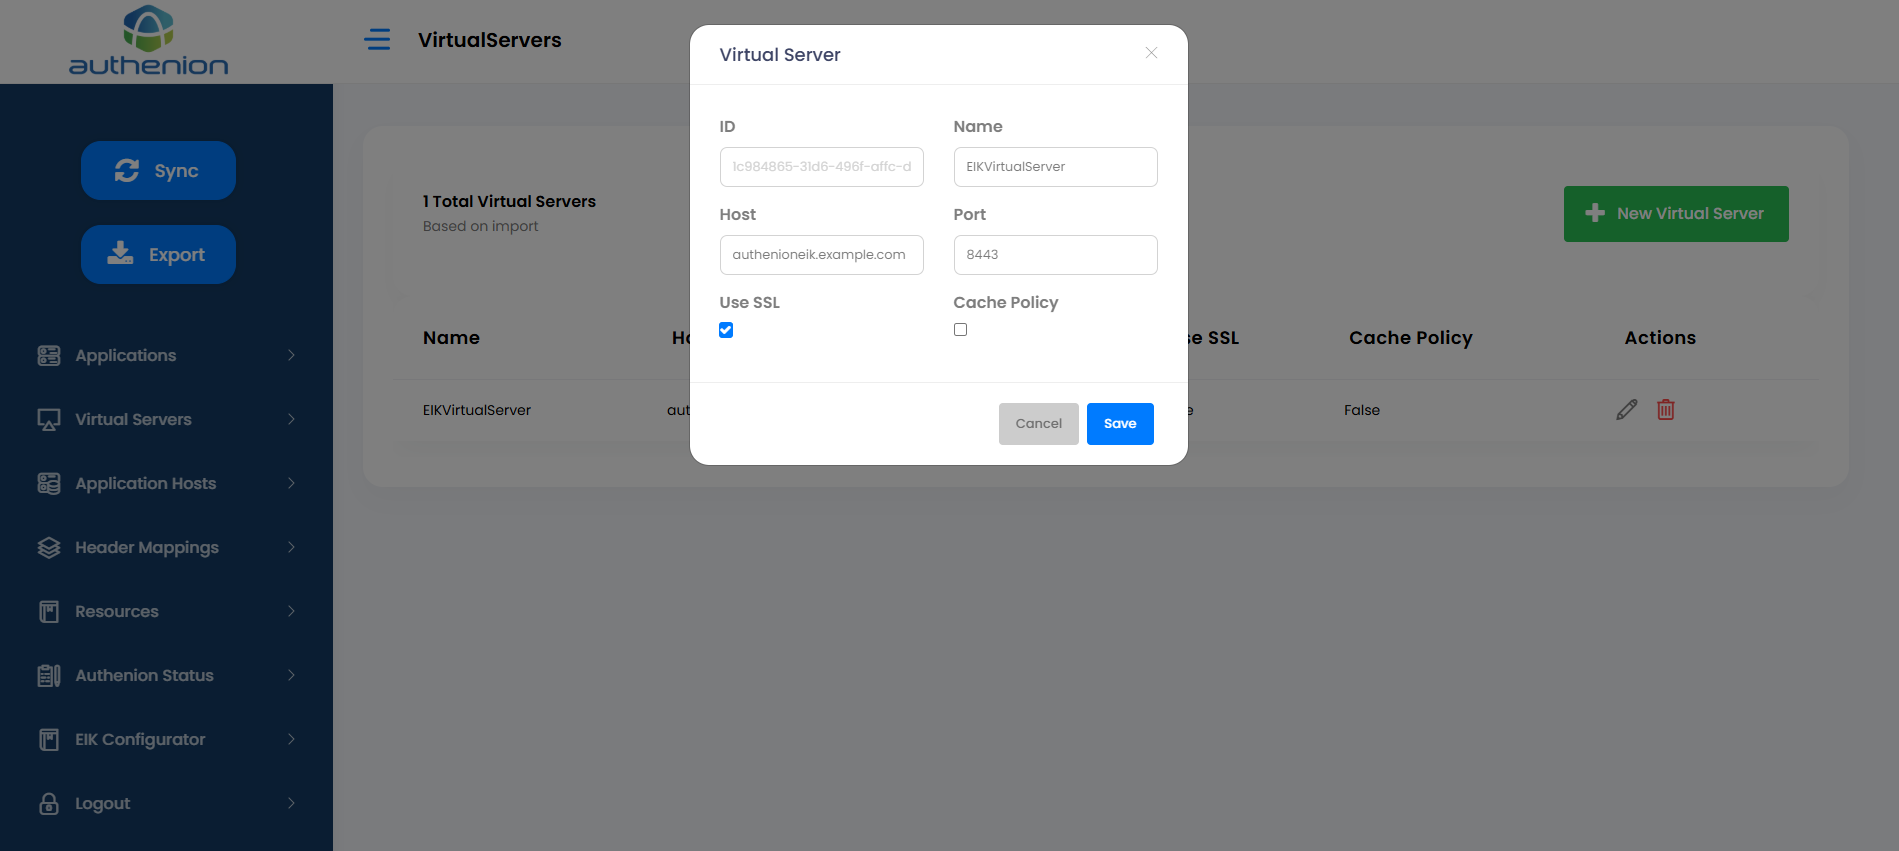
Application Host
Following is an example configuration of an Application Host in Authenion for EIK application.
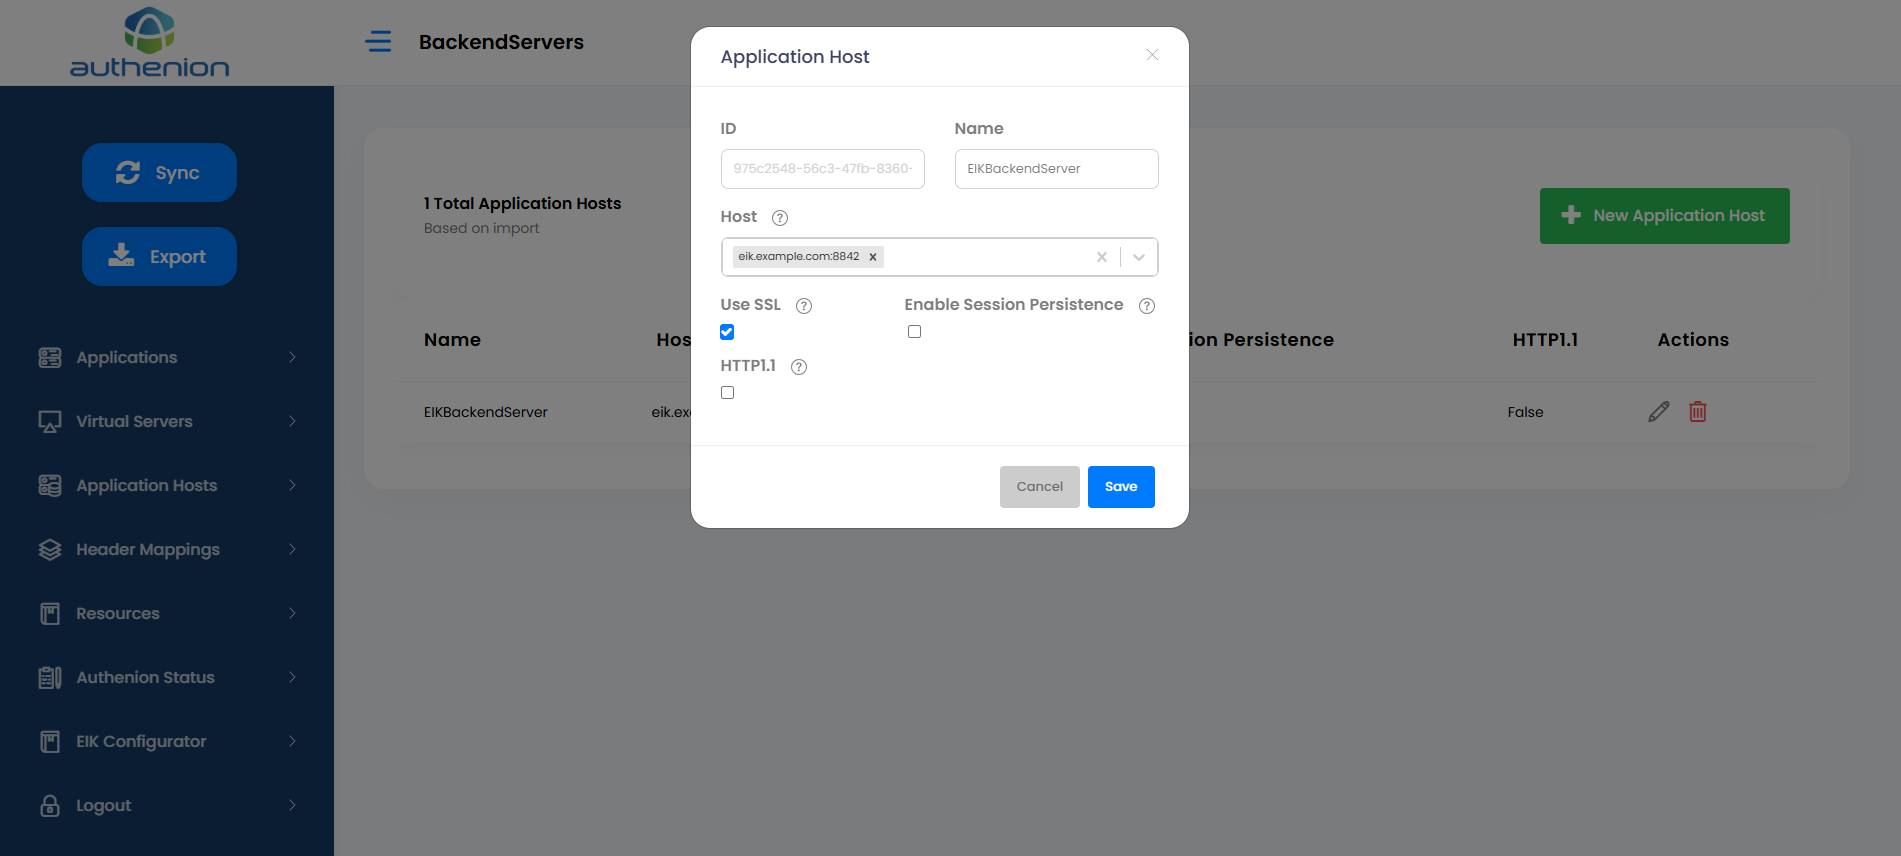
Header Mapping
Following is an example configuration of a Header Mapping for EIK application.
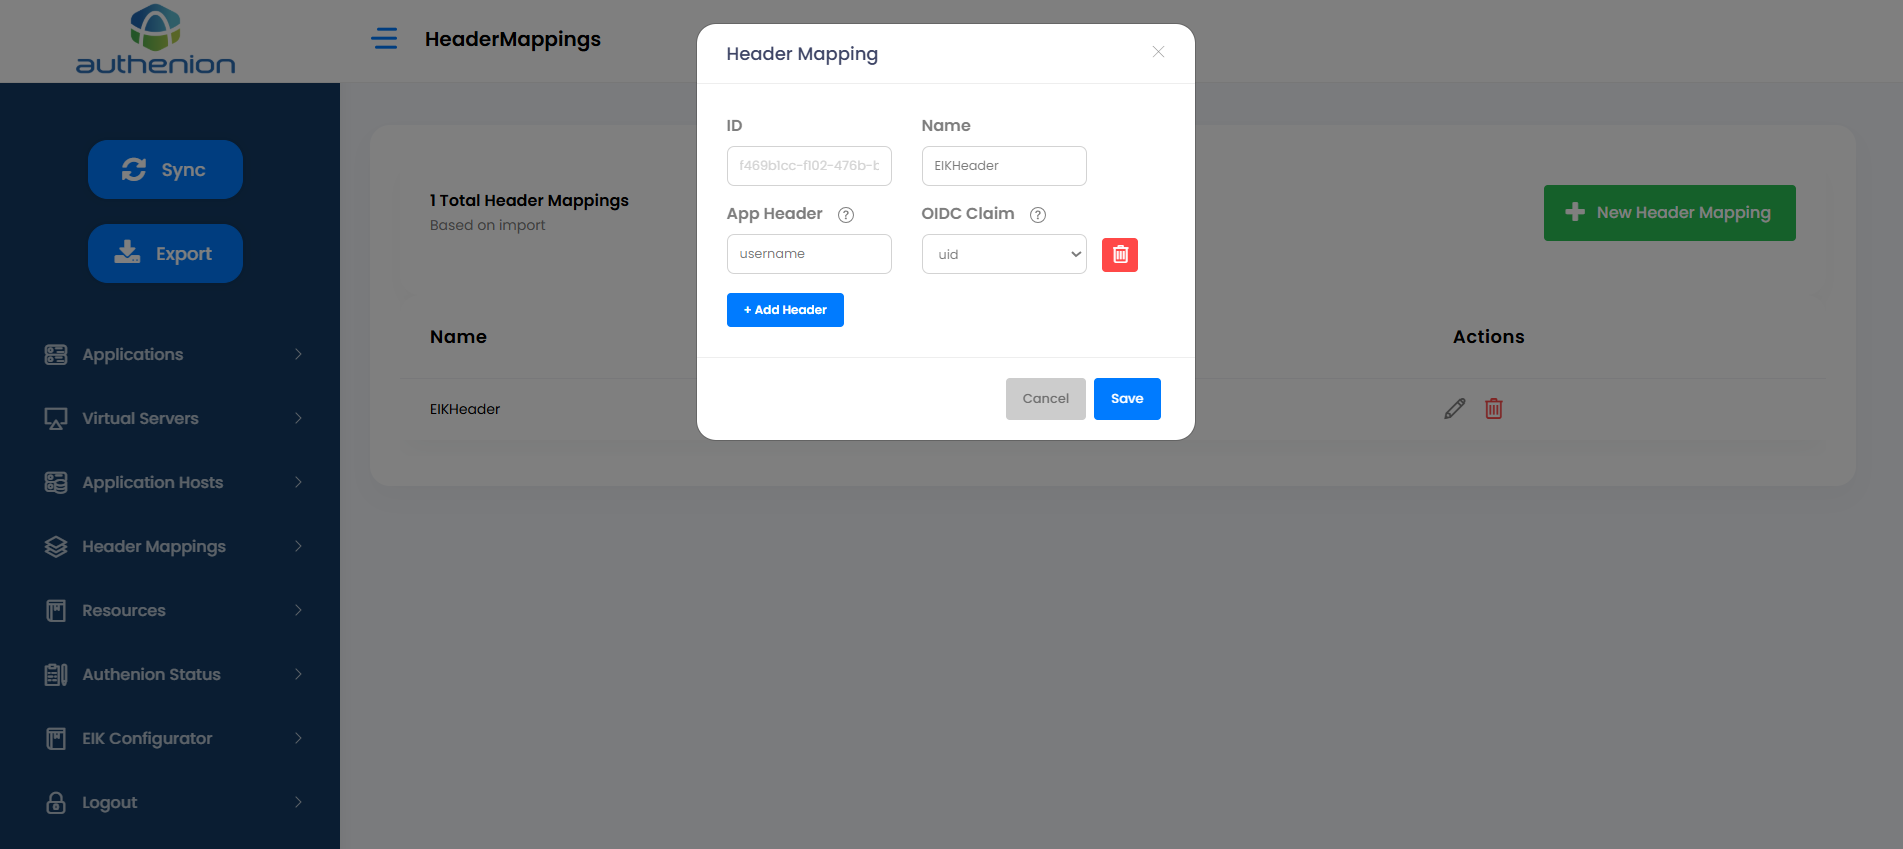
Resources
Following is an example configuration of Protected & Excluded Resources in Authenion for EIK application.

Registering an Application for EIK in Authenion
Following is an example configuration of creating an Application in Authenion for EIK.
| Configuration | Values |
|---|---|
|
Name |
EIK |
|
Virtual Server |
EIKVirtualServer |
|
Header Mapping |
EIKHeaders |
|
Protected Resource |
EIKProtected |
|
Excluded Resource |
EIKExcluded |
|
Application Host |
EIKBackend |
|
Authenion Instances |
Auto populated |
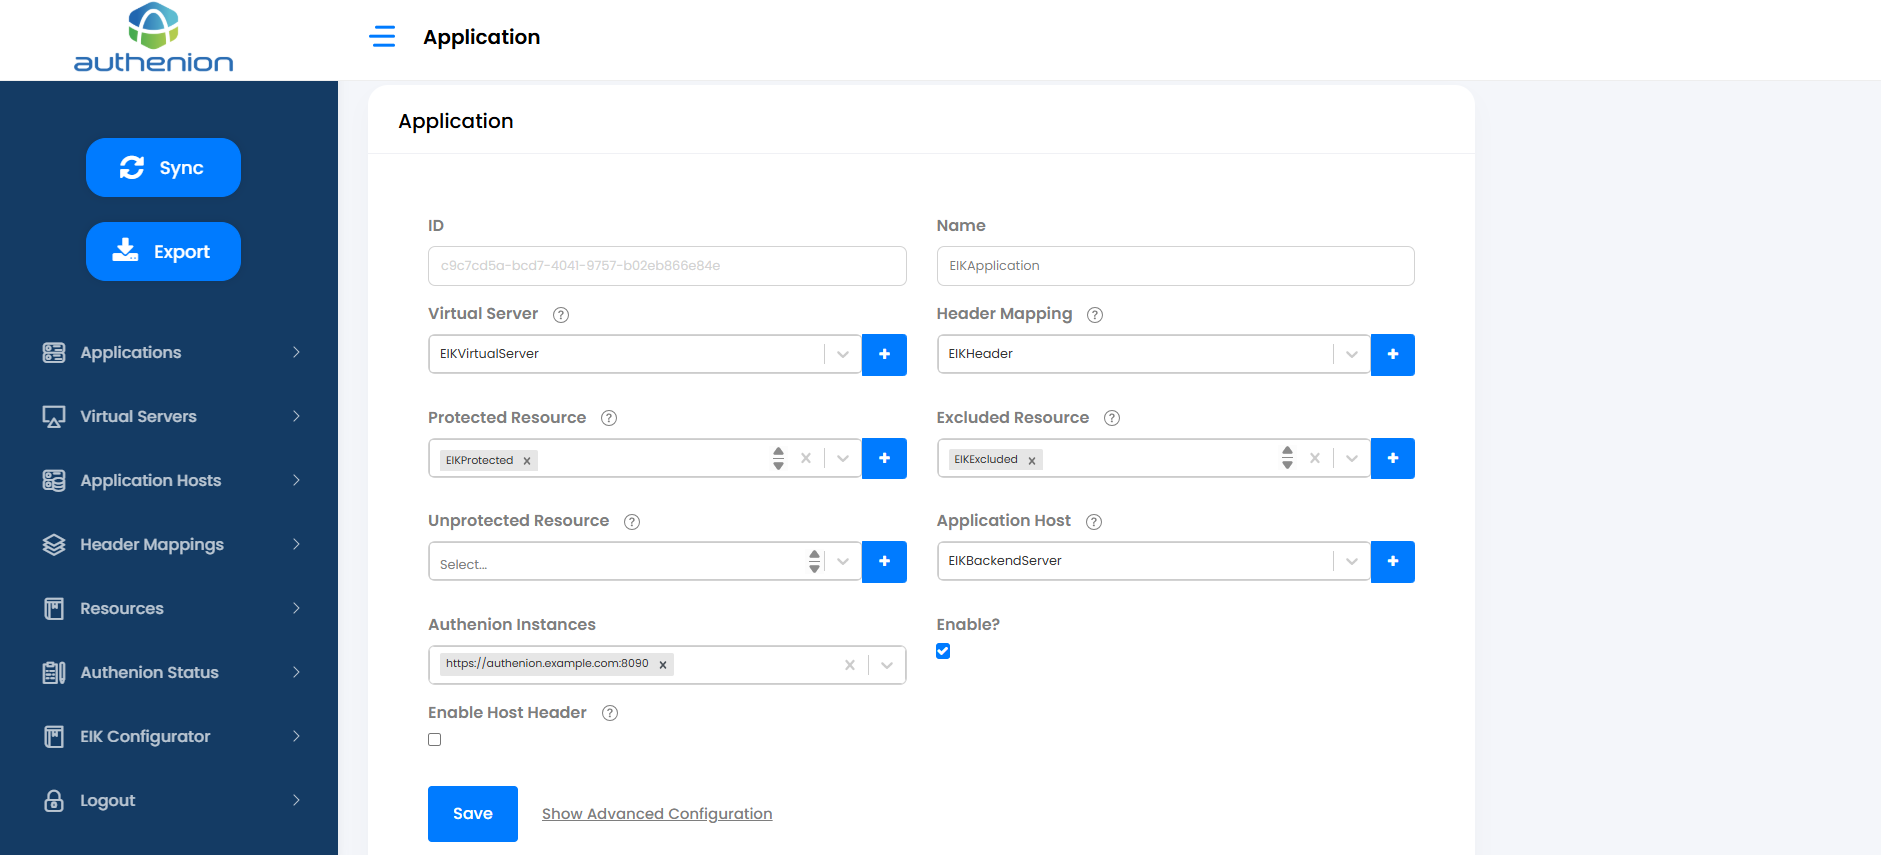
EIK Migration From 2.x to 3.x Version
Configuration Steps
1. System Requirements
For successful execution of Authenion for EBS 3.0, ensure that the System Requirements (OS version, recommended Java, etc.) are met.
2. File System Preparation
Create or use an existing folder with a user-defined name (e.g., EBSAuth ). This folder will serve as the config path for the Authenion-EIK implementation.
Eg:/home/user/EBSAuth/
3. EBS Database connection with Authenion-EIK
A database connection between Authenion-EIK and the EBS database can be established using the DBC file (available in the EBS DB) along with the dbConfig.properties file, which contains the required database user settings.
Upon initialization, EIK automatically generates the EIK.dbcx configuration file using the parameters defined in the .dbc file and the dbconfig.properties file. The generated .dbcx file is then used to establish the connection to the Oracle E-Business Suite (EBS) database.
Authenion for EBS is also backward compatible with the existing dbcx file.
4. Identity Provider Configurations
Authenion for EBS is compatible with the existing EBSAuth.config which has your identity provider configuration.
Other Dependent files:
-
startup.properties(This is the new file which needed for Authenion-EIK 3.x version)
-
ebsauth.lic
-
Log4j2.xml
-
Security.properties
5. Deployment of Authenion-EIK 3.X
Authenion for EBS does not require a J2EE container for deployment. Instead, it is provided as a standalone JAR file, making the execution process straightforward and lightweight.
Navigate to the config path created earlier and place all dependent files required for deployment in this path (Eg; /home/user/EBSAuth).
-
startup.properties
-
ebsauth.lic
-
EIKAuth.config
-
Log4j2.xml
-
Security.properties
-
dbConfig.properties
The EIK plugin (authenion-eik.jar), along with all its dependencies (mentioned above), should be executed using the following command.
-
Authenion for EBS has a different architecture and port which allows administrators to standup a parallel instance in the same machine without affecting existing setup. The load balancers can be adjusted to point to the new instance to take overtraffic.
End-of-Life (EOL) Policy
1. Overview
To ensure continued innovation, performance, and security, Like Minds Consulting Inc. may periodically retire specific Software products, versions, features, or third-party dependencies. This End-of-Life (EOL) Policy defines how such transitions are managed, including lifecycle stages, support timelines, and customer communication practices. This policy is intended to provide customers with sufficient visibility and guidance to plan upgrades and migrate to supported technologies in a timely manner.
2. Scope
This policy applies to all generally available Software products and versions provided by Like Minds Consulting Inc., including associated components and supported third-party integrations, unless otherwise specified in a separate agreement. Hosted or SaaS offerings may follow separate lifecycle policies where applicable.
3. Software Release Classification
3.1.Release Types
Major Release
A Major Release represents a substantial evolution of the Software. It may introduce significant new capabilities, remove obsolete or previously deprecated features, and identify additional features planned for future removal. These releases often consolidate prior fixes and may include architectural changes requiring customers to reassess deployment models or infrastructure.
Minor Release
A Minor Release delivers incremental enhancements, including new features, improvements to existing functionality, and planned deprecations aligned with future Major Releases. It also includes bug fixes and performance optimizations.
Maintenance Release
A Maintenance Release is focused on stability and security:
Releases addressing only defects are designed for seamless adoption and do not require configuration changes.
Releases that include security updates may introduce changes impacting compatibility or behaviour; such impacts will be clearly documented.
Maintenance Releases typically include:
Remediation of identified defects and vulnerabilities.
Resolution of customer-reported issues.
3.2.Versioning Format
Software versions follow a structured format:
[Major].[Minor].[Maintenance].[Sequence]
Example: 3.2.1.1
The last digit denotes the incremental sequence number (often optional) in that release type.
4. Software Support Lifecycle
Each Software version progresses through defined lifecycle stages:
4.1 Active Maintenance
Full support, including bug fixes, updates, and security patches.
Ongoing improvements and maintenance releases.
4.2 End of Maintenance (EOM)
No further routine updates or maintenance releases.
Limited fixes may be provided for critical issues at Like Minds Consulting Inc.'s discretion.
Support services remain available.
4.3 End of Support (EOS)
sStandard support services are discontinued.
No further updates or fixes are provided.
Optional extended support may be available (if applicable).
4.4 End of Life (EOL)
Software is no longer supported or maintained.
No fixes, patches, or updates will be issued.
The product is considered unsupported and may pose security or compliance risks.
Once a product reaches EOL, it is no longer eligible for any support services.
5. Notification Commitments
Like Minds Consulting Inc. will make commercially reasonable efforts to provide advance notice for lifecycle transitions:
End of Sale (EOS): Minimum 6 months' notice (for full product retirement)
End of Life (EOL): Minimum 9–12 months' notice
Feature or third-party deprecation: Minimum 12 months' notice
Ecosystem or dependency changes: Minimum 6 months' notice
Notifications will be communicated through:
Email notifications
Customer Support portals
Official website announcements
Partner channels
These timelines are designed to enable adequate planning and risk mitigation.
6. Extended Support (Optional)
For certain versions, Like Minds Consulting Inc. may offer Extended Support beyond the standard support period, subject to:
Active support subscription.
Additional fees.
Defined duration (typically limited-term).
Extended Support may include:
Limited technical support access.
Fixes for critical defects or high-severity vulnerabilities.
Access to documentation and knowledge resources.
Extended Support does not include:
Feature enhancements.
New platform or OS support.
Non-critical fixes or improvements.
7. Security Considerations
Maintaining Software within supported lifecycle stages is critical to ensuring a secure deployment.
Customers are strongly advised to:
Apply security updates promptly.
Monitor security advisories.
Upgrade to supported versions before EOL.
After EOL:
No vulnerability remediation will be provided.
Exposure to security threats may increase.
Compliance with regulatory standards may be impacted.
8. Documentation
Documentation for supported versions will be actively maintained during the Active Maintenance phase.
After a version transition beyond this stage:
Documentation will remain available for reference.
No further updates or corrections will be made.
9. Definitions
End of Sale (EOS): Date after which the Software is no longer available for purchase
End of Maintenance (EOM): Stage where routine updates cease but support continues
End of Support (EOS): Stage where standard support services are discontinued
End of Life (EOL): Final stage where Software is no longer supported or maintained
Maintenance Release: Update addressing defects or vulnerabilities
Support Services: Assistance provided under applicable agreements
10. Customer Responsibilities
Customers are responsible for:
Tracking lifecycle announcements.
Maintaining supported Software versions.
Planning and executing upgrades prior to EOL.
Evaluating risks associated with continued use of unsupported versions.
11. Final Statement
Operating Software beyond its supported lifecycle introduces significant operational, security, and compliance risks.
Like Minds Consulting Inc. strongly recommends that all customers remain on supported versions to ensure continued protection, stability, and access to support services.
End of Life (EOL) Software Tracker
Like Minds Consulting Inc End of Life (EOL) Software Tracker
Description
The Like Minds Consulting Inc. End of Life Policy can be found here.
This article covers Like Minds Consulting Inc.'s major software products as they enter "end of maintenance", "end of support", and "end of life" status. Versions earlier than those listed are considered end of life.
Policy Details
Please note that a new End of Life Policy is in effect as of July 1st, 2026.
When reviewing this document, keep in mind the format of major.minor.maintenance.sequence version numbers. For Example, the release "3.7.2.4": "3" is the major version, "7" is the minor version, "2" is the maintenance release, and "4" is the incremental sequence number often optional.
Software Tracker
EBS Integration Kit (EIK)
Currently Supported Releases: EIK 3.1.1, 3.0.1, 2.3.1.8, 2.3.1.7, 2.3.1.6, 2.3.1.5, 2.3.1.0, 2.3.0.2.
| Product Version | Release Date | Current Stage | End of Maintenance Date | End of Support Date | End of Life Date | Recommended Upgrade |
|---|---|---|---|---|---|---|
EIK 3.1.1 |
Mar 2026 |
Active Maintenance |
-- |
-- |
-- |
-- |
EIK 3.0.1 |
May 2025 |
Maintenance Mode |
-- |
31 Mar 2027 |
30 Jun 2027 |
Yes |
EIK 2.3.1.8 |
Jul 2026 |
End of Sale |
31 Dec 2026 |
31 Mar 2027 |
30 Jun 2027 |
Yes |
EIK 2.3.1.7 |
Feb 2026 |
End of Sale |
31 Dec 2026 |
31 Mar 2027 |
30 Jun 2027 |
Yes |
EIK 2.3.1.6 |
Jan 2025 |
End of Sale |
31 Dec 2026 |
31 Mar 2027 |
30 Jun 2027 |
Yes |
EIK 2.3.1.5 |
Dec 2024 |
End of Sale |
31 Dec 2026 |
31 Mar 2027 |
30 Jun 2027 |
Yes |
EIK 2.3.1.0 |
Jan 2024 |
End of Sale |
31 Dec 2026 |
31 Mar 2027 |
30 Jun 2027 |
Yes |
EIK 2.3.0.2 |
May 2023 |
End of Sale |
31 Dec 2026 |
31 Mar 2027 |
30 Jun 2027 |
Yes |
Authenion
Currently Supported Releases: Authenion 3.1.1.0, 3.0.1.7, 3.0, 2.0
| Product Version | Release Date | Current Stage | End of Maintenance Date | End of Support Date | End of Life Date | Recommended Upgrade |
|---|---|---|---|---|---|---|
Authenion 3.1.0.0 |
Mar 2026 |
Active Maintenance |
-- |
-- |
-- |
-- |
Authenion 3.0.1.7 |
Apr 2025 |
Maintenance Mode |
-- |
31 Mar 2027 |
30 Jun 2027 |
Yes |
Authenion 3.0 |
Jun 2025 |
Maintenance Mode |
-- |
31 Mar 2027 |
30 Jun 2027 |
Yes |
Authenion 2.0 |
Apr 2024 |
End of Sale |
31 Dec 2026 |
31 Mar 2027 |
30 Jun 2027 |
Yes |
Troubleshoot
1. Logger Level for Log4j2
Logger levels define the severity or importance of log messages generated by the system.
Common Logger Levels
-
DEBUG : Useful for debugging application logic during development or issue reproduction
-
INFO : General operational events (e.g., system start-up, user login)
-
WARN : Indicates a potential issue or unexpected behavior that doesn’t disrupt operations
-
ERROR : Represents serious problems that might impact functionality
To enable standard DEBUG level logging in Authenion, make the following changes to the <authenion_install_dir>/authenion/config/log4j2.xml file:
Enable DEBUG Level Logging :
<Logger name="com.authenion" level="DEBUG" additivity="false">
<appender-ref ref="FileAppender"/>
Changes to log4j2.xml do not require a restart.This change should be made on all nodes in a cluster that you wish to collect more detailed logging for.
Note: If you make this change in a production environment, it is likely to impact performance, so should be reverted to the defaults as soon as possible.
2. Authenion Logs
Authenion has different log types for different uses:
-
authenion.engine.log : Writes information about the SSO login, logout transactions and Identity Provider communication for authentication.
-
audit.log : Writes information regarding the user access to the applications. Mainly used for security audit purposes. .
-
server.log : The log file is located at authenion/server/logs/server.log.
-
access.log : The log file is located at authenion/server/logs/server.log.